
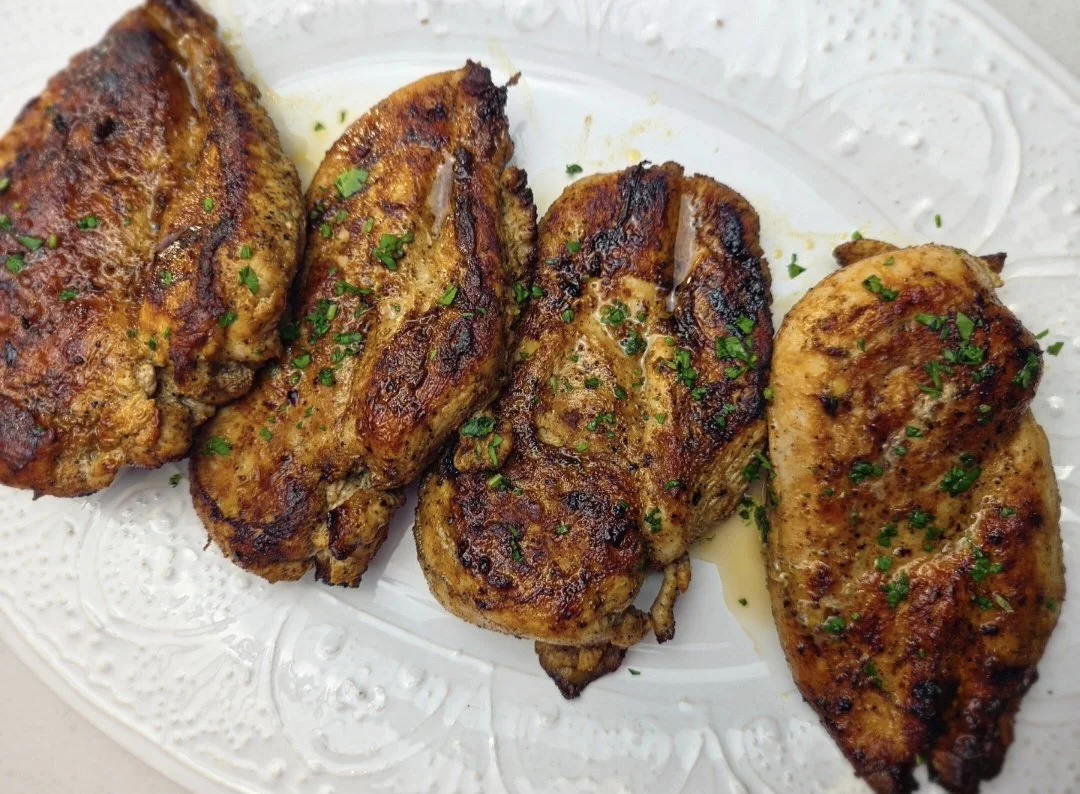
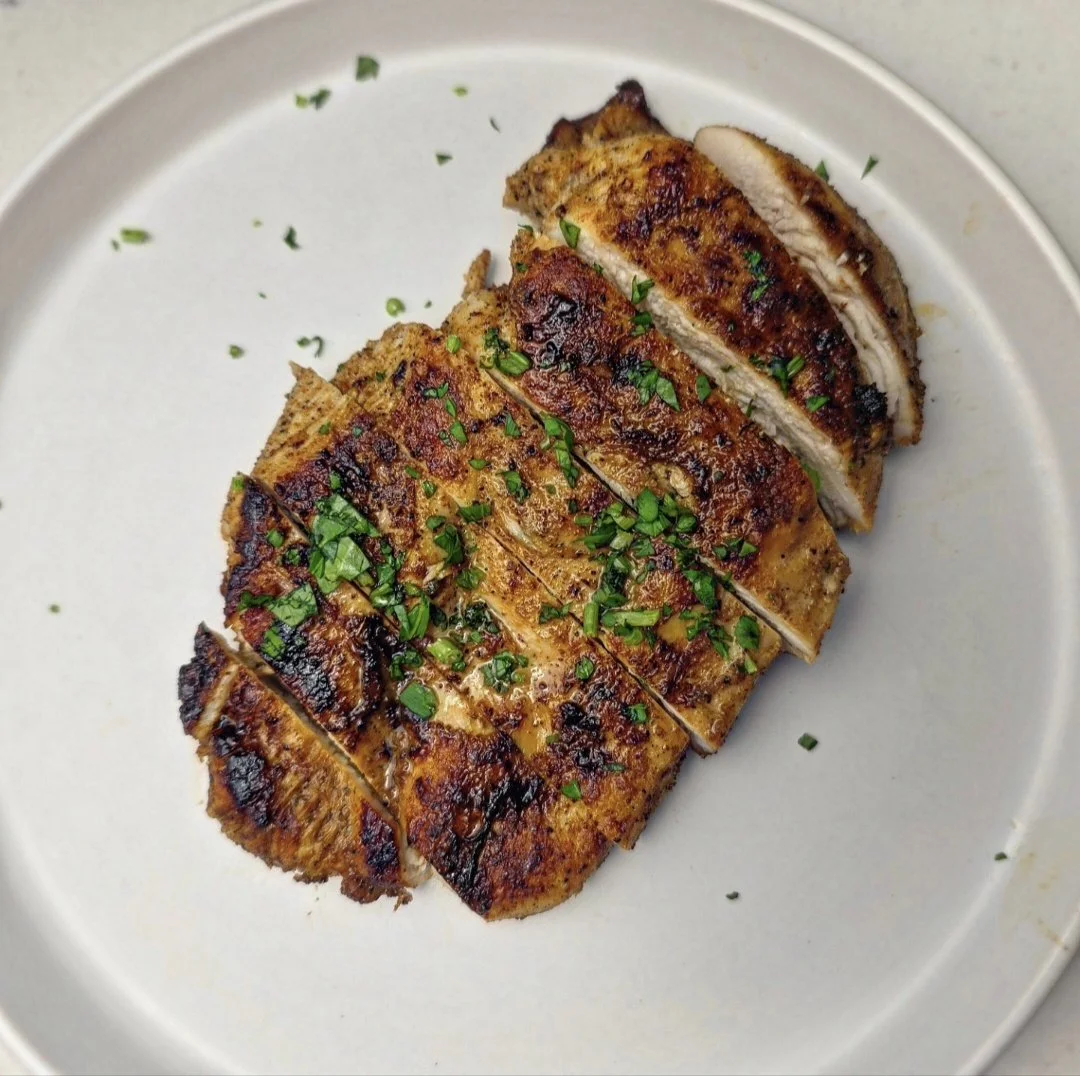
Tender, Moist Chicken Breasts for Easy Weeknight Meals
Chicken breasts have a reputation for being dry or bland, but with the right technique they can be incredibly tender, juicy, and full of flavor. This recipe uses a simple trick that makes a big difference: a quick marinade made with pickled jalapeño juice. The jalapeño brine acts as a shortcut brine, helping the chicken retain moisture while adding a subtle tangy kick that enhances the seasoning without making the dish spicy.
After marinating, the chicken is pounded to an even thickness so it cooks quickly and evenly. This step is key for juicy chicken breasts because it prevents the thinner parts from drying out while the thicker center finishes cooking. The chicken is then seared in ghee in a hot cast iron skillet, creating a beautiful golden crust and adding a rich, nutty flavor.
Ghee works especially well for this recipe because it has a higher smoke point than butter, allowing the chicken to sear properly without burning. Once the chicken develops that golden crust, it can finish cooking quickly in the oven if needed, ensuring the center reaches the perfect temperature without overcooking the outside.
The final step is one of the best parts: a drizzle of melted ghee combined with the flavorful pan drippings. Spoon this over the rested chicken breasts and finish with fresh parsley and a squeeze of lime for brightness. The result is tender, juicy chicken with layers of flavor — savory spices, a hint of jalapeño tang, and the richness of ghee.
This recipe is simple enough for a weeknight dinner but flavorful enough to serve for guests. Pair it with roasted vegetables, rice, or a fresh salad for a balanced and satisfying meal.
Why This Recipe Works
This chicken breast recipe hits the sweet spot between simplicity and flavor. The pickled jalapeño juice acts as a quick brine, keeping the chicken juicy while adding a subtle tang. Pounding the breasts to an even thickness ensures they cook evenly, while searing in ghee creates a golden, flavorful crust. Finishing in the oven if needed guarantees perfectly cooked, tender chicken every time. These small but deliberate steps make this recipe reliable for weeknight dinners or special meals.
Tips for Juicy Chicken Breasts
Even thickness matters: Use a mallet to flatten the breasts to about ½–¾ inch so they cook evenly.
Don’t skip the brine: Even a short 30–45 minute soak in pickled jalapeño juice keeps the meat moist and adds subtle flavor.
Rest before slicing: Let the chicken rest for 5 minutes after cooking to lock in juices.
Ghee finish: Spoon melted ghee and pan drippings over the cooked chicken for extra richness and a glossy finish.
Serving Suggestions
Serve this juicy chicken breast alongside simple sides like roasted vegetables, garlic mashed potatoes, or a fresh green salad. A squeeze of lime on top brightens the flavors and balances the richness of the ghee. You can also pair it with rice, quinoa, or warm bread to make it a complete, satisfying meal.

Tender, Moist Chicken Breasts for Easy Weeknight Meals
These chicken breasts stay perfectly juicy thanks to a quick brine in pickled jalapeno juice and a golden sear in ghee. Finished in the oven with a drizzle of ghee, they’re tender, flavorful, and ready for any weeknight meal. Quick, simple, and packed with a subtle kick.
Ingredients
- 4 large chicken breasts, patted dry
- 2 tbsps olive oil (for the marinade)
- 1 tbsp pickled jalapeño juice
- 1 tsp garlic powder
- 1 tsp onion powder
- 1 tsp paprika
- ½ tsp cumin
- 1 tsp chicken seasoning
- 1 tbsp ghee (for searing)
- 1 tbsp ghee (for finishing)
- Fresh parsley, chopped, for garnish
- Fresh lime wedges, for serving (optional)
Instructions
- Pat the air-chilled chicken breasts dry. Place them in a large zip-top bag and use a mallet to gently pound them to an even thickness of about ½–¾ inch (1.3–2 cm). Pounding inside the bag keeps juices from splattering and helps the chicken cook evenly.
- In a bowl, mix your seasonings with a little oil and the pickled jalapeño juice. Add the chicken breasts and turn to coat well.
- Refrigerate for at least 30 minutes, ideally about 45 minutes, and no longer than 60 minutes.
- Remove the chicken from the refrigerator and pat the breasts dry again before cooking.
- Heat a cast-iron skillet over medium-high heat and melt 2 tablespoons ghee.
- Sear the chicken 3–4 minutes per side without moving it, until golden brown. Cook in batches if needed, adding more ghee between batches. Let the first pieces rest on a plate while you cook the remaining chicken.
- Check the thickest part of the chicken with a thermometer. Chicken breasts should reach 165°F (74°C). Because thickness can vary, thinner pieces may already be fully cooked after searing.
- If the chicken hasn’t reached temperature, preheat the oven to 400°F (200°C). Place the chicken in a baking dish with 2–4 tablespoons water, lightly tent with foil, and bake about 5 minutes or until the internal temperature reaches 165°F (74°C).
- Let the chicken rest 5 minutes. Meanwhile, melt 2–4 tablespoons more ghee and combine it with any drippings from the resting plate and skillet. Spoon this over the chicken.
- Top with fresh parsley and serve with fresh lime wedges for brightness.
Notes
- Pro Tip: Pounding the chicken to an even thickness (about ½–¾ inch) helps it cook quickly and evenly, preventing dry spots.
- Brine Tip: The pickled jalapeño juice acts as a quick brine, helping the chicken stay juicy while adding a subtle tangy kick.
- Cooking Tip: Chicken breast thickness varies. Always cook until the internal temperature reaches 165°F (74°C).
Nutrition Facts
Calories
220Fat (grams)
10 gCarbs (grams)
2 gProtein (grams)
30 gI am not a certified nutritionist and any nutritional information on dontmissmyplate.com should only be used as a general guideline.
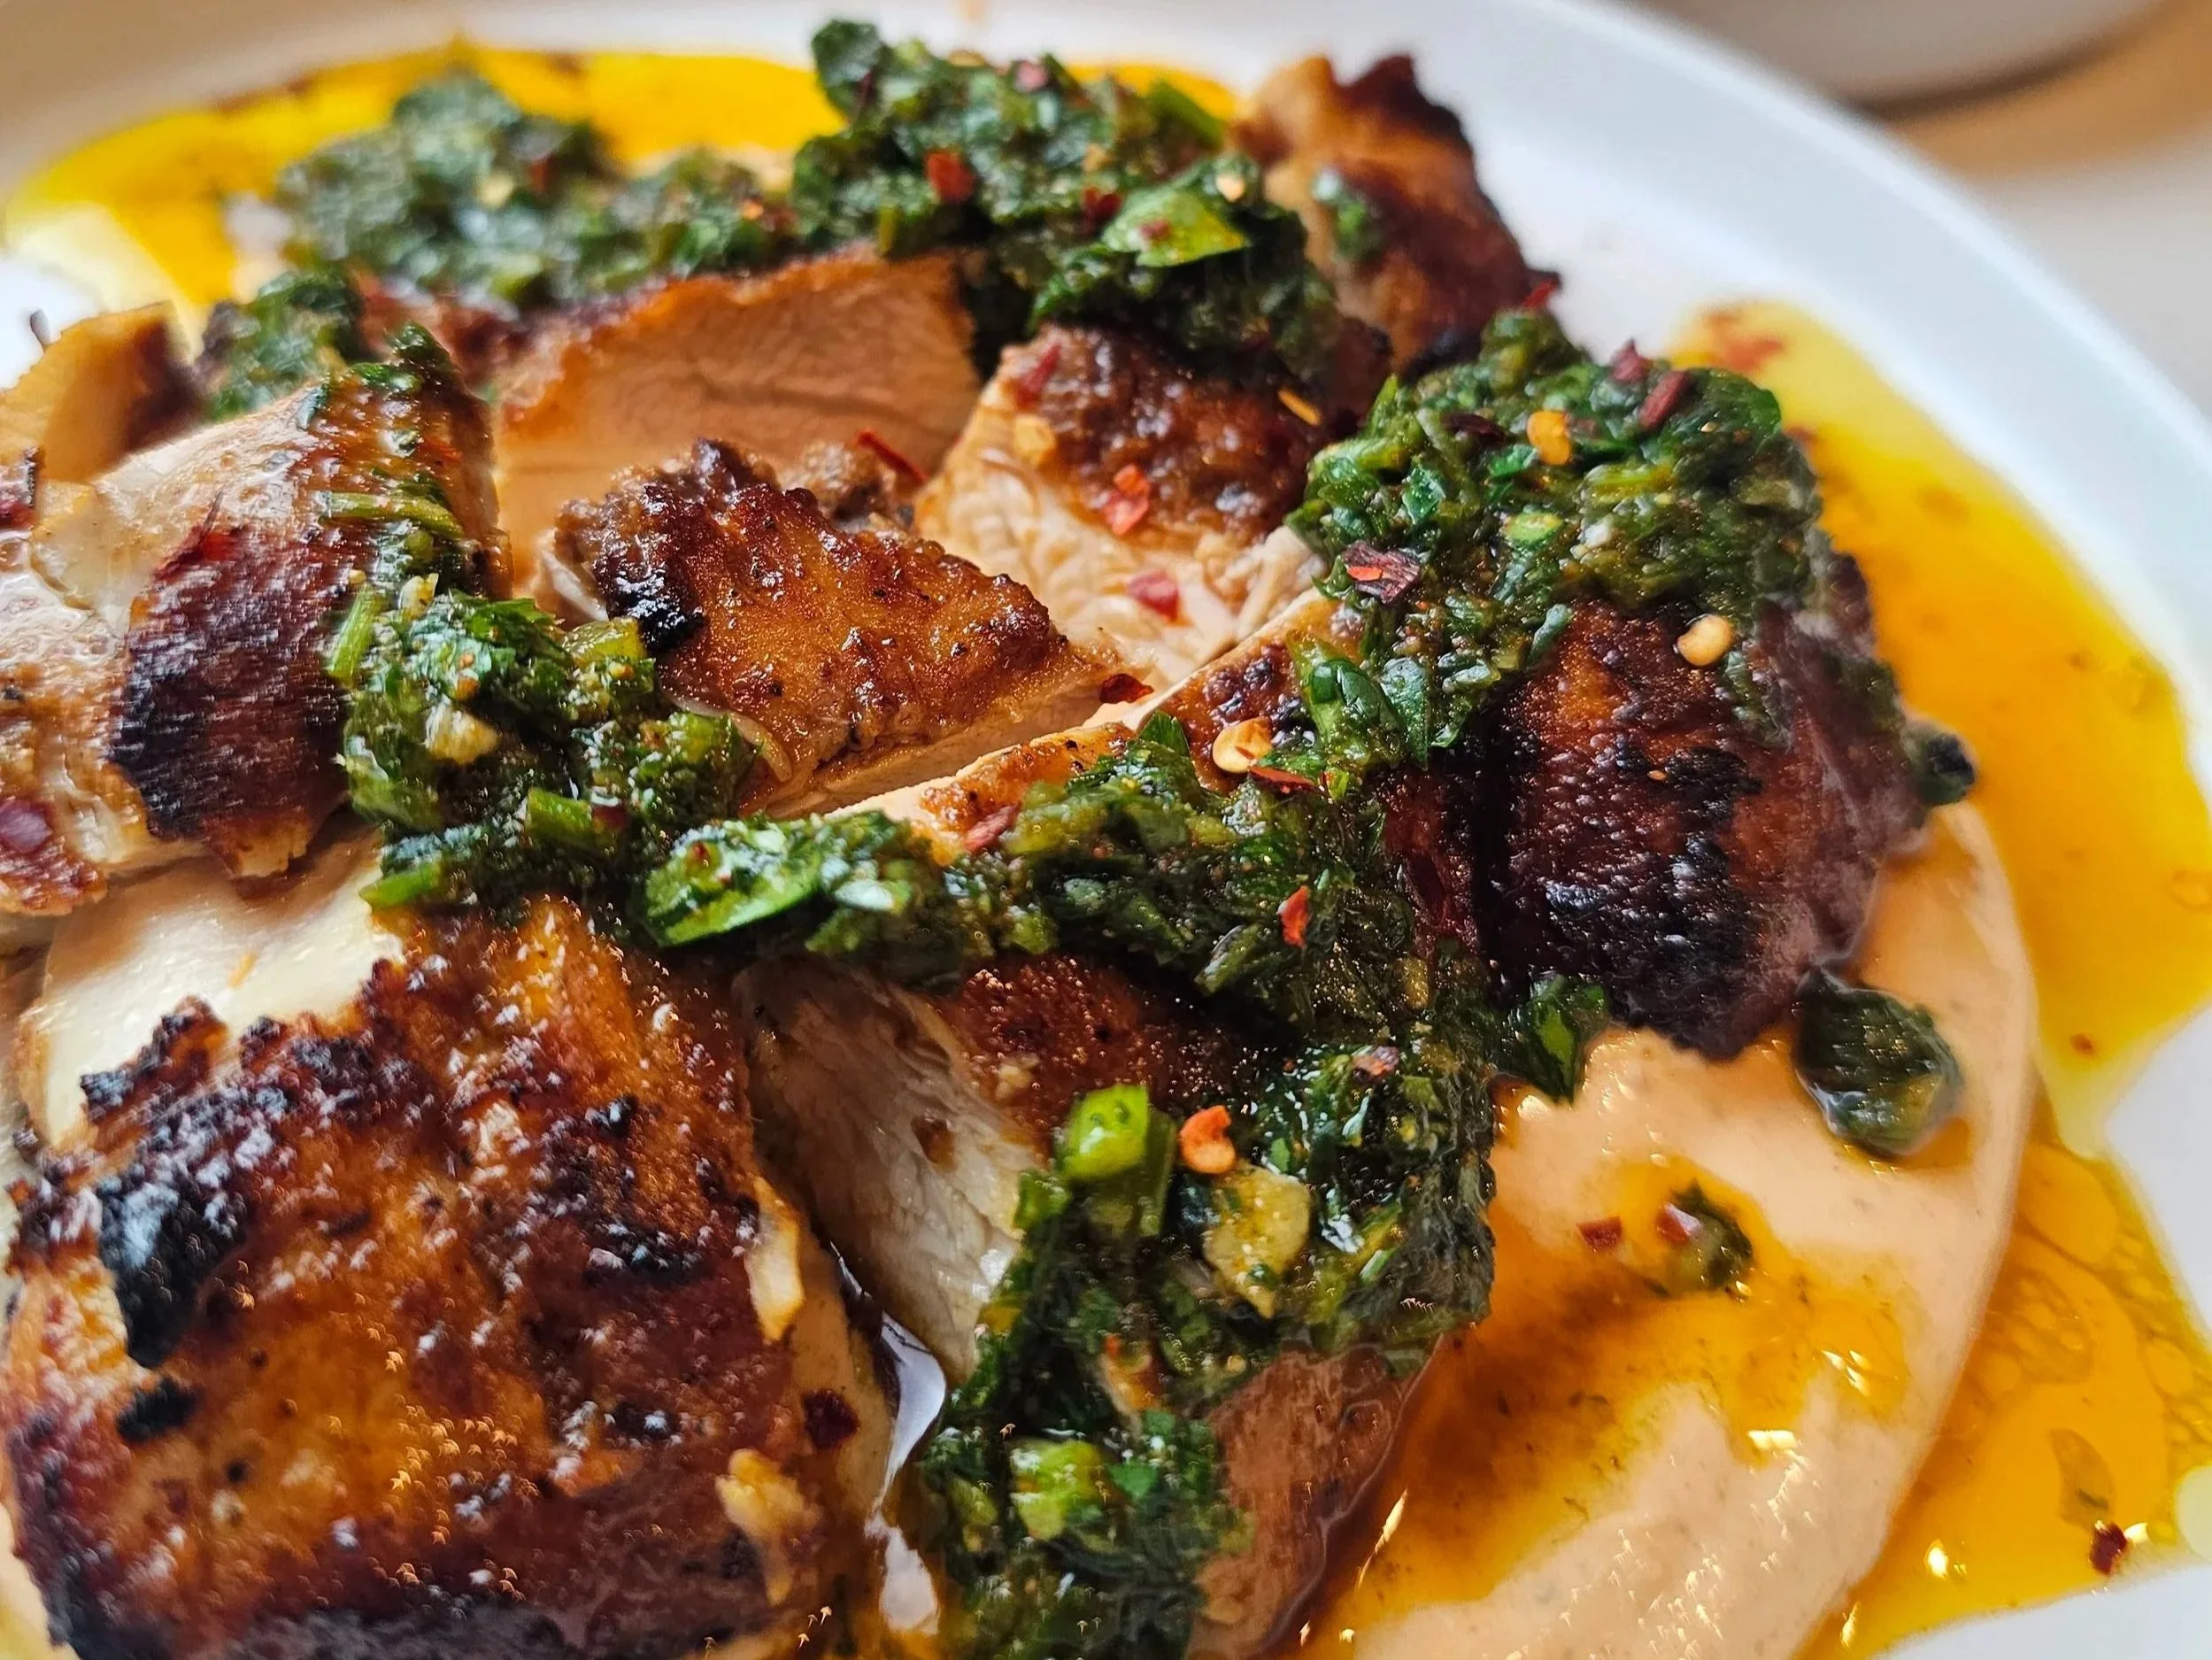
Harissa Chicken with Chermoula Sauce
Some recipes are born in your kitchen. Others follow you home from a restaurant and refuse to leave your mind.
I was inspired to make this after trying an unforgettable appetizer at Cordelia Fishbar on Valentine’s Day in DC. The chicken was extremely succulent, with perfectly crisped with skin-on goodness (breast? thigh? still debating), deeply savory, and served over a harissa-kissed yogurt that tied everything together. It didn’t taste marinated in harissa, but the warmth was there, subtle, layered, intentional.
So naturally, I did what any home cook on a flavor mission would do: I made it my own.
In my version, the chicken is marinated in harissa for bold depth. I used my often-neglected Ninja indoor grill and air fryer, and it delivered that perfect char and gentle smokiness that feels like summer, even when it’s not. And the real star? Chermoula.
If you’ve been following my kitchen journey, you already know: I’ve been championing chermoula for a while now. Think of it as North Africa’s answer to chimichurri—bright, herbaceous, alive. It reflects the Afro-fusion influences and close-to-my-roots flavors that continue shaping my evolution as a home cook. I’ve used it with croaker fish alongside peri peri and harissa, and it never disappoints.
This dish is smoky, herbaceous, creamy, spicy, and fresh all at once. The kind of layered flavor that tastes like you planned ahead—even if you just wanted something impressive for dinner.

Harissa Chicken with Chermoula Sauce
Smoky grilled Harissa Chicken with creamy harissa yogurt and vibrant chermoula. Juicy, bold, and herb-forward, this North African–inspired dish serves 4 and is perfect for weeknight dinners or entertaining.
Ingredients
- 1 cup parsley, finely chopped
- ½ cup cilantro, finely chopped
- 3 garlic cloves, minced
- 1 jalapeño, finely diced
- ½ tsp smoked paprika
- ½ tsp ground coriander
- ½ tsp cumin
- ½ tsp salt
- ¼ tsp black pepper
- 2–4 tbsp olive oil
- 4 large chicken thighs (skinless, bone-in)
- 1.5 tbsp harissa
- 3–4 tbsp olive oil
- ½ tsp garlic powder
- ½ tsp oregano
- ½ tsp cumin
- 1 tsp chicken seasoning
- ½ tsp smoked paprika
- ½ tsp black pepper
- ½ tsp onion powder
- Juice of ½ lemon
- 1 tbsp sesame oil
- 2/3 cup plain Greek yogurt
- Chilli flakes (optional)
Instructions
- Chermoula: Mix parsley, cilantro, garlic, jalapeño, spices, and olive oil. Set aside. Optional: warm slightly before serving.
- Harissa Marinade and Yogurt: In a bowl, combine harissa, olive oil, garlic powder, oregano, chicken seasoning, smoked paprika, black pepper, onion powder, lemon juice, and sesame oil. Reserve 1–2 tbsp and stir into Greek yogurt; refrigerate for yogurt sauce. Coat the chicken in the remaining marinade and refrigerate for at least 1 hour. If you are pressed for time, 30 minutes works, and overnight will give the deepest flavor.
- Grill Chicken: Preheat grill to medium. Pat chicken dry. Grill 7 minutes per side (14 minutes total) until internal temperature reaches 165°F. Rest 5 minutes, then cut into squares.
- Assemble: Spoon harissa yogurt on plates, add grilled chicken, top with chermoula, and sprinkle chili flakes if desired.
Notes
- Pat chicken dry for better char; fresh lemon brightens the dish; chermoula can be extra sauce.
Nutrition Facts
Calories
460Fat (grams)
32 gCarbs (grams)
6 gFiber (grams)
1 gSugar (grams)
2 gProtein (grams)
38 gI am not a certified nutritionist and any nutritional information on dontmissmyplate.com should only be used as a general guideline.

How to Butterfly (Spatchcock) a Chicken - Peri Peri Style
How to Butterfly a Whole Chicken
Butterflied chicken is a game-changer. It delivers bold flavors and a show-stopping presentation despite its simplicity. By flattening the chicken, you reduce cooking time and ensure a perfect char on the outside while keeping the meat juicy inside. Pair that with smoky, spicy, and tangy peri-peri sauce—a staple in Portuguese and Southern African cuisine—and you’ve got a dish perfect for grilling or roasting.
During marination, flavors penetrate the meat better, and the chicken cooks more evenly. Because it is flattened, it also cooks faster, so watch the oven or grill closely to avoid overcooking. The main way to prepare the chicken this way is to split it in half by separating the breasts and removing the backbone, as shown in the video. Cut carefully along the joints and around tough bones to free the rest of the chicken.
Whether you’re hosting a summer barbecue or craving something vibrant for dinner, this recipe delivers big on flavor with minimal fuss. Plus, it’s easily customizable—you can tweak the heat level or adjust the seasonings to suit your taste.
If you love this butterflied peri-peri chicken, you’ll also want to try my updated peri-peri recipe with a bold, tangy wet marinade — it’s perfect for those who want even juicier, flavor-packed chicken.
Tips for the Perfect Butterflied Chicken
Butterfly Like a Pro
Use sharp kitchen shears to remove the backbone, then press down firmly on the breastbone to flatten the bird. This ensures even cooking and maximum exposure to the marinade and heat.Marinate for Maximum Flavor
Let the chicken marinate for at least 2 hours, but overnight is best. The longer it marinates, the deeper the peri-peri flavors will infuse the meat.Adjust the Heat
Peri-peri sauce can be as fiery or mild as you like. Use more chili peppers for a kick or balance the heat with extra lemon juice and olive oil for a milder sauce.Choose the Right Cooking Method
For smoky, authentic flavor, grill the chicken over medium heat, turning frequently. If using the oven, roast at a high temperature to achieve crispy skin, then finish under the broiler for charred edges.Serve It Right
Peri-peri chicken pairs beautifully with cooling sides like cucumber salad or a dollop of yogurt sauce. For a more authentic touch, serve with Portuguese-style rice or grilled vegetables.Don’t Waste the Marinade
Reserve some peri-peri sauce before marinating to use as a basting sauce or drizzle over the cooked chicken. Keep it separate from any sauce that touched raw chicken.
The Magic of Homemade Peri-Peri Sauce
I grew up eating peri-peri at least once a month on Fridays. As a family, we’d make trips to Nando’s, famous for flame-grilled chicken marinated in the sauce.
Since then, I’ve tasted peri-peri chicken both in Portugal and across Southern Africa. Nando’s celebrates both culinary traditions, and my love for the sauce has grown even more. Bird’s eye chili peppers give peri-peri its unique flavor. “Piri-piri” and “peri-peri” are derived from the Swahili word pili pili, meaning “pepper.”
There are many variations of the sauce, but three essentials remain: peppers, garlic, and acid. Aromatic spices and fresh herbs elevate the flavor even further.
Peri-peri sauce is incredibly versatile. Use it as a marinade, dipping sauce, or finishing drizzle for grilled meats, seafood, and vegetables. Making it at home allows you to tailor it to your taste (mild, medium, or tongue-tingling hot) and it’s always fresher and more flavorful than store-bought versions.
I remember tasting authentic peri-peri sauce for the first time in a small coastal town about 30 minutes from Lisbon, Portugal. The heat was exhilarating but perfectly balanced by the bright tang of lemon and the richness of olive oil. It transformed simple grilled chicken into something unforgettable. When I returned home, I couldn’t wait to recreate it. After a bit of experimenting, I found my go-to version. Once you make it from scratch, it will become a staple in your kitchen too.
Tips for Crafting the Perfect Peri-Peri Sauce
Choose the Right Peppers
Traditional peri-peri sauce uses bird’s eye chilies, but you can substitute Thai chilies, serranos, or even habanero if you want extra heat. For a milder version, include a few sweet peppers to balance the spice. Bird’s eye chilies are fruity and peppery, half as hot as habanero but twice as hot as jalapeños.Blend for the Perfect Texture
Use a blender or food processor for a smooth consistency. If you prefer chunkier sauce, pulse until just combined.Balance the Flavors
Great peri-peri sauce balances heat, acidity, and richness. Add lemon juice or vinegar to cut through the spice, a touch of sweetness to mellow it, and oil for a silky finish. Taste as you go to find the right harmony.Let It Rest
After blending, let the sauce sit for at least an hour to allow flavors to meld. For best results, make it a day ahead.Store It Right
Keep peri-peri sauce in the fridge up to two weeks in an airtight container, or freeze in small portions for future use.Experiment with Variations
Add smoked paprika for smokiness, fresh herbs like oregano for fragrance, or roasted red peppers for a sweeter, milder sauce.Use It Everywhere
While it’s famous for chicken, peri-peri sauce elevates roasted potatoes, scrambled eggs, grilled vegetables, and more. Keep some on hand to make everyday meals exciting.
 Peri-Peri Chicken")
Spatchcock (Butterflied) Peri-Peri Chicken
This vibrant sauce, inspired by Portuguese and African cuisines, blends chili, garlic, citrus, and spices. Perfect as a marinade, dip, or drizzle, it enhances grilled meats, seafood, and veggies. Flattening the chicken through the butterfly method ensures quick cooking, a charred exterior, and juicy meat.
Ingredients
- 1 whole chicken
- 1/2 cup sweet bell peppers
- 4 garlic cloves
- 4 fresco chilli peppers*
- 1 habanero pepper*
- 1/2 cup cup olive or avocado oil
- 2 tablespoons fresh thyme
- 1/3 cup (cooking) wine
- 2 lemons, juiced
- 1 tablespoon salt
- 1 tablespoon sugar
- 1 tablespoon smoked paprika
- 1 teaspoon ground ginger
- 1 teaspoon cumin
- 1 tablespoon cayenne pepper
- 1 tablespoon dried thyme
- 1 tablespoon black pepper
- 1 tablespoon onion powder
- 1 tablespoon dried oregano
- Optional: 4 tablespoons chicken spice blend
Instructions
- Prepare and marinate the chicken.For the best flavor, let the chicken soak up the piri piri marinade for at least 4–8 hours or overnight.
- Gather your ingredients and juice the lemons.
- Blend the marinade. In a blender or food processor, combine the peppers, hot chili peppers, garlic, fresh thyme, and all the spices and seasonings.
- Add the liquids. Blend in the oil, lemon juice, and wine to create a smooth marinade.
- Butterfly the chicken. Clean and prep the chicken. Pat it dry and remove any remaining feathers or excess fat.
- Remove the backbone. Hold the tail, and use your fingers to locate the backbone. Cut from tail to neck and set it aside for broth or discard it.
- Make small incisions. Flip the chicken over and, using a sharp knife, make two small cuts at the bottom where you see cartilage on each side—this helps the chicken cook evenly.
- Flatten the breastbone. Score the center of the breastbone to help the chicken lay flat, or remove the bone entirely if preferred.
- Tuck the wings in and transfer the chicken to a dish. Pour the marinade over both sides, cover, and refrigerate until ready to cook.
- Cook the chicken. Preheat the oven to 350°F (177°C).
- Sear on an indoor grill for about 5 minutes per side, then transfer to the oven and bake for 45 minutes, or until the internal temperature reaches 165°F (74°C).
- Alternatively, you can skip the grilling step and bake the chicken directly in a tray. If so, increase the baking time by 10 minutes, flipping the chicken halfway through.
- Rest for 5 minutes before serving with homemade or store-bought piri piri sauce.
Notes
- For the peppers, use bird’s eye chili, Fresno for color, or habanero—but use less of the latter, as it’s much hotter. Adjust the quantity based on your heat tolerance. If using Fresno peppers, use four to achieve a reddish tint.
- You can save some of the sauce to cook on the stovetop and serve with your chicken once it's done.
- For extra flavor, season your chicken with all-purpose chicken spice before marinating.
- To prevent drying out the meat, avoid overcooking the chicken once it reaches a safe internal temperature.
Nutrition Facts
Calories
180Fat (grams)
11.6 gSat. Fat (grams)
3.4 gCarbs (grams)
2.3 gFiber (grams)
1.1 gProtein (grams)
16.4 gI am not a certified nutritionist and any nutritional information on dontmissmyplate.com should only be used as a general guideline.

Guava-Glazed Chicken Wings & Air Fryer Sweet Potato Fries
The Ultimate Sweet and Savory Snack
Wings are the ultimate snack: not too heavy, perfectly balanced between sweet and salty, and endlessly customizable with rubs, marinades, or sauces. This version adds a tropical twist with a luscious guava glaze inspired by the one guava tree I climbed growing up in Zimbabwe. Paired with crispy air fryer sweet potato fries, this combo brings a vibrant, naturally sweet edge to classic chicken and BBQ flavors.

A Perfect Game Day Snack
Wings are a game day staple for a reason: they’re shareable, satisfying, and hit that sweet-and-savory balance almost everyone loves. This version keeps things familiar while adding a glossy guava glaze that feels like a fresh take on classic BBQ wings—bold, sticky, and crowd-friendly.
Why Guava Makes an Incredible Wing Glaze
Guava naturally combines sweetness and acidity, which makes it ideal for sauces and glazes. When reduced with honey and soy sauce, it creates a smooth, flavorful coating that clings to wings without overpowering them. I’ve always been drawn to guava—partly for the taste, and partly because I grew up climbing a guava tree as a child. That early connection stuck, and it’s why guava still feels like such a natural ingredient to cook with.
Guava is also widely used in Caribbean and Latin cuisines where it shows up in pastes, sauces, and desserts. That cross-cultural familiarity is what makes this glaze feel both unique and instantly comforting.
Crispy Sweet Potato Fries, Made Easy
Sweet potato fries are the perfect pairing for sticky wings, adding a subtle sweetness and hearty texture. Using the air fryer keeps them crisp on the outside and tender inside, with less oil and less cleanup. They cook quickly, hold up well for serving, and can be made in batches, ideal for entertaining.
Designed for Game Day Hosting
This recipe is built for ease and repeatability. The wings are baked instead of fried, the glaze comes together quickly on the stovetop, and the air fryer does the heavy lifting for the fries. Whether it’s the Super Bowl, a playoff game, or a casual watch party, this is the kind of snack that disappears fast—and brings people back for more.

Guava Glazed Wings with Air Fryer Sweet Potato Fries
A finger-licking combination never gets old! Try this version to make things interesting, and get your sweet and salty fix to soothe cravings while sipping cocktails or entertaining on game night.
Ingredients
- 2 lbs chicken wings
- 2–3 tablespoons oil
- 2 Tbsp chicken spice
- 1½ tablespoon smoked paprika
- 1 tablespoon sesame seeds
- 1 tablespoon parsley
- ⅓–½ cup guava paste, chopped
- ½ cup water or orange juice
- 2 tablespoons soy sauce
- 2–3 tablespoons honey
- 1 tablespoons vinegar or lime juice
- 2 large sweet potatoes, cut evenly
- 1 tablespoon cornstarch
- 2 tablespoons canola oil
- 1½ tablespoon Old Bay
- 1 tablespoon smoked paprika
- 1 tablespoon dried rosemary, lightly crushed
- ½ teaspoon salt
- Cooking oil spray
Instructions
- In a large bowl, combine 2–3 tbsp oil, 2 tbsp chicken spice, 1½ tbsp paprika, 1 tbsp sesame seeds, and 1 tbsp parsley.
- Add 2 lbs chicken wings and toss well to coat. Let sit for 10–15 minutes.
- Transfer wings to a parchment-lined baking tray—make sure they’re in a single layer, not piled up.
- Bake at 425°F (220°C) for 25 minutes.
- Flip each wing, reduce oven temperature to 350°F (175°C), and bake for another 15–20 minutes until caramelized and golden.
- In a nonstick saucepan, combine ⅓–½ cup chopped guava paste, ½ cup water (or orange juice), 2 tbsp soy sauce, 2–3 tbsp honey, and 1 tbsp lime juice or vinegar.
- Bring to a boil, then reduce heat to low.
- Simmer gently, stirring frequently, until the glaze thickens and is smooth and glossy (about 5–10 minutes).
- Peel and cut 2 large sweet potatoes into thin fries (1/4 inch thick).
- Optional: Soak in cold water for 20–30 min, drain and pat dry.
- Toss fries in 1 tablespoon cornstarch until evenly coated.
- Drizzle with 2 tablespoons canola oil and toss.
- Season with 1½ tbsp Old Bay, 1 tbsp smoked paprika, 1 tbsp dried rosemary, and ½ tsp salt.
- Line the air fryer basket with foil or parchment and add fries in a single layer. Cook in batches if needed.
- Air fry at 400°F (204°C) for 8–10 minutes, toss and lightly spray with oil, then cook another 10–12 minutes or until crispy and golden.
- Serve immediately.
To serve:
- When wings are done, toss them gently in the warm guava glaze until well coated. Serve wings hot with the crispy sweet potato fries on the side.
- Garnish wings with extra sesame seeds and parsley for that final touch.
- Offer extra guava glaze on the side for dipping.
Nutrition Facts
Calories
530Fat (grams)
32 gCarbs (grams)
36 gSugar (grams)
18 gProtein (grams)
26 gI am not a certified nutritionist and any nutritional information on dontmissmyplate.com should only be used as a general guideline.

