
Carrot Cake Malva Pudding with Cream Cheese Sauce
Well, this was an experiment that actually went right — I figured out the tricky parts so you don’t have to!
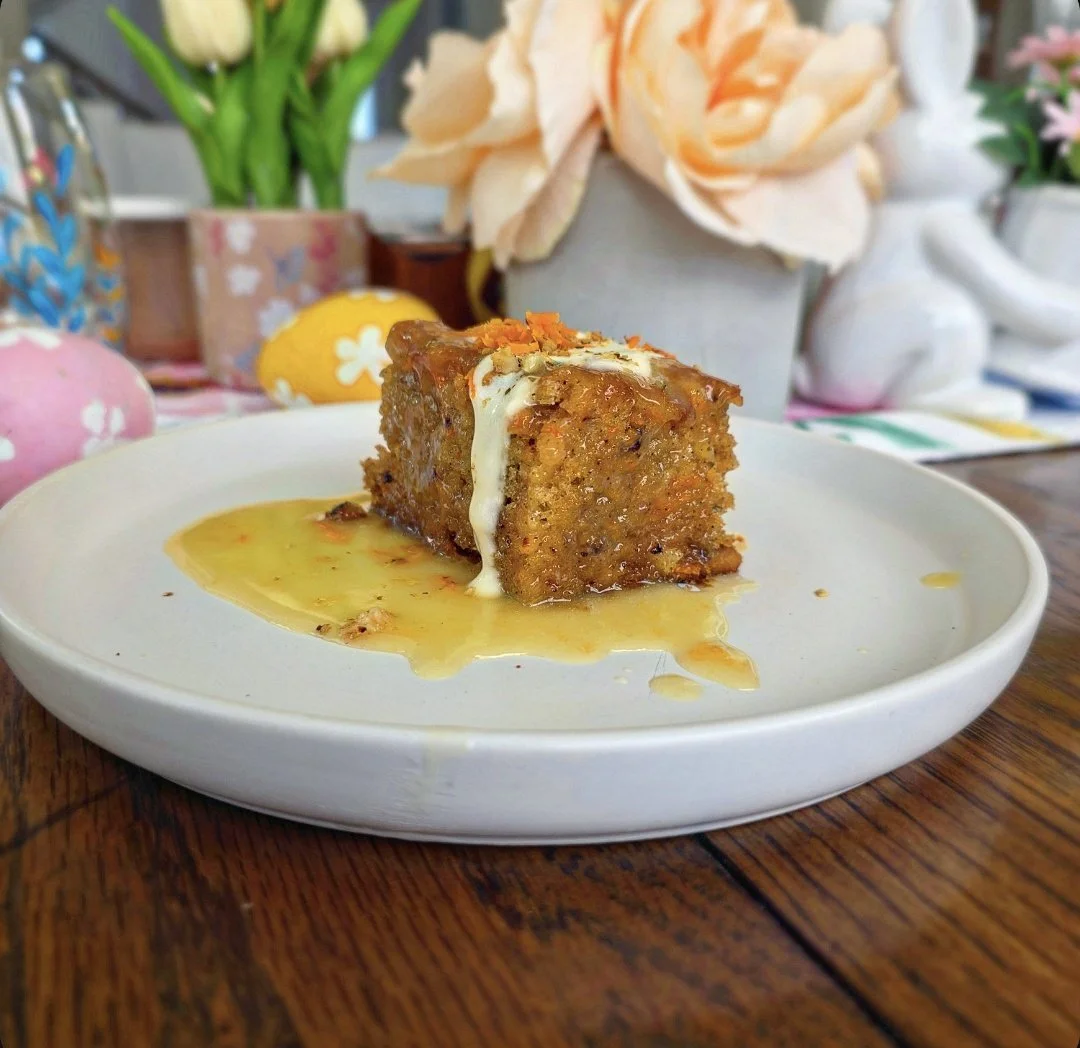
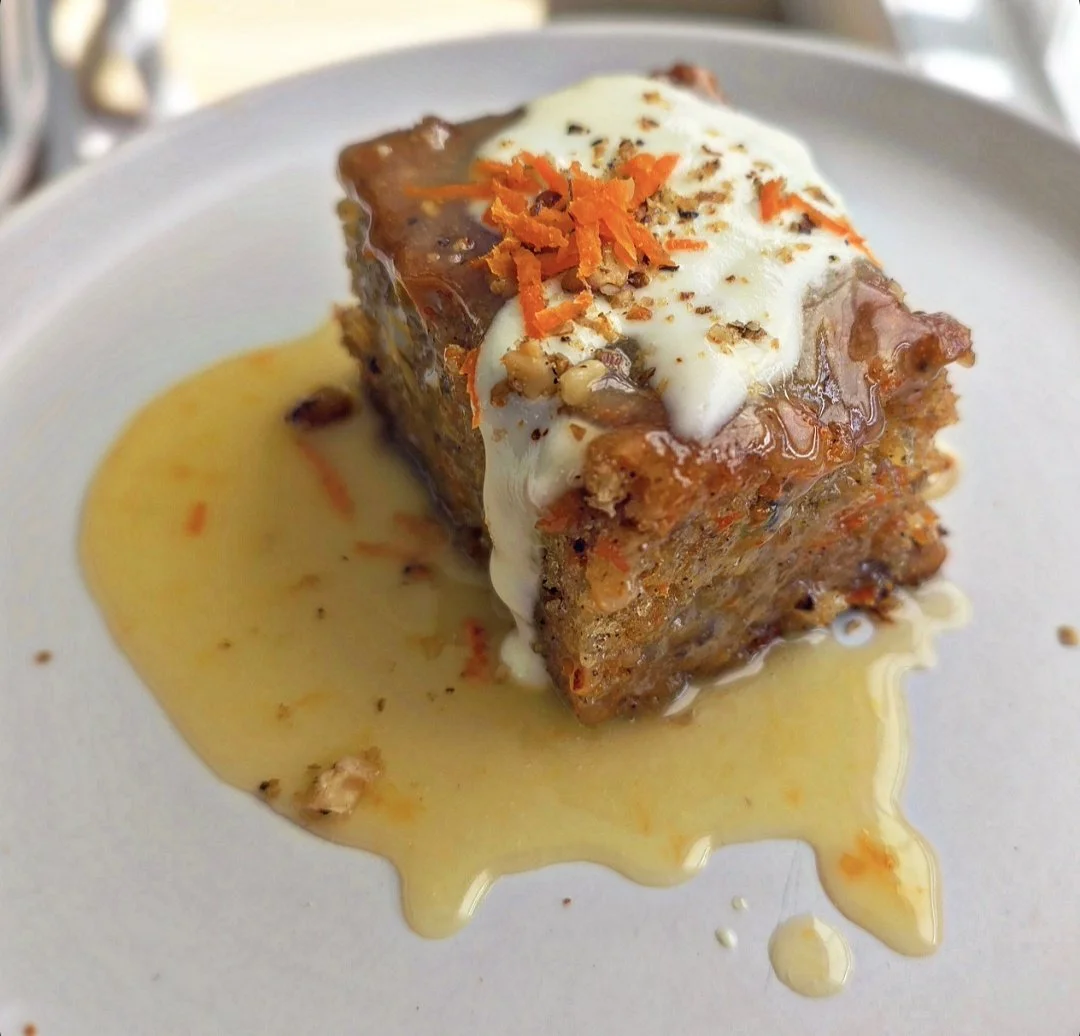
The dessert that brings together the warm, spiced flavors of carrot cake with the soft, sticky indulgence of South African malva pudding. It is not a fully traditional pudding. It has the body of a soft crumb cake, with a lightly caramelized top, a buttery, soaked texture near the surface, and a drizzle of cream cheese sauce that makes each bite rich and luscious.
I have always loved malva pudding growing up. It is a South African favorite, usually served with custard or ice cream. For this version, I swapped in a cream cheese sauce instead, giving it a slightly tangy lift that works perfectly with the carrots, walnuts, and apricot pockets. The result is soft, flavorful, and a little playful. It is perfect for spring or anytime you want a dessert that feels cozy but still a bit special.
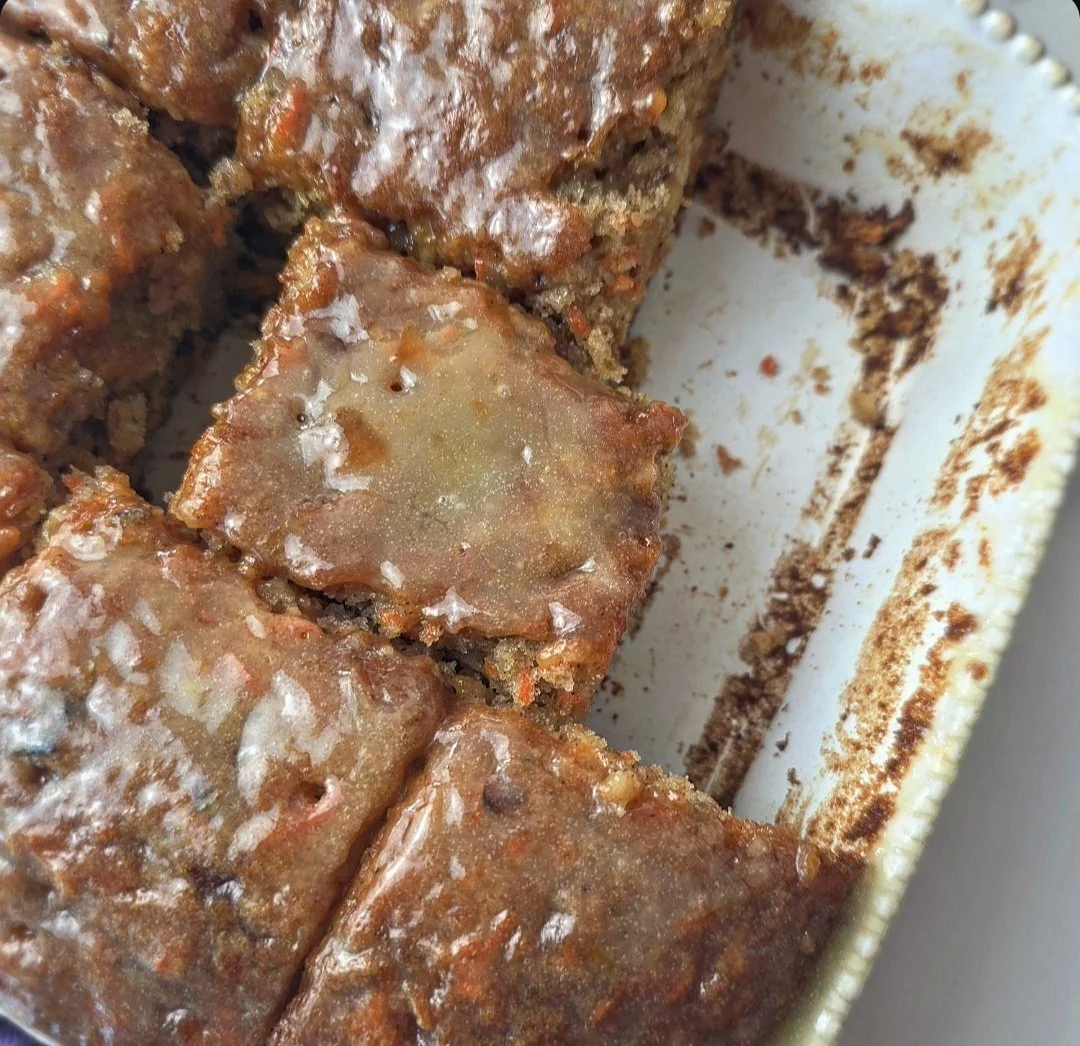
Carrots add moisture, so it is important to pat them dry slightly before adding them to the batter. When it comes to the butter sauce, people often undersauce more than they oversauce. You can absolutely add more if you want it fully soaked, especially if you are after that classic malva pudding texture. I did not go as heavy on the soak here because the cream cheese sauce already makes it quite indulgent.
That said, if you are a malva pudding lover, you will want to make sure the butter sauce really gets in there. Just keep in mind this version leans more toward a soft crumb cake rather than the fully spongy texture of a traditional malva pudding.
Even if you have never tried malva pudding before, the combination of carrot cake flavors and that silky sauce makes it approachable and irresistible.
This version has a soft crumb cake base, so the buttery soak mostly glistens near the top. The cream cheese sauce ensures every bite is indulgent, and you can poke extra holes if you like a more fully soaked texture.

Carrot Cake Malva Pudding with Cream Cheese Sauce
This Carrot Cake Malva Pudding is a soft, spiced dessert combining the warmth of carrot cake with the buttery richness of South African malva pudding. With a tender crumb, lightly caramelized top, butter soak, and silky cream cheese sauce, it’s moist, flavorful, and perfectly balanced.
Ingredients
- 1 ½ cups grated carrot (or 1 cup lightly packed)
- 2 large eggs
- 1 cup sugar
- 1 cup flour
- 1 tsp baking soda
- ½ tsp salt
- 1 tsp cinnamon
- ½ ground ginger
- ½ tsp nutmeg
- ½ tsp vanilla
- ½ cup neutral oil (e.g. peanut or coconut)
- ½ cup milk
- 2-3 tbsp apricot jam/preserves
- 1 tsp white vinegar (or lemon juice)
- ½ cup toasted walnuts, chopped
- ½ cup butter
- ½ cup sugar
- ½ cup heavy cream
- 2 tbsp apricot jam/preserves
- 4 oz cream cheese, softened
- 2 tbsp sugar
- ½ cup milk
- ½ tsp vanilla
Instructions
- Preheat oven to 350°F / 175°C and grease an 8x8 or 9x9 pan (a 9x13 works if you prefer a thinner pudding).
- In a medium bowl, beat eggs and sugar with a hand mixer until pale and fluffy. Add oil, milk, vanilla, apricot jam, and vinegar. Whisk lightly to combine.
- In a large bowl, combine flour, baking soda, salt, and cinnamon. Make a well in the center.
- Pour the wet ingredients into the dry. Fold gently with a spatula until just combined, do not overmix! Fold in carrots and walnuts carefully, making sure everything is evenly distributed without overworking the batter.
- Spread batter evenly in the pan and lightly tap to release air bubbles. Bake 35–40 minutes, starting to check at 30 minutes. A toothpick should come out mostly clean; slight moisture in the center is okay.
- While the cake bakes, melt butter, cream, sugar, and water together until smooth. When the cake is out of the oven, poke holes all over and pour the sauce evenly over the warm cake. Let it absorb for 5–10 minutes.
- In a small pot over low heat, gently whisk cream cheese, sugar, and milk until smooth and pourable. Stir continuously for 5 minutes, then let sit for 2–3 minutes to thicken slightly. Avoid high heat to prevent clumps.
- Cut carefully with a spatula or serrated knife. Drizzle cream cheese sauce over the top, add any remaining butter sauce, and sprinkle with walnuts and a few carrot shreds.
Notes
Tips:
- Be careful not to overmix the batter to prevent tunnels and holes.
- Too-wet carrots can make the base soggy; pat them dry (not completely bone dry).
- Greasing the bottom of the pan helps create a slight crust for texture.
- The center may be slightly jiggly when removed from the oven; this is normal for a malva-style pudding.
- Don’t overbake, or the pudding will dry out.
- Use a 9x9 or 9x13 pan depending on the depth you prefer; this will affect texture.
- The butter soak naturally settles more toward the top, while the cream cheese sauce adds richness throughout. For a fully soaked effect, poke extra holes in the cake and pour a little more butter sauce over each slice.
Storage:
- Pudding/Cake: Store covered at room temperature for up to 2 days, or in the refrigerator for up to 5 days. Reheat gently if desired.
- Butter Sauce: Keep in an airtight container in the fridge for up to 1 week. Rewarm before using.
- Cream Cheese Sauce: Store in an airtight container in the fridge for up to 3 days. Rewarm gently over low heat, stirring constantly to prevent separation.
I am not a certified nutritionist and any nutritional information on dontmissmyplate.com should only be used as a general guideline.

One-Can Guava Cobbler
This is a tropical twist on the Southern summer classic—made easy with just one can of guava.
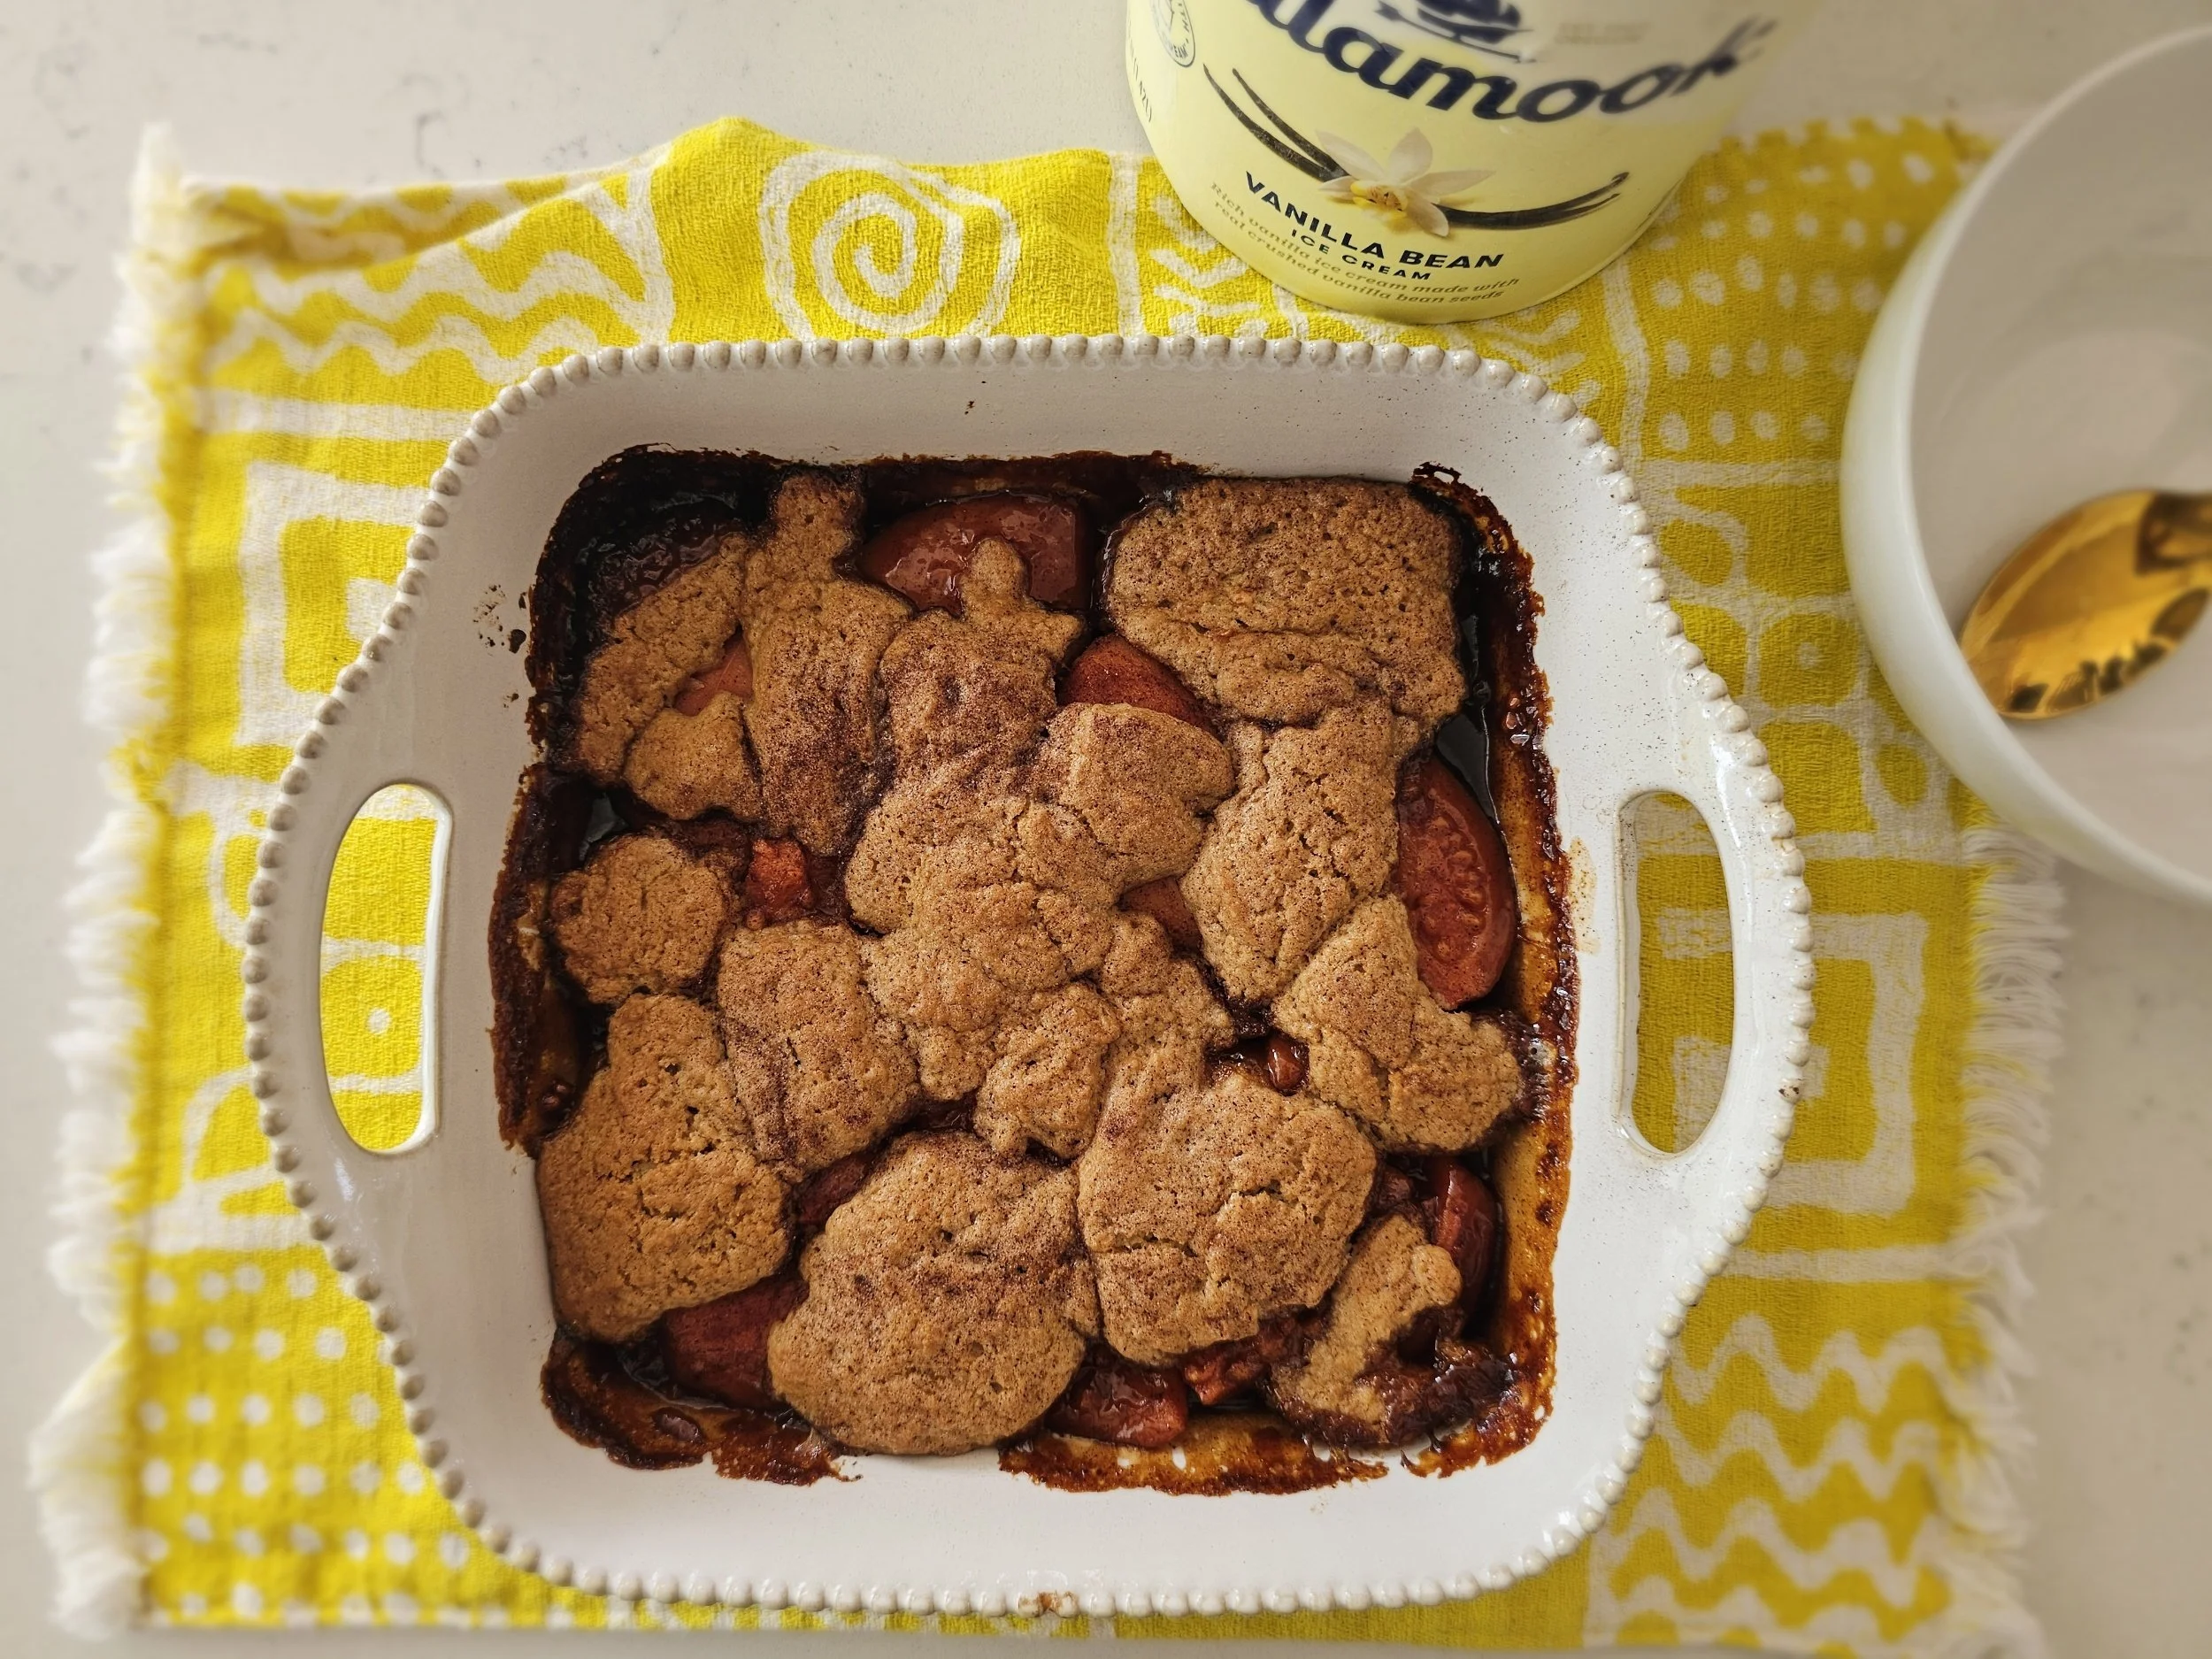
Who doesn’t love a warm, comforting bowl of peach cobbler during the summer? It’s golden, gooey, sweet, and just a bit tangy, topped with cold vanilla ice cream melting into the crispy edges? Bliss. But what if we could give that Southern classic a tropical upgrade That’s where guava comes in.
I grew up with a guava tree in my backyard in Zimbabwe, and despite being surrounded by its sweet, fragrant fruit, I never thought to use it in desserts, not even jam. Where I’m from, guava was more of a snack or juice ingredient than anything else. But after moving to the U.S., I realized that guava doesn’t get nearly enough love, especially outside of Caribbean or Latin cuisine. This cobbler changes that. We’re taking the soul of a traditional cobbler and infusing it with tropical flavor using just one can of guava (though feel free to double or triple the recipe if you're feeding a crowd). It's sweet, buttery, warmly spiced, and perfect served hot with a generous scoop of vanilla ice cream.
Trust me: if you like peach cobbler, you’re going to love this.
This recipe serves two generous portions, or just one if you're having a me time moment. No judgment. Dig in.

Tips and Variations
Want more topping? Just double the batter recipe for a thicker, cakier crust.
Like it tangier? Add more lemon juice or a pinch of lime zest to the guava filling.
You can substitute fresh guava (peeled, seeded, and sliced) if you have access to it, just add more sugar and liquid.
This is for guava of course but you can experiment with berries, apples and cherries (or go traditional with peaches, and some fruit you’ll want to cook down first with the filling).


One-Can Guava Cobbler
Give your classic Southern peach cobbler a tropical twist with this easy guava cobbler recipe, made with just on3 can of guava! Sweet, buttery, and warmly spiced, it’s the perfect summer dessert served hot with vanilla ice cream. A unique fusion of Caribbean flavor and Southern comfort that’s simple, nostalgic, and unforgettable.
Ingredients
- 1 tablespoon butter, melted (for greasing the pan)
- 1 can guava in syrup (I used Koo's, 410g)
- 1/4 cup brown sugar
- 1 tablespoon white sugar
- 1 teaspoon cornstarch
- 1 teaspoon vanilla extract
- 1/2 teaspoon lemon juice
- 1/8 teaspoon salt
- 3/4 teaspoon ground cinnamon
- 1/4 teaspoon ground ginger
- 1/8 teaspoon ground nutmeg
- 1/2 cup all-purpose flour
- 1/8 cup white sugar
- 1/8 cup brown sugar
- 1/2 teaspoon baking powder
- 1/2 teaspoon ground cinnamon
- 1/4 teaspoon salt
- 3 tablespoons cold butter, cut into small pieces
- 1/8 cup boiling milk or water (milk adds richness)
- 1 1/2 teaspoons cinnamon sugar, for sprinkling
Instructions
- Preheat your oven to 400°F (200°C).
- In an 8x8 inch baking dish (or similar size), add 1 tablespoon of melted butter and swirl to coat the bottom and sides. This adds flavor and keeps things from sticking.
- Drain the guava, saving a tablespoon or two of syrup if you'd like to drizzle over the finished cobbler.
- In a bowl, combine the drained guavas with 1/4 cup brown sugar, 1 tablespoon white sugar, 1 teaspoon cornstarch, 1 teaspoon vanilla extract, 1/2 teaspoon lemon juice, 1/8 teaspoon salt, 3/4 teaspoon cinnamon, 1/4 teaspoon ginger, and 1/8 teaspoon nutmeg.
- Gently stir to coat, being careful not to mash the guava, they’re more delicate than peaches.
- Carefully spoon this mixture into the prepared baking dish.
- In a mixing bowl, combine 1/2 cup flour, 1/8 cup white sugar, 1/8 cup brown sugar, 1/2 teaspoon baking powder, 1/2 teaspoon cinnamon and 1/4 teaspoon salt.
- Add 3 tablespoons of cold butter, and use a pastry cutter or your fingertips to work it into the dry mixture until it resembles coarse crumbs.
- Stir in the boiling milk or water just until a dough forms. Do not overmix, or the topping will be tough.
- Drop spoonfuls of the dough over the guava filling, then use your fingers or the back of a spoon to gently spread it out. It doesn’t need to be perfect or fully covered, rustic is beautiful.
- Sprinkle the top evenly with cinnamon sugar.
- Bake for 30-35 minutes, or until the top is golden brown and the filling is bubbling.
- Let cool for a few minutes (if you can wait), then serve warm with a scoop of vanilla ice cream or even coconut whipped cream for an extra tropical vibe.
I am not a certified nutritionist and any nutritional information on dontmissmyplate.com should only be used as a general guideline.

Cornmeal and Condensed Milk (Chess) Pie
I grew up with custard as a staple dessert, and cornmeal was always in the pantry. This pie combines both, turning a humble custard into a textured, rich treat. Inspired by the classic Southern chess pie with roots in England, I’ve added condensed and evaporated milk to give the custard extra creaminess. Lemon or chocolate are common variations, but here I stick to the simple, original custard flavour that melts in your mouth. Perfect for any time of year, with tea, coffee, or as a standalone dessert.

Cornmeal and Condensed Milk (Chess) Pie
Classic Southern chess pie made with cornmeal, condensed milk, and evaporated milk for a rich, custard-filled dessert. Textured, sweet, and comforting—perfect for dessert lovers looking to try a traditional American treat with a simple twist.
Ingredients
- 1 pie crust (room temperature)
- 1/4 cup cornmeal
- 1/4 cup condensed milk
- 1/4 cup water
- 1 tablespoon apple cider vinegar or lemon juice
- 1/4 cup evaporated milk
- 1/2 teaspoon cinnamon
- 1/2 teaspoon salt
- 1 tablespoon flour
- 2 teaspoons vanilla extract
- 1/2 teaspoon almond extract
- 4 large eggs
- 1 cup sugar
- 1/2 cup (8 tablespoons) butter
Instructions
- Roll out the pie crust into your pan. Poke small holes in the bottom and sides with a fork or knife. Freeze for 15 minutes.
- Blind bake the crust at 425°F (220°C) for 15 minutes with pie weights, dried beans, or rice on parchment to prevent air pockets.
- Reduce the oven to 350°F (175°C).
- For the filling, beat the eggs and sugar until well combined. Whisk in condensed milk, butter, water, vanilla, almond extract, vinegar, and evaporated milk.
- Add flour, cornmeal, salt, and cinnamon. Mix until everything is evenly incorporated, the filling will seem slightly watery but will set as it bakes.
- Pour the filling into the pre-baked crust and bake for 45–50 minutes, until firm to the touch.
- Cool at room temperature for about 4 hours, then chill before serving.
- Optional: dust with icing sugar or cinnamon before serving.
Nutrition Facts
Calories
320Fat (grams)
18 gCarbs (grams)
35 gSugar (grams)
20 gI am not a certified nutritionist and any nutritional information on dontmissmyplate.com should only be used as a general guideline.

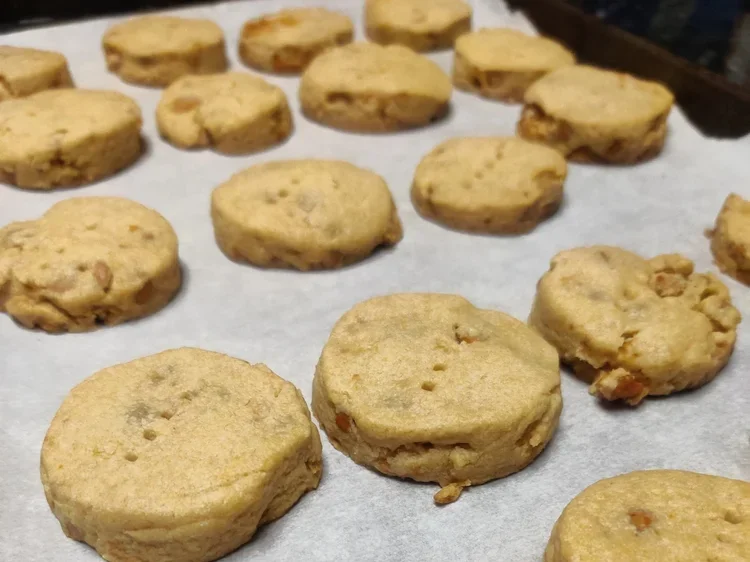
Cinnamon and Pear Shortbread Biscuits – Buttery, Soft and Crispy
Shortbread cookies are the ultimate testament to the beauty of simplicity. With just butter, sugar, and flour, these cookies deliver a tender, crumbly texture that melts in your mouth. I grew up eating these biscuits in Zimbabwe, a former British colony, where they were a staple at holiday tables, family tea times, and special occasions. Brands like Eat Sum More from South Africa were often on our shelves, and they hold a special place in my childhood memories.
While traditional shortbread is simple—one part sugar, two parts butter, three to four parts flour—I love to give it subtle seasonal twists. In this version, I’ve added diced dried pears and cinnamon chips, perfect for winter baking. Even though shortbread isn’t as popular in the U.S. outside of the holidays, it’s divine any time, whether for afternoon tea or just a sweet treat with your coffee.
That said, if you prefer classic, unadorned shortbread, you can skip the pears and cinnamon and still enjoy the melt-in-your-mouth texture and buttery richness that make shortbread timeless. This blog walks you through both approaches, so you can enjoy the cookies exactly the way you like them.
Tips for Perfect Shortbread Cookies
Even a simple cookie like shortbread has a few secrets to make it melt-in-your-mouth. Whether you’re making the classic version or the pear and cinnamon cookies inspired by winter flavors, these tips will help:
For Classic Shortbread
Use high-quality unsalted butter—it was the key in the biscuits I grew up eating.
Stick to the traditional trio: flour, sugar, butter. Subtle vanilla or citrus zest is fine.
Measure carefully; too much flour can make cookies dense.
Don’t overmix; just bring the dough together.
Chill for at least 30 minutes.
Prick with a fork before baking.
Bake low and slow: 300–325°F (150–165°C).
Cool completely and store in an airtight container.
For Pear and Cinnamon Shortbread
Gently fold in diced dried pears and cinnamon chips at the end so the dough stays tender.
You may need slightly more liquid if using whole wheat flour.
Chill, roll evenly, and follow the other tips above—the fruit will make the cookies softer, but just as buttery.
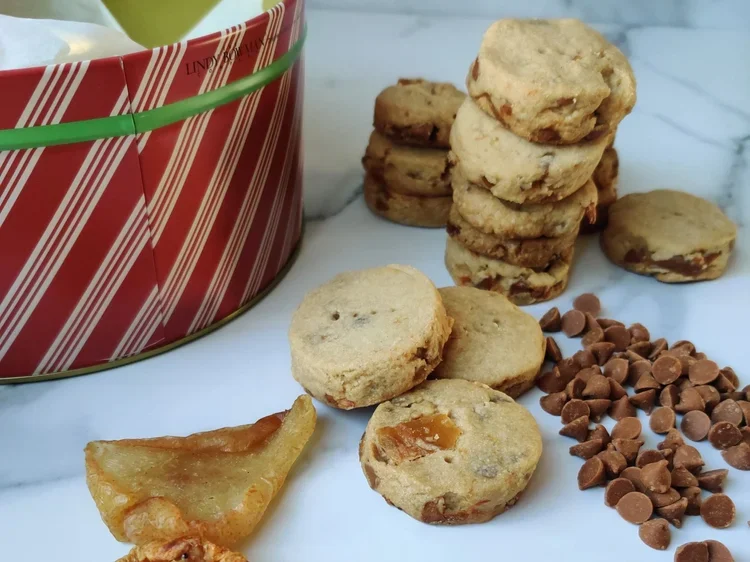

Cinnamon and Pear Shortbread Biscuits
These shortbread cookies are buttery, crisp, and melt in your mouth. Make them classic with just sugar, butter, and flour, or add pears and cinnamon for a festive touch.
Ingredients
- 3 cups all-purpose flour (or white whole wheat) + extra for dusting
- 1/2 cup + 2 tbsp granulated sugar
- 1/2 tsp salt
- 1 cup unsalted butter, softened
- 1 tsp vanilla extract
- 2–3 tbsp water (or heavy cream if using whole wheat)
- 2/3 cup finely diced dried pears
- 2/3 cup cinnamon chips or toffee bits
Instructions
- In a stand mixer with paddle attachment, beat softened butter and sugar on medium until fluffy and light.
- Gradually add flour and salt at low speed until a crumbly dough forms.
- For the pear + cinnamon version, fold in diced pears and cinnamon chips with a spatula.
- Add vanilla, then slowly add water (or cream if needed) just until the dough comes together. It should stick slightly but not be wet.
- Transfer dough to a floured surface, flatten to ~½ inch thickness. Cut into shapes or rounds.
- Place on parchment-lined trays and prick with a fork. Chill for at least 30 min.
- Bake at 350°F (175°C) for 30 min, or until just lightly golden at edges. Cool completely before serving.
Notes
- Classic Shortbread: Skip pears and cinnamon. The flavor comes purely from butter and sugar.
- Flour Tip: White whole wheat may require extra liquid (cream) for dough cohesion.
- Storage: Airtight container at room temp for up to 2 weeks. Flavor improves after a day.
- Variations: Chocolate chips, nuts, or subtle zest work well too.
Nutrition Facts
Calories
125Fat (grams)
7 gCarbs (grams)
15 gSugar (grams)
7 gProtein (grams)
1 gI am not a certified nutritionist and any nutritional information on dontmissmyplate.com should only be used as a general guideline.
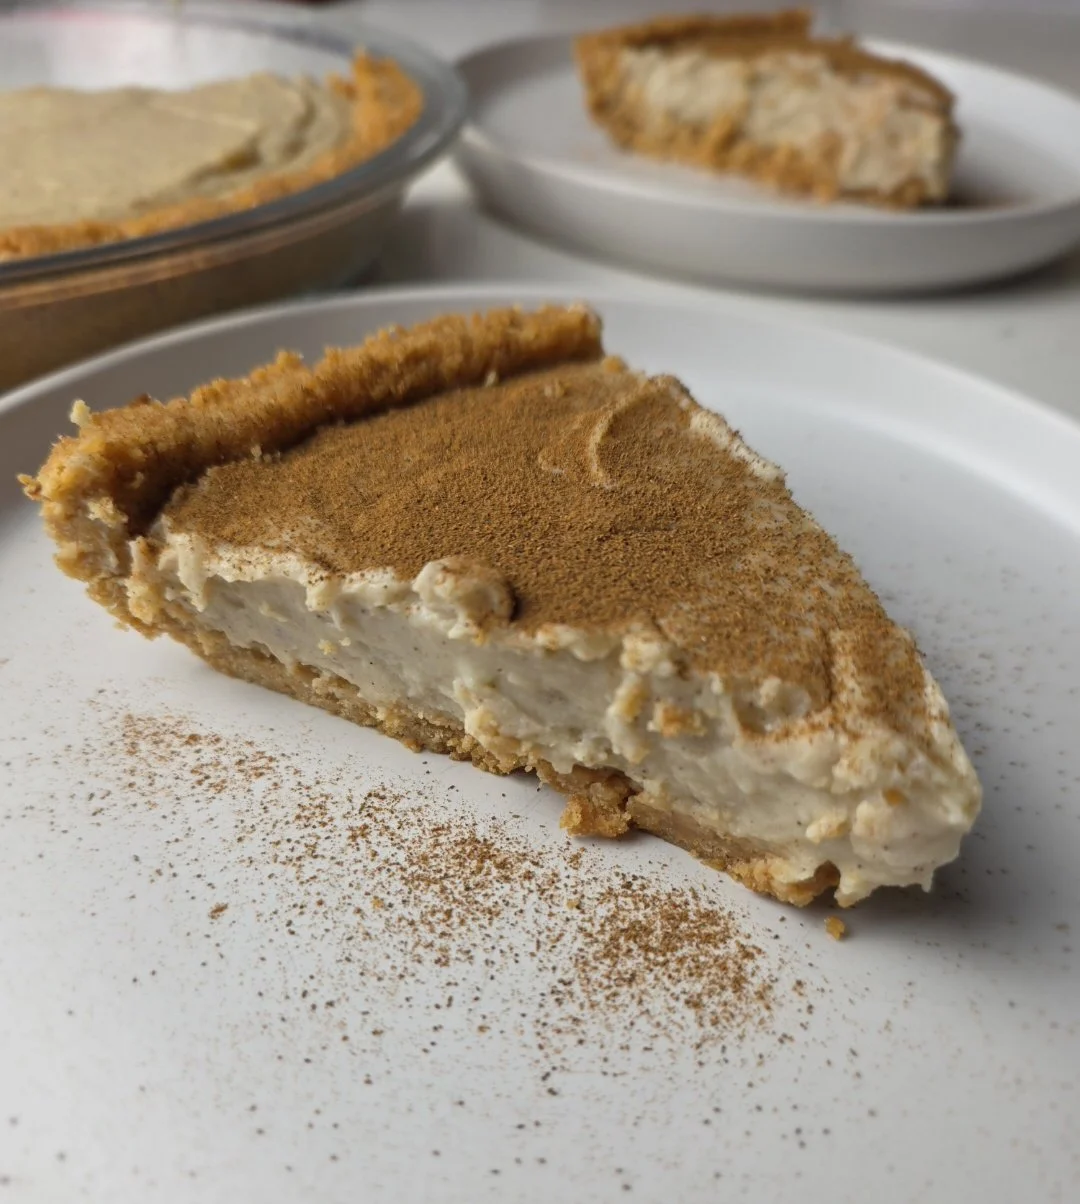
Creamy Coconut Milk Tart (Melktart)
Milk tart, or melktert, is one of my all-time favorite desserts. It brings back so many memories of my mom in the kitchen, making silky custard, pudding, jelly, and cakes while I watched and learned. As a child, custard (packaged!) in particular was one of the first desserts I ever started making on my own, so it was no surprise that milk tart quickly became a comfort food I could never pass up. The buttery crust, creamy filling, and cinnamon (sometimes stronger, sometimes lighter) are simple but so satisfying.
For these versions, I’ve added a twist by using coconut milk in the filling (and toasted coconut flakes in the crust in the first version) for a subtle, unique flavor that enhances the sweet, nutty, tropical notes of the milk tart. I also made the custard slightly richer and creamier than the traditional version, so slices may be a touch softer than the classic, but the indulgent texture is intentional and totally worth it. In the second option, I swapped the traditional pastry for my favorite oatmeal crust to give it extra texture, thickness, and heartiness. Whether you’re a lifelong custard lover or just discovering this South African-inspired classic, it’s worth every bite.


Creamy Coconut Milk Tart
Classic South African milk tart (melktert) with a creamy coconut custard and an optional oatmeal crust for added texture. Sweet, comforting, and custard-forward—perfect for dessert lovers. This version is slightly richer and creamier than traditional milk tart, which may make slices less “perfectly set” than older recipes, but it delivers extra indulgence and flavor.
Ingredients
- 1 ½ cups coconut tennis biscuits (18–20 biscuits)
- 3 tbsp toasted coconut flakes
- 1 tbsp granulated sugar
- Pinch of salt
- ½ cup butter, melted (add more 1 tbsp at a time if needed)
- 1 ¼ cups whole milk
- ¾ cup coconut milk
- ½ cup condensed milk
- 2 tbsp granulated sugar
- 3 tbsp cornstarch
- 2 eggs
- 1 tbsp butter
- 1 tsp vanilla extract
- ¾ tsp cinnamon
- Pinch of nutmeg
- Pinch of cardamom
- 1¾ cups rolled or quick-cook oats
- 2½ sticks cold butter, cubed
- ²⁄₃ cup flour
- ²⁄₃ cup brown sugar
- 1 tsp salt
- 1 tsp cinnamon
Instructions
- Preheat oven to 325°F (160°C).
- Set aside the toasted coconut flakes.
- Pulse the biscuits in a food processor until they resemble coarse sand. Alternatively, crush them in a ziplock bag with a rolling pin.
- Add the toasted coconut and give the mixture a few more pulses (or a good mix) to integrate everything.
- Transfer the crushed biscuits to a bowl and mix in the sugar, salt, and melted butter until the mixture resembles damp sand and holds together when pinched. Add more butter 1 tbsp at a time if needed. It should not be too wet or too dry.
- Press the mixture evenly into a pie dish, using a cup to press the base and your fingers to shape the sides.
- Chill in the fridge for 10–15 minutes, then bake for 10–12 minutes. Cool while preparing the filling.
- In a small saucepan, heat the whole milk and coconut milk over low heat until steaming. Do not boil. Remove from the heat.
- In a separate bowl, whisk together the eggs, condensed milk, sugar, and cornstarch until smooth.
- Slowly whisk the warm milk mixture into the egg mixture a little at a time to temper it. Tempering means gradually warming the eggs so they don’t scramble when exposed to heat.
- Return the combined mixture to the saucepan and cook over low heat, stirring constantly for 5–8 minutes, or until it thickens and coats the back of a spoon.
- Remove from the heat and stir in the butter, vanilla, cinnamon, nutmeg, and cardamom.
- Pour the filling into the baked crust and bake for 15 minutes.
- Cool at room temperature for 1 hour, then chill overnight (or at least 2–4 hours if you are short on time).
- Preheat oven to 350°F (175°C).
- In a large bowl, combine oats, flour, brown sugar, salt, and cinnamon. Cut in the cold butter with a pastry cutter until the mixture resembles large breadcrumbs. (Optional: pulse the dry ingredients with butter a few times in a food processor, but keep some texture—don’t over-process into a fine powder.)
- Press the mixture evenly into a greased 9-inch pie tin using the bottom of a measuring cup to compact the base and the sides.
- Bake for 15–20 minutes, until the crust is lightly browned and slightly crispy.
- Optional: To prevent shrinking or puffing, weigh down the crust with dried beans or pie weights on a piece of parchment paper while baking. If the crust does puff or shrink slightly, press it back into place gently while still warm.
- Let the crust cool completely before adding the filling.
Notes
For the oatmeal crust:
- Make sure butter is cold, this helps create that tender, crumbly texture.
- Pressing the crust evenly and firmly is key; uneven thickness can cause it to bake inconsistently.
- Using rolled oats gives a chewier, more textured crust, while quick-cook oats yield a slightly softer crust.
For 'classic' milk tart:
- Custard consistency: Make sure to whisk the cornstarch and eggs thoroughly before combining with warm milk to avoid lumps. The custard should coat the back of a spoon when fully cooked.
- Baking the tart: Keep an eye on the tart while baking—the filling should set but remain slightly wobbly in the center; it will firm as it cools.
- Crust options: You can use a traditional shortcrust pastry or swap in an oatmeal crust for extra texture and heartiness.
- Coconut twist: Using coconut milk adds a subtle tropical flavor, but you can substitute with regular milk if preferred.
- Serving: For neat slices, use a warm knife. Dust with cinnamon just before serving for a beautiful presentation.
- Storage: Store in the fridge, covered, for up to 3 days. Best served chilled or at room temperature.
Nutrition Facts
Calories
320Fat (grams)
18 gCarbs (grams)
36 gSugar (grams)
20 gProtein (grams)
6 gI am not a certified nutritionist and any nutritional information on dontmissmyplate.com should only be used as a general guideline.
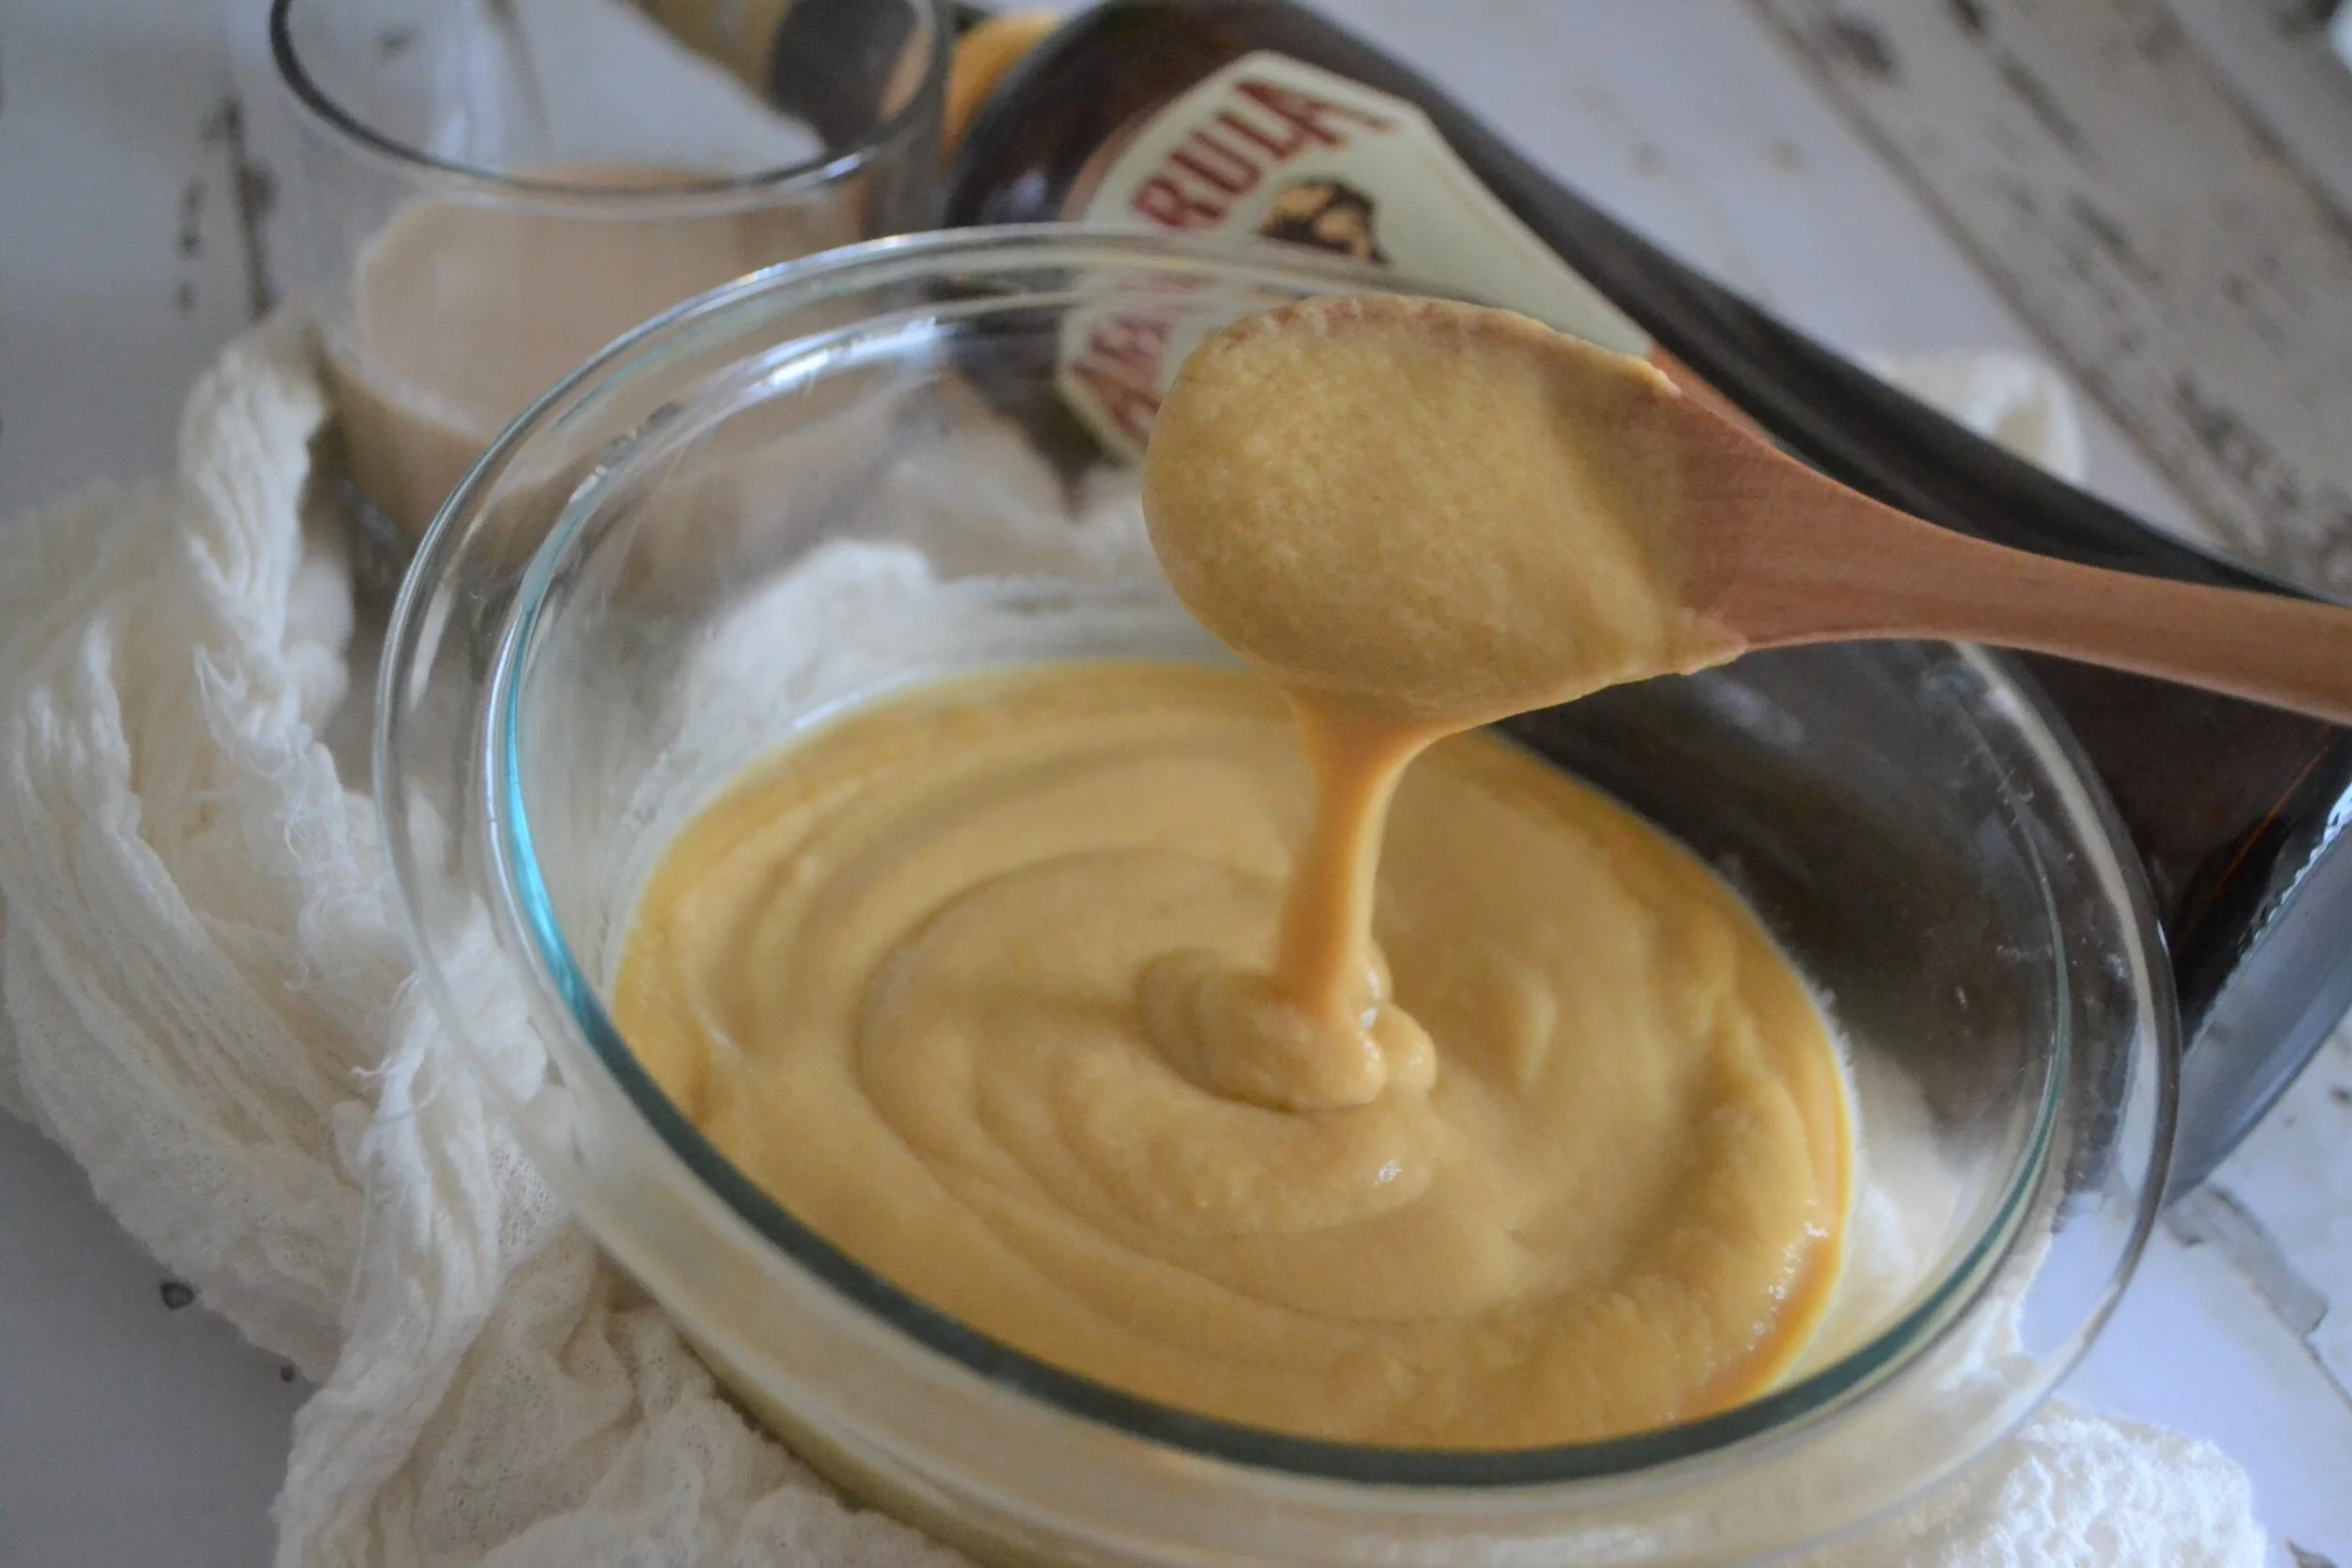
Amarula Custard
If you’re looking to make a homemade custard with a unique twist, this Amarula custard is the perfect choice. Made with Amarula liqueur, crafted from the fruit of the Marula tree native to Southern Africa, this creamy dessert brings a rich, indulgent flavor to your table.
The naturally sweet, fruity notes of the Marula fruit combine beautifully with the smooth cream base, creating a custard that pairs perfectly with cakes, tarts, or fresh fruit. This recipe is designed to complement our Malva Pudding Cake, adding a luxurious, silky layer that enhances the traditional South African dessert experience. You can serve it warm or chilled, drizzle it over your favorite baked goods, or enjoy it alongside fruit for a simple yet elegant treat.
Easy to prepare yet full of flavor, this Amarula custard is a simple way to bring the taste of Southern Africa into your kitchen and impress family and friends alike. Try it today and experience a truly indulgent dessert that’s both classic and unique.