

Spiced Caramel Coffee Cake (Hot Cross Bun Style)
I was inspired to make this recipe after ordering some snacks from a South African online grocery store. One item that immediately caught my eye was their Hot Cross Bun Caramel Spread. I was so excited because I love anything caramel and I absolutely adore hot cross buns. There’s something nostalgic and comforting about the warm spices, soft raisins, and rich, buttery flavor.
The caramel itself had a spiced, rum-like taste with little bursts of raisins, just like a true hot cross bun in spreadable form. I knew I wanted to do something special with it, and one of my favorite pastries to enjoy with a cappuccino or another espresso drink is a coffee cake. So, I combined the two.
This Hot Cross Bun Caramel Coffee Cake has all the warm spices and cozy flavor of the classic Easter treat but turned into a soft, fluffy cake with a gooey caramel swirl and a crunchy streusel topping. It’s comforting, flavorful, and just the right amount of indulgent.
Whether you’re enjoying it as a breakfast treat, a mid-morning snack, or dessert, it’s a beautiful bake to pair with coffee or tea. And honestly, who doesn’t love hot cross buns in any form?
")
Spiced Caramel Coffee Cake (Hot Cross Bun Style)
A spiced, cozy coffee cake swirled with caramel and topped with buttery streusel — perfect with a cappuccino.
Ingredients
- 1¾ cups (220g) white whole wheat flour
- 1 teaspoon baking powder
- ½ teaspoon baking soda
- ½ teaspoon salt
- 1 teaspoon cinnamon
- ½ teaspoon nutmeg
- ½ cup (100g) brown sugar
- ½ cup (120ml) neutral oil (or melted butter)
- 2 large eggs
- 1 cup (240ml) milk (or buttermilk)
- 1 teaspoon vanilla extract
- ½ cup (75g) raisins
- ½ cup (120g) Hot Cross Bun Caramel Spread
- ½ cup (65g) white whole wheat flour
- ⅓ cup (65g) brown sugar
- 1 teaspoon cinnamon
- ¼ cup (55g) cold butter, cubed
- ½ cup powdered sugar
- 6 teaspoons milk or cream
- Splash of lemon juice
- ½ teaspoon vanilla extract
- ¼ cup extra Hot Cross Bun Caramel Spread (for extra drizzle on top)
Instructions
- Preheat your oven to 350°F (175°C). Grease and line an 8x8-inch or 9-inch square pan.
- In a large bowl, whisk together the flour, baking powder, baking soda, salt, cinnamon, and nutmeg.
- In a separate bowl, whisk the brown sugar, oil (or melted butter), eggs, milk, and vanilla.
- Pour the wet ingredients into the dry and mix until just combined. Fold in the raisins.
- In a small bowl, rub the flour, brown sugar, cinnamon, and cold butter together with your fingertips until the mixture becomes crumbly. Set aside.
- Pour half the batter into the prepared pan and spread evenly. Dollop half the caramel spread over the batter and swirl gently with a knife.
- Pour the remaining batter on top and repeat with the rest of the caramel. Swirl again lightly.
- Sprinkle the streusel topping evenly over the batter.
- Bake for 40 to 45 minutes, or until a toothpick inserted into the center comes out clean. Let cool in the pan for 10–15 minutes.
- In a small bowl, whisk together the icing drizzle ingredients until smooth. Once the cake has cooled slightly, drizzle with the icing and an extra spoonful or two of the Hot Cross Bun Caramel for a glossy finish.
Notes
Tips
- If you can't find Hot Cross Bun Caramel, you can use a spiced caramel or mix plain caramel with cinnamon, nutmeg, and a splash of rum extract.
- Swap raisins for dried cranberries or chopped dates if preferred.
- This cake keeps well in an airtight container for up to 3 days and can be frozen without the drizzle (if frozen with drizzle texture will change).
- If you don't want the darker color, use white sugar or all-purpose flour.
I am not a certified nutritionist and any nutritional information on dontmissmyplate.com should only be used as a general guideline.

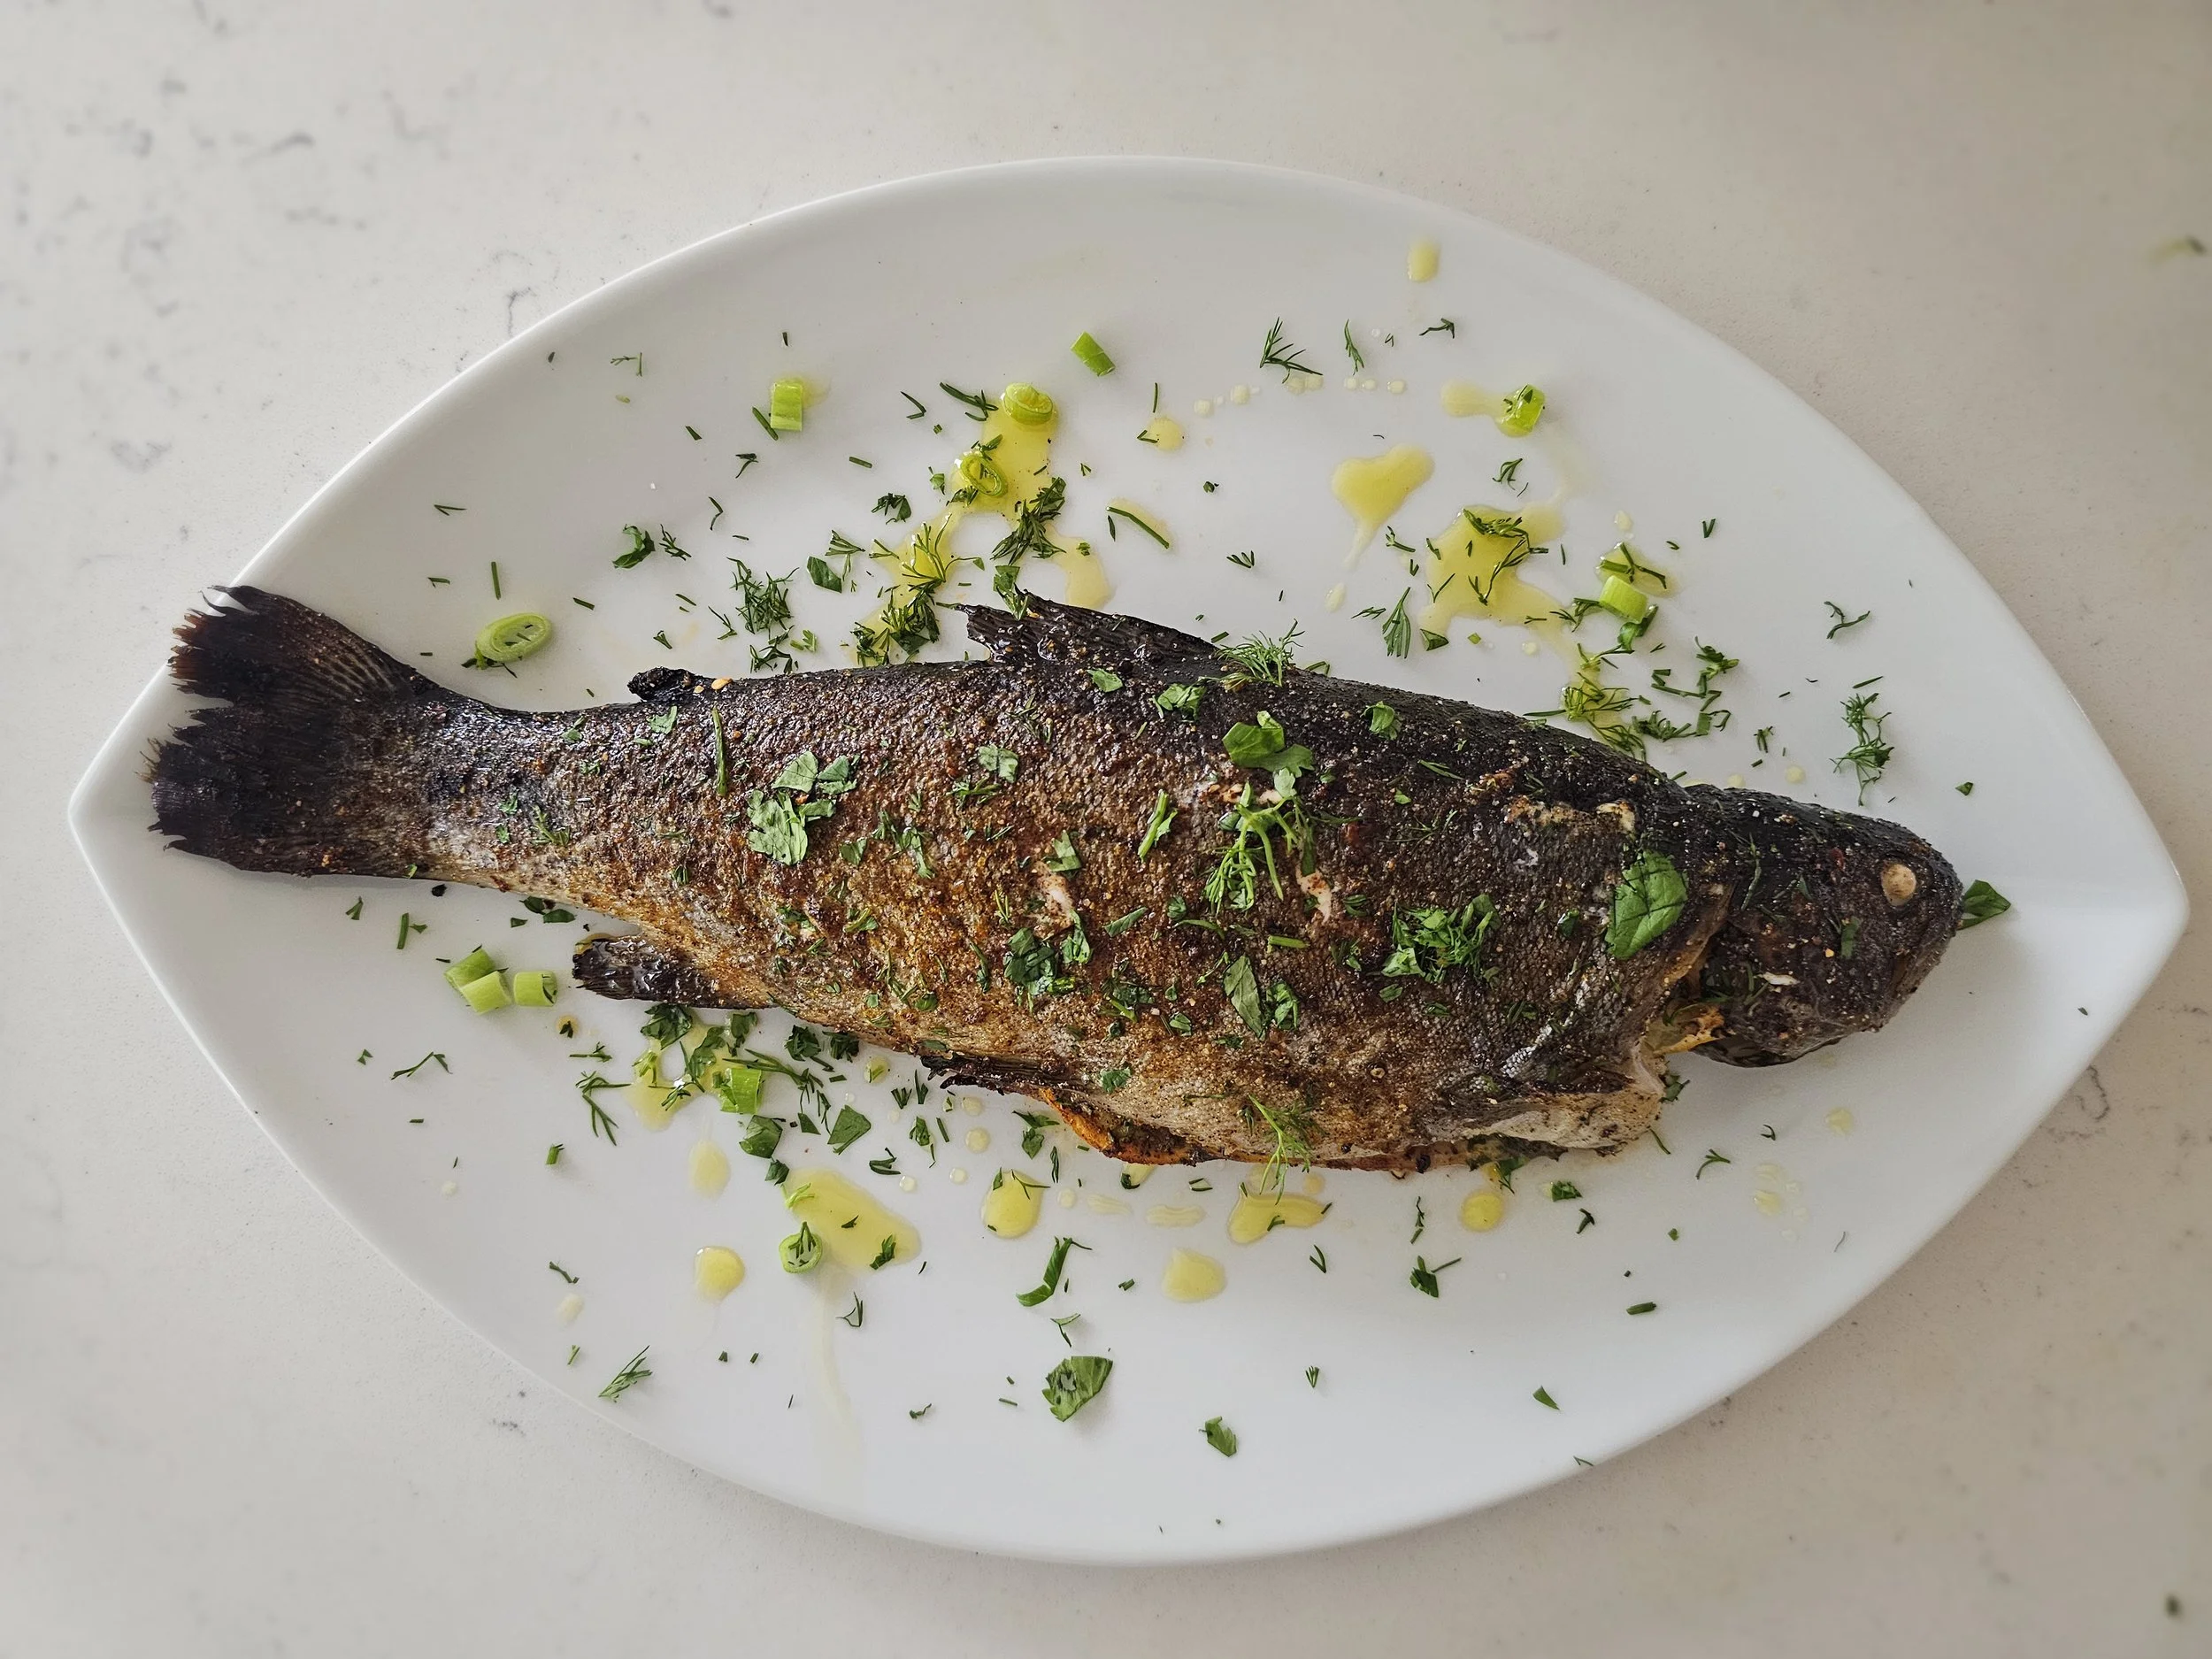
Oven-Baked Whole Trout with Herbs and Lemon
I’ve always had a particular love for cooking whole fish. There is something deeply satisfying about preparing it this way, honoring its structure, texture, and natural flavor rather than disguising it. That appreciation began long before the kitchen, through a love of fishing and the quiet patience it requires. Catching fish yourself changes the way you approach it on the plate.
This trout recipe reflects that mindset. It keeps the preparation simple while layering in thoughtful flavor. Fresh dill and parsley add brightness, while berbere, the warm and aromatic East African spice blend, brings depth and gentle heat. With its combination of chilies, garlic, and warming spices, berbere complements fish beautifully by enhancing its richness without overwhelming its delicate flesh. A squeeze of lemon at the end lifts and balances everything.
The method is straightforward. Roast the trout gently, then finish it under the broiler on parchment for a few minutes to crisp the skin while keeping the inside tender and juicy. The result is bold yet balanced, simple yet intentional, and a reminder that whole fish needs very little to feel special.
Tips for Perfect Trout:
Freshness is key: Choose trout with bright eyes, firm flesh, and a mild aroma. Fresh fish makes all the difference.
Pat dry thoroughly: Moisture is the enemy of crisp skin. Make sure the trout is well dried before applying your seasoning paste.
Herb and spice paste: Don’t skimp—it infuses flavor into every part of the fish. Rub generously inside the cavity and on the outside.
Watch the broil: Broiling is quick! Keep a close eye to avoid burning while achieving that golden, crispy skin.
Serving Suggestions:
Pair with lightly roasted vegetables like sweet potatoes, bell peppers, or zucchini to complement the spices.
A fresh, tangy salad with avocado, cucumber, and a citrus dressing balances the richness of the trout.
Just before serving, drizzle with a little extra olive oil and a squeeze of lemon for a burst of brightness.
Variations and Fusion Ideas:
Swap trout for other firm, white-fleshed fish like tilapia or bass if needed.
Add chopped chili or smoked paprika for a smoky, spicy kick.
Try a light yogurt drizzle on the side to introduce a creamy element that balances the spices.
This broiled trout is more than a meal, it’s a celebration of fresh ingredients, bold African flavors, and the simple joy of cooking whole fish. (As shown in the video, you can also fillet the fish before serving for a boneless option your family or guests will appreciate.)
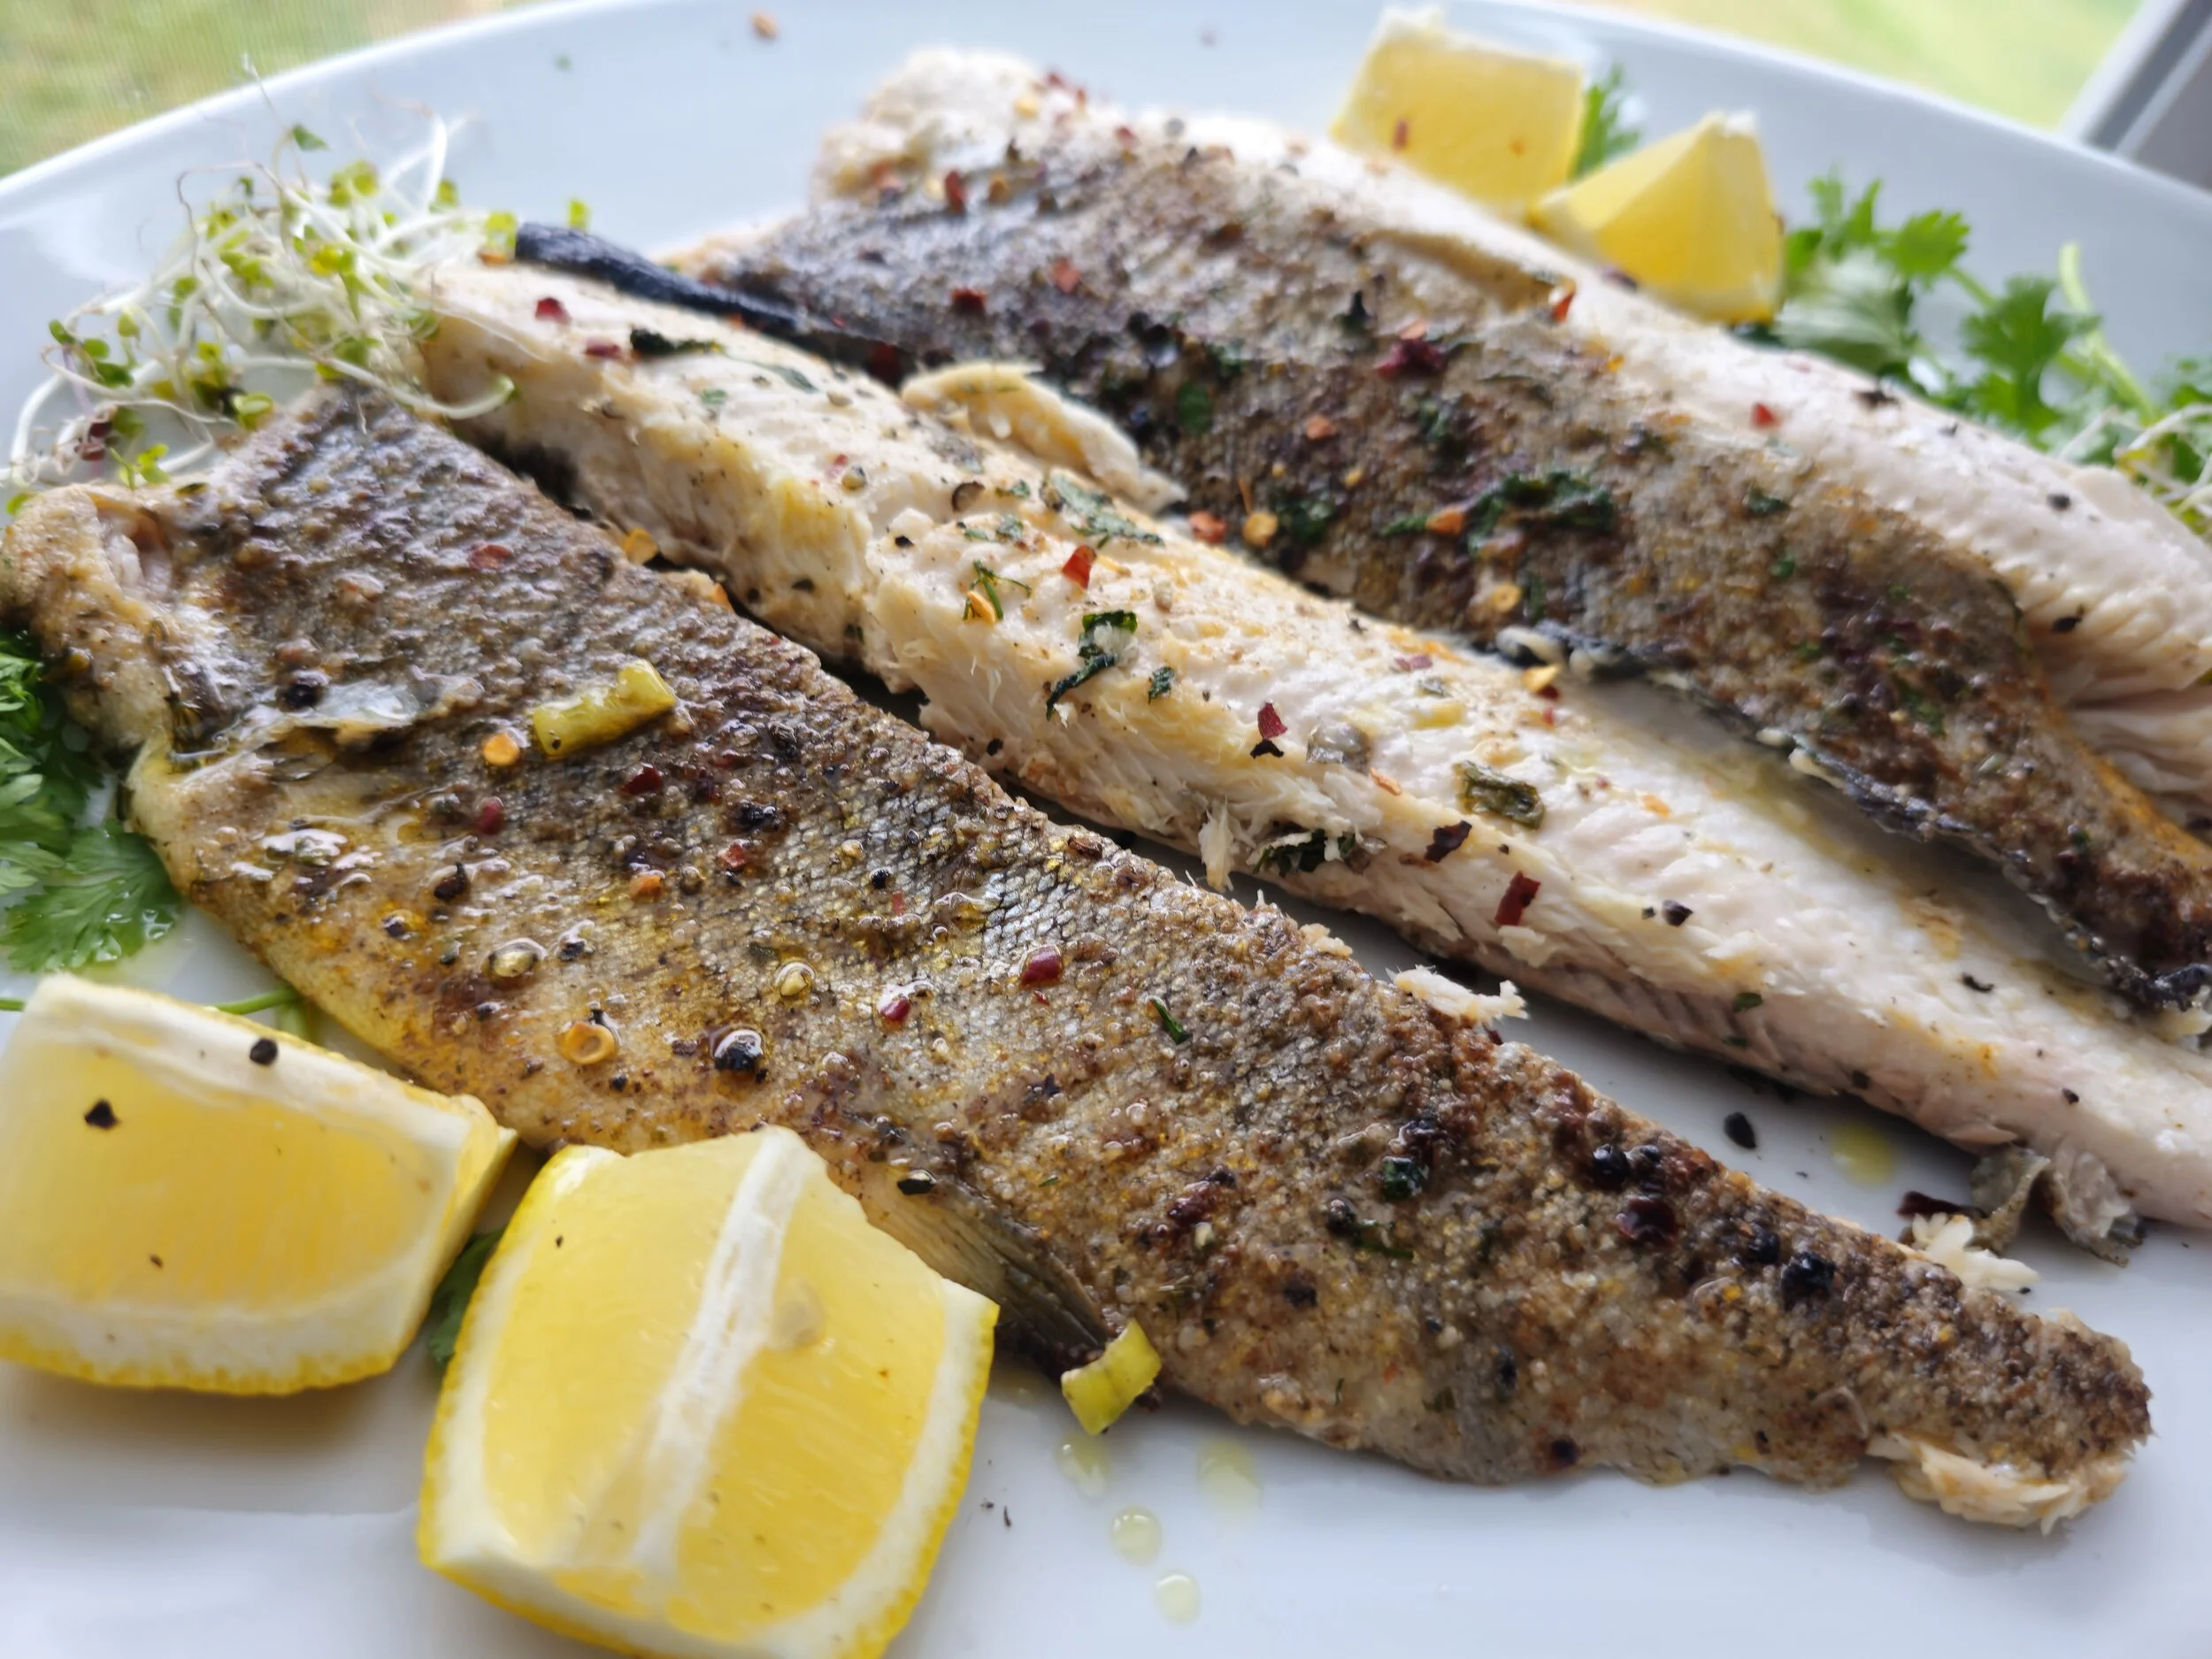
Whether it’s a weeknight dinner or a special occasion, this dish shines in both flavor and presentation. By layering herbs and spices and finishing with a quick broil for that irresistible skin, you’ll create something that’s not only visually stunning but deeply satisfying.

Oven-Baked Whole Trout with Herbs and Lemon
A simple, flavorful oven-baked whole trout recipe with herbs, lemon, and a crisp finish, perfect for weeknight dinners or special occasions.
Ingredients
- 1 whole large trout
- 2 lemons
- 1/3 cup spring onions, chopped
- 1/3 cup fresh dill, chopped
- 1/3 cup fresh parsley, chopped
- 2 garlic cloves, minced
- 2 tablespoons berbere spice
- 2 tablespoons spice for fish
- 1 tablespoon butter
- Salt and black pepper to taste
- Chili flakes (optional)
- Olive oil
Instructions
- Preheat your oven to 200°C (400°F).
- Clean and pat the trout dry. Make a few diagonal slashes on each side.
- In a small bowl, mix spring onions, dill, parsley, garlic, berbere spice, fish spice, salt, black pepper, and a drizzle of olive oil to form a paste.
- Rub the paste all over the trout, including inside the cavity. Slice one lemon and place the slices inside the fish cavity with a small knob of butter.
- Place the trout on parchment-lined baking sheet and cook in the oven until almost done, about 15–20 minutes depending on size.
- Switch the oven to broil and broil the trout for 5 minutes at the end to crisp the skin. Watch closely so it doesn’t burn.
- Serve hot with extra lemon wedges on the side and enjoy the fusion of African flavors with tender, juicy trout and perfectly crisp skin.
I am not a certified nutritionist and any nutritional information on dontmissmyplate.com should only be used as a general guideline.

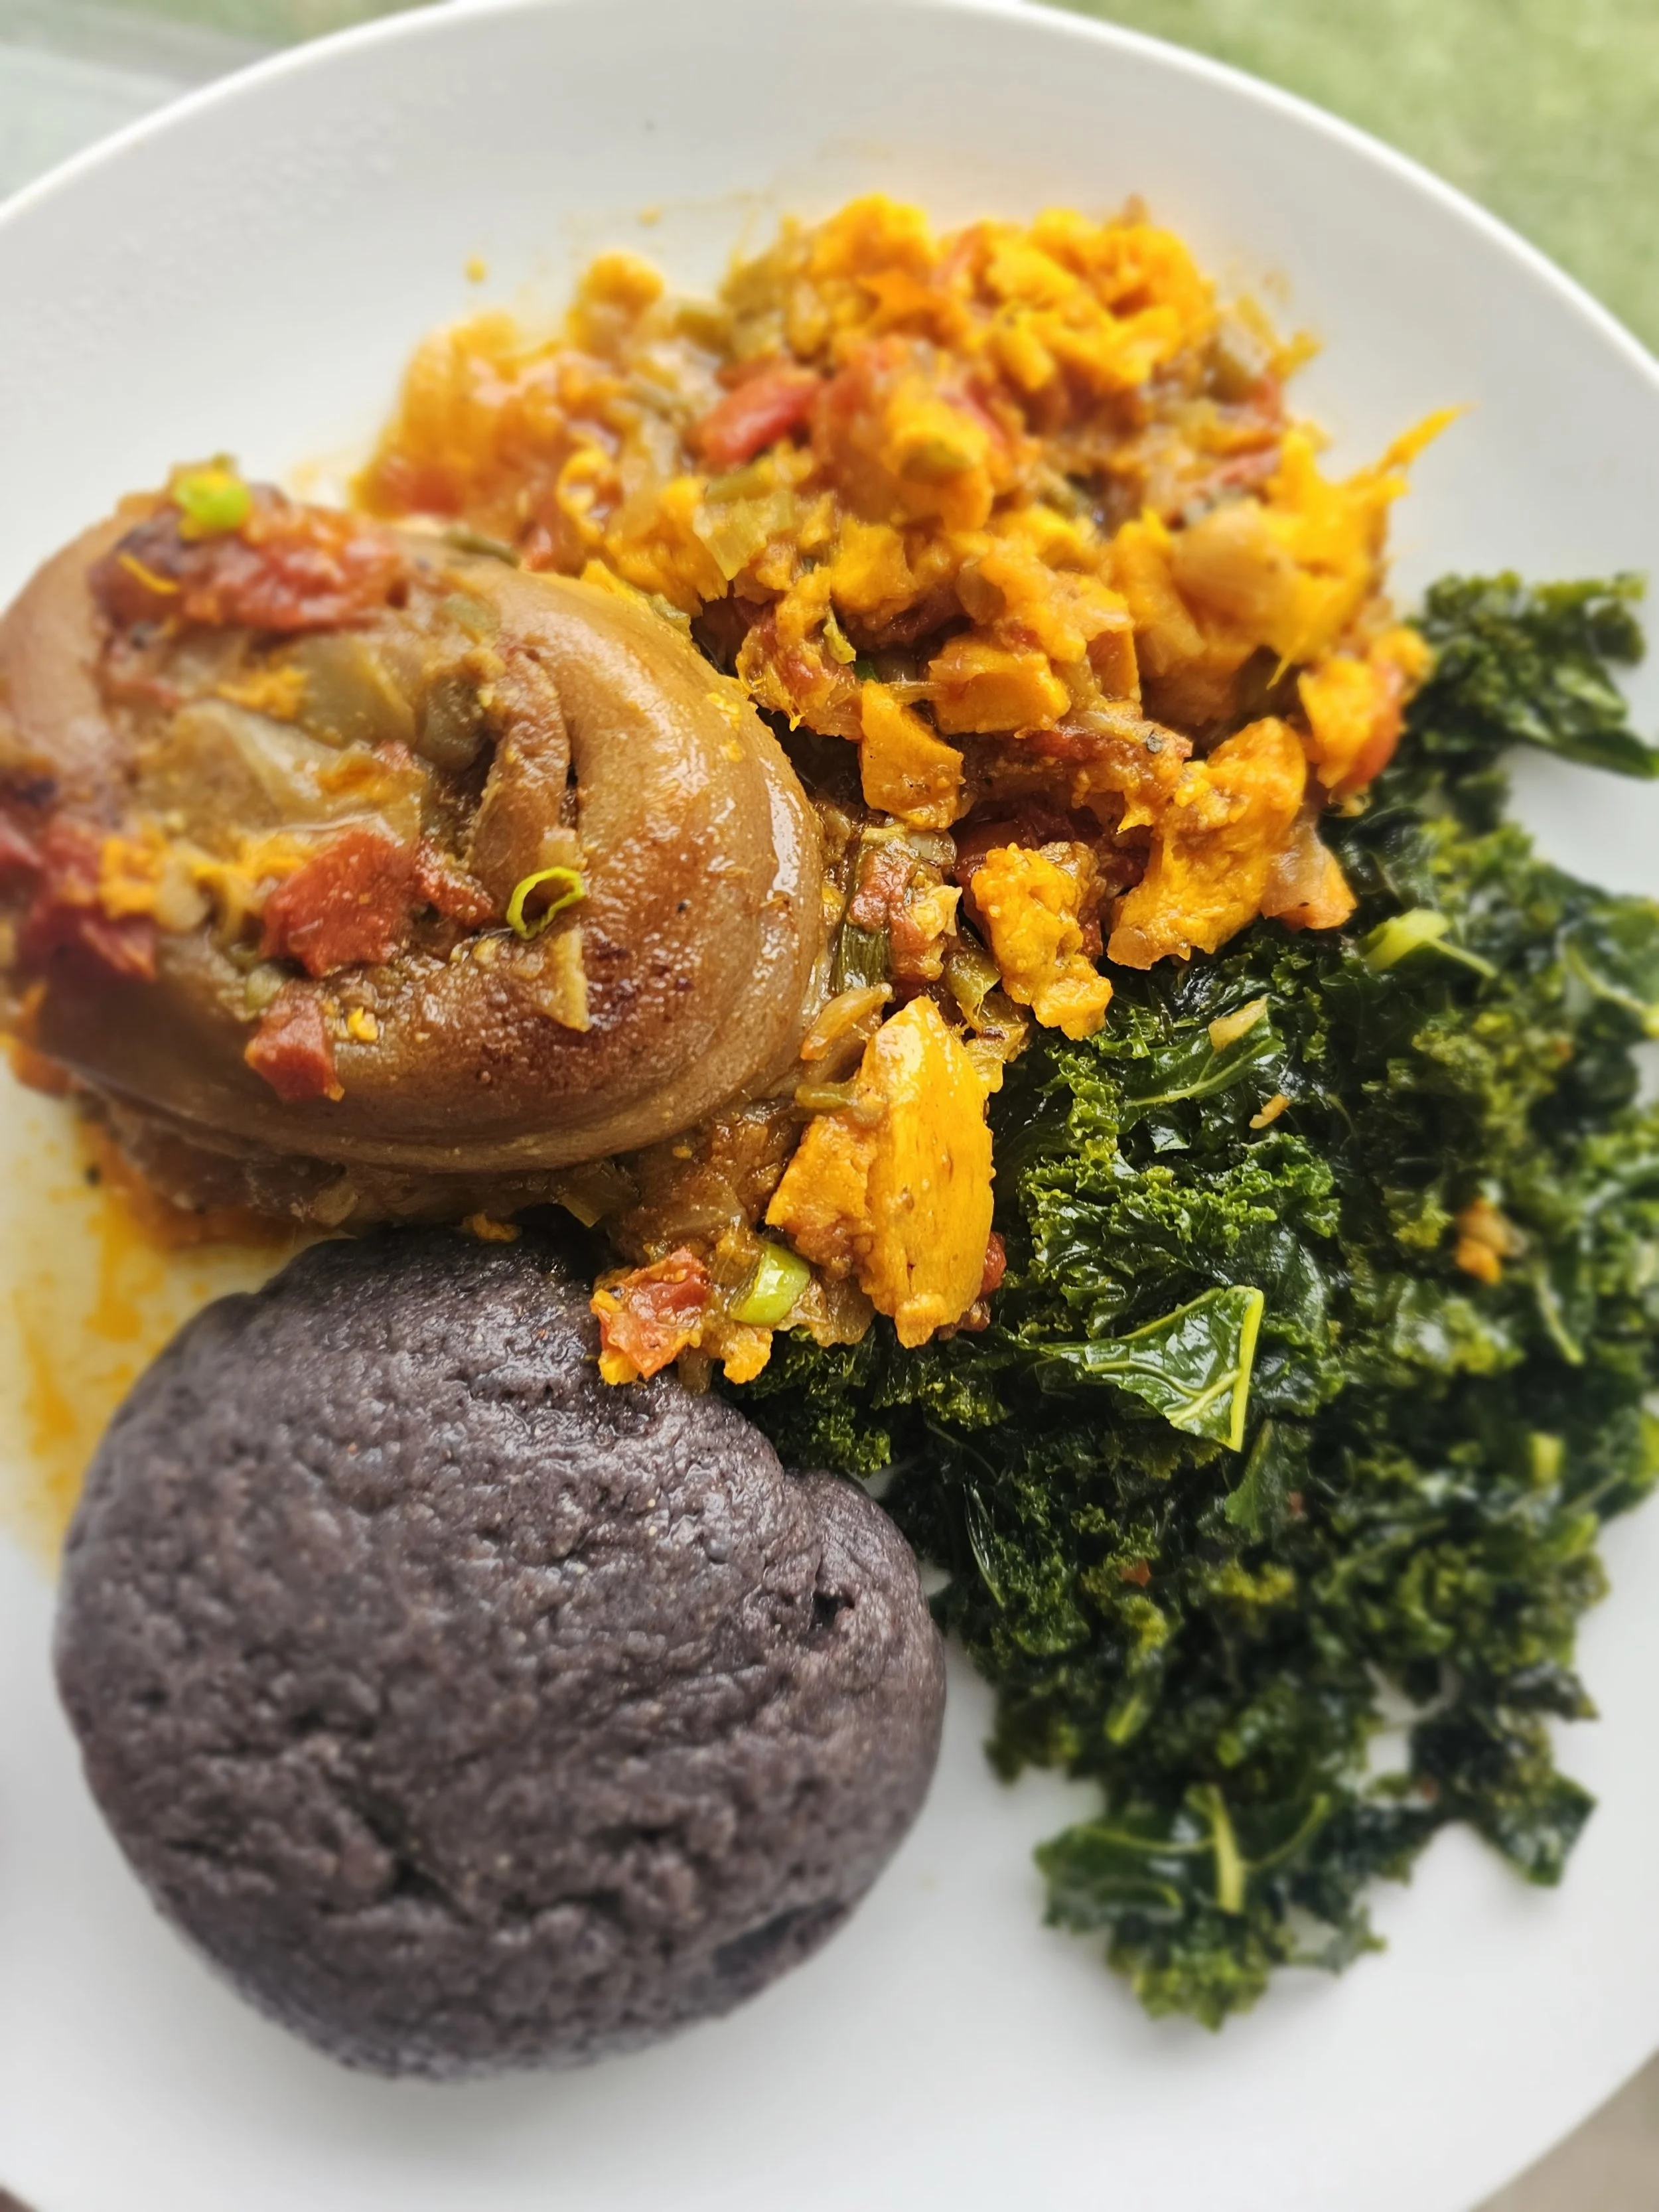
Stewed Pork Hocks with Sweet Potato (Mazondo)
If delicacies could walk… or rather, trot. Few cuts of meat are as humble yet deeply flavorful as pork hocks. Known for their tough skin, bone, and rich connective tissue, pork hocks have long been transformed by cultures that understand the value of slow cooking. In the American South, ham hocks brought deep, smoky flavor to pots of collard greens and beans, a survival food turned soulful cuisine. In Zimbabwe, they take on a new identity as mazondo, pig’s feet or ankles, revered as a delicacy. Often served in bars, homesteads, and special gatherings, mazondo is slow-cooked with onions, chilies, tomatoes, and spices until it’s meltingly tender.
In this recipe, I brought that tradition into the stew pot, giving the hocks a good sear to lock in flavor, then letting them braise low and slow with bold aromatics, rich seasoning, and an unexpected but powerful addition: sweet potato. While in Zimbabwe sweet potatoes (mbambaira) are typically enjoyed boiled or roasted as a standalone snack or side, they have an untapped potential when added to stews. Here, the sweet potato doesn’t just add subtle, earthy sweetness — it also brings nutrition and natural starch that gently thickens the broth as it cooks down, tying everything together in a rich, velvety texture.
Before cooking, I soak the hocks in red wine vinegar. This isn’t just for cleaning and tenderizing, but also to cut through the richness and add a subtle tang that balances the stew. It's a simple step, but it makes all the difference when working with fatty, collagen-rich cuts.

Prep and Cooking Tips for Mazondo
1. Soaking = Better Flavor and Cleaner Broth
Soaking pork hocks in vinegar and water helps clean the meat, neutralize strong odors, and tenderize it slightly. Rinse well after soaking to avoid excess acidity in the stew.
2. Sear for Maximum Flavor
Don’t skip the browning step, it adds deep, caramelized flavor that builds the base of your stew. Let the hocks sear undisturbed for a few minutes per side to get a good crust.
3. Low and Slow is Key
This stew rewards patience. Keep the heat low and let the hocks simmer gently for 2.5 to 3 hours. Rushing will result in chewy meat and thin broth.
4. Sweet Potato Choices Matter
Use a firm, orange-fleshed sweet potato or yam that holds up to long cooking. Softer varieties may break down too much, though that can also be desirable for thickening.
5. Customize the Heat
Adjust the chili to your preference. For mild stew, remove seeds from the chili or use a milder pepper. For more heat, add fresh chili near the end of cooking or include crushed chili flakes.
6. Make it Ahead
Like most stews, this tastes even better the next day. The flavors deepen and the texture improves after resting. Store in the fridge overnight and reheat gently.
7. Serving Suggestions
Traditionally served with sadza in Zimbabwe, but it's also excellent with rice, mashed potatoes, or crusty bread to soak up the broth. Try pairing it with sautéed greens for a full meal.
8. Skim the Fat (or Don’t)
Pork hocks release a good amount of fat. You can skim some off the top during or after cooking, or stir it back in for maximum richness, up to you.
9. Broth Boost
If you have homemade broth, use it! It gives the stew more body and complexity than water and bouillon alone.
10. Leftover Ideas
Leftover stew can be shredded and used in tacos, wraps, or even spooned over pap/sadza for a quick second-day meal.
With each spoonful, you're tasting tradition, technique, and transformation. The vinegar, the hocks, the sweet potato, each element speaks to how simple ingredients, handled with care and patience, can deliver deeply rooted, unforgettable flavor.
")
Stewed Pork Hocks with Sweet Potato (Mazondo)
Discover a rich, slow-cooked Pork Hock Stew (Mazondo) with sweet potato, inspired by Zimbabwean flavors and Southern soul food traditions. Tender pork hocks are soaked in vinegar, seared, and simmered with tomatoes, chili, and spices for a hearty, flavorful dish.
Ingredients
- 4 large pork hocks
- 1/3 cup red wine vinegar (for soaking)
- 1 tablespoon salt
- 1 tablespoon black pepper
- 1 large sweet potato or yam, peeled and cubed
- 1 large yellow onion, chopped
- 4 Roma tomatoes, chopped
- 1 chili pepper, finely chopped
- 2 large cloves garlic, minced
- 2 spring onions, sliced
- 2 bouillon cubes + 2 cups water (or homemade broth)
- 1/2 tablespoon Royco Usavi Mix (or your preferred all-purpose seasoning)
- 1/2 tablespoon Shishanyama spice (or BBQ meat rub)
- 2 tablespoons Worcestershire sauce
- 1 teaspoon cumin
- 1 teaspoon paprika
- 1 teaspoon oregano
- Cooking oil (coconut or olive oil)
- 2 tablespoons butter
Instructions
- Rinse the pork hocks under cold water. Place them in a large bowl and soak in red wine vinegar with enough water to cover. Let sit for 10 minutes, then drain and pat dry—very dry, so they brown nicely.
- Season the hocks with salt and pepper. In a large oven-proof pot roast dish or Dutch oven, heat a bit of oil over medium-high heat. Sear the hocks on all sides until golden and well browned. Remove and set aside.
- In the same pot, sauté the onion, garlic, chili, and spring onions until softened and fragrant. Add the Royco Usavi Mix, Shishanyama, and bouillon cubes. Cook for 1–2 minutes to bloom the spices, adding a bit more oil if needed. Stir in the tomatoes and Worcestershire sauce and cook for another 1–2 minutes.
- Add the cubed sweet potatoes, followed by the broth (or water), cumin, paprika, and oregano. Let everything simmer for 3–4 minutes to start developing the base of the stew.
- Transfer the pork hocks to a deep roasting pan or heavy pot. Pour the sweet potato and tomato mixture over the hocks, making sure they’re mostly submerged. The liquid will reduce and become the stew.
- Cover and simmer on low heat at 325°F for 2.5 to 3 hours, until the meat is fall-off-the-bone tender and the sweet potatoes are soft. When checking occasionally during cooking, avoid over-mixing to prevent the sweet potatoes from breaking down into a soup-like consistency.
- If there's more liquid than you'd prefer with about 30 minutes remaining, increase the temperature to 350°F.
- Finish with chopped fresh spring onions. Adjust seasoning with extra salt, pepper, or chili flakes if you like more heat. Serve hot with sadza, rice, or thick bread, and sautéed kale (muriwo) on the side.
I am not a certified nutritionist and any nutritional information on dontmissmyplate.com should only be used as a general guideline.

Honey-Glazed Tofu with Beet Purée, Roasted Mushrooms, and Eggplant Crisp
This dish started with a trip to the farmer’s market, where the deep purple of late-season eggplants and the vibrant reds of fresh beets caught my eye. A few days later, with some tofu and mushrooms already waiting in the fridge, it all started to come together. This recipe is a great way to make use of what you have and stop you from being so quick to toss older vegetables in the fridge. It took a while for me to use the Japanese eggplant!
The beets were roasted and blended into a smooth, earthy-sweet purée. The eggplant was sliced thin and baked until golden and crisp around the edges. Tofu was pressed and roasted until perfectly crisp, then tossed in a sticky glaze of honey and soy sauce. Mushrooms, slightly forgotten in the back of the fridge, got a second life in the oven with olive oil and ras el hanout—a North African spice blend that adds warmth, complexity, and just a hint of spice I love cooking with.
What came together was a dish full of contrast and character: soft and crisp, sweet and savory, humble and elegant. It’s proof that a few fresh ingredients and some leftovers can become something unexpected and deeply flavorful. Whether served as a starter, a shared small plate, or the centerpiece of a plant-based meal, it delivers on texture, color, and bold flavor, with just the right touch of comfort and creativity.
Tips for Making Beet Purée Smooth and Velvety
1. Roast or Steam the Beets Thoroughly
Roasting (wrapped in foil at 400°F/200°C for 45–60 minutes) brings out their natural sweetness and softens them deeply. Steaming also works well and helps preserve the vivid color. Make sure the beets are fork-tender—completely soft—before blending.
2. Peel for Smooth Texture
After cooking and cooling slightly, remove the skins by rubbing them off with a paper towel or your hands. Leaving the skins on can lead to a gritty texture in the purée.
3. Use a High-Speed Blender
A blender will yield a much smoother purée than a food processor. Add a small amount of liquid to help it blend evenly—this can be water, olive oil, cream, coconut milk, lemon juice, or vinegar, depending on your flavor goals. Blend in stages, starting slow and increasing speed for 1–2 minutes to achieve a silky consistency.
4. Strain for Extra Smoothness (Optional)
For an ultra-smooth finish, pass the purée through a fine-mesh sieve or chinois after blending. This removes any remaining fibrous bits.
5. Add a Fat or Binder for Creaminess
Incorporating a bit of butter, cream, Greek yogurt, or olive oil enhances texture and richness. For a vegan option, use tahini or avocado oil.

Honey-Glazed Tofu with Beet Purée, Roasted Mushrooms, and Eggplant Crisp
A beautifully plated vegetarian dish that balances bold flavors and contrasting textures: crisp honey-glazed tofu, silky beet purée, roasted mushrooms, and crunchy eggplant slices. Perfect for showcasing seasonal produce in a refined and modern way.
Ingredients
- 14 oz (400 g) firm tofu
- 1 tablespoon soy sauce
- 1 tablespoon teriyaki sauce
- 1 teaspoon garlic powder
- 1 teaspoon onion powder
- 1 tablespoon baking powder
- 1 teaspoon salt
- 1 teaspoon black pepper
- 1 teaspoon paprika
- 1 teaspoon chili flakes
- 1 teaspoon dried oregano
- Sesame seeds, for garnish
- Sprouts or fresh parsley, for garnish
- 4 tablespoons honey
- 4 tablespoons soy sauce
- 4 teaspoons sesame oil
- 4 teaspoons rice vinegar
- 2 large beets, roasted or boiled
- ¼ cup + 3 tablespoons olive oil (total: 7 tablespoons or ~105 ml)
- 2 teaspoons rice vinegar
- 1½ teaspoons salt
- ½ cup broth or water (about 120 ml)
- 8 oz (225 g) wild or brown button mushrooms, sliced
- 1 tablespoon olive oil
- 1 tablespoon dried thyme
- 1 teaspoon garlic powder
- 1 tablespoon rice vinegar
- 1 tablespoon ras el hanout (Moroccan spice blend)
- 1 Japanese eggplant, sliced
- 1 to 2 tablespoons olive oil
- ½ teaspoon salt
- ½ teaspoon black pepper
Instructions
- Start with the beets, since they take the longest. Remove the stems, peel, and dice. In a bowl, toss with olive oil, salt, pepper, and oregano. Wrap tightly in foil and bake at 400°F (200°C) for 45–60 minutes, tossing halfway through, until fork-tender.
- Remove excess moisture from the tofu. Either microwave the block wrapped in paper towels for 2 minutes or gently press and let drain for at least 10 minutes.
- Slice the tofu into 1-inch cubes. In a bowl, toss with soy sauce, teriyaki sauce, garlic powder, onion powder, salt, oregano, paprika, black pepper, and chili flakes. Coat well, then add baking powder to help crisp the surface. Spread the tofu on parchment paper and bake at 400°F for 35–40 minutes, flipping halfway, until golden brown. Be careful not to burn.
- In a bowl, toss mushrooms with olive oil, ras el hanout, oregano, garlic powder, and rice vinegar. Spread on a baking sheet and bake at 400°F for 25 minutes, flipping halfway. Season to taste if needed.
- Trim the top and slice very thinly (a mandoline works great). Discard any discolored sections. Toss slices in olive oil, salt, and pepper. Spread on a baking sheet and bake alongside the mushrooms for 25–30 minutes, flipping halfway, until crisp and slightly golden.
- Once the tofu is ready, combine soy sauce, honey, and sesame oil in a small saucepan over medium heat. Cook for 3–5 minutes, stirring, until thickened enough to coat the back of a spoon. Do not overcook. Toss the tofu in the glaze just before serving. If the sauce thickens while sitting, rehydrate with a splash of soy sauce and rice vinegar.
- Once the roasted beets have cooled slightly, transfer to a blender. Add rice vinegar and begin blending. Slowly drizzle in olive oil and/or broth as you blend until the purée is smooth—this can take up to 10 minutes. Taste and adjust seasoning. If you like a bit of texture (as I do), leave it slightly rustic.
- Spoon the beet purée onto the plate first. Add 2–3 pieces of glazed tofu on top, followed by roasted mushrooms and crispy eggplant slices. Garnish with sesame seeds, fresh sprouts, or parsley. Drizzle with extra glaze if desired.
I am not a certified nutritionist and any nutritional information on dontmissmyplate.com should only be used as a general guideline.

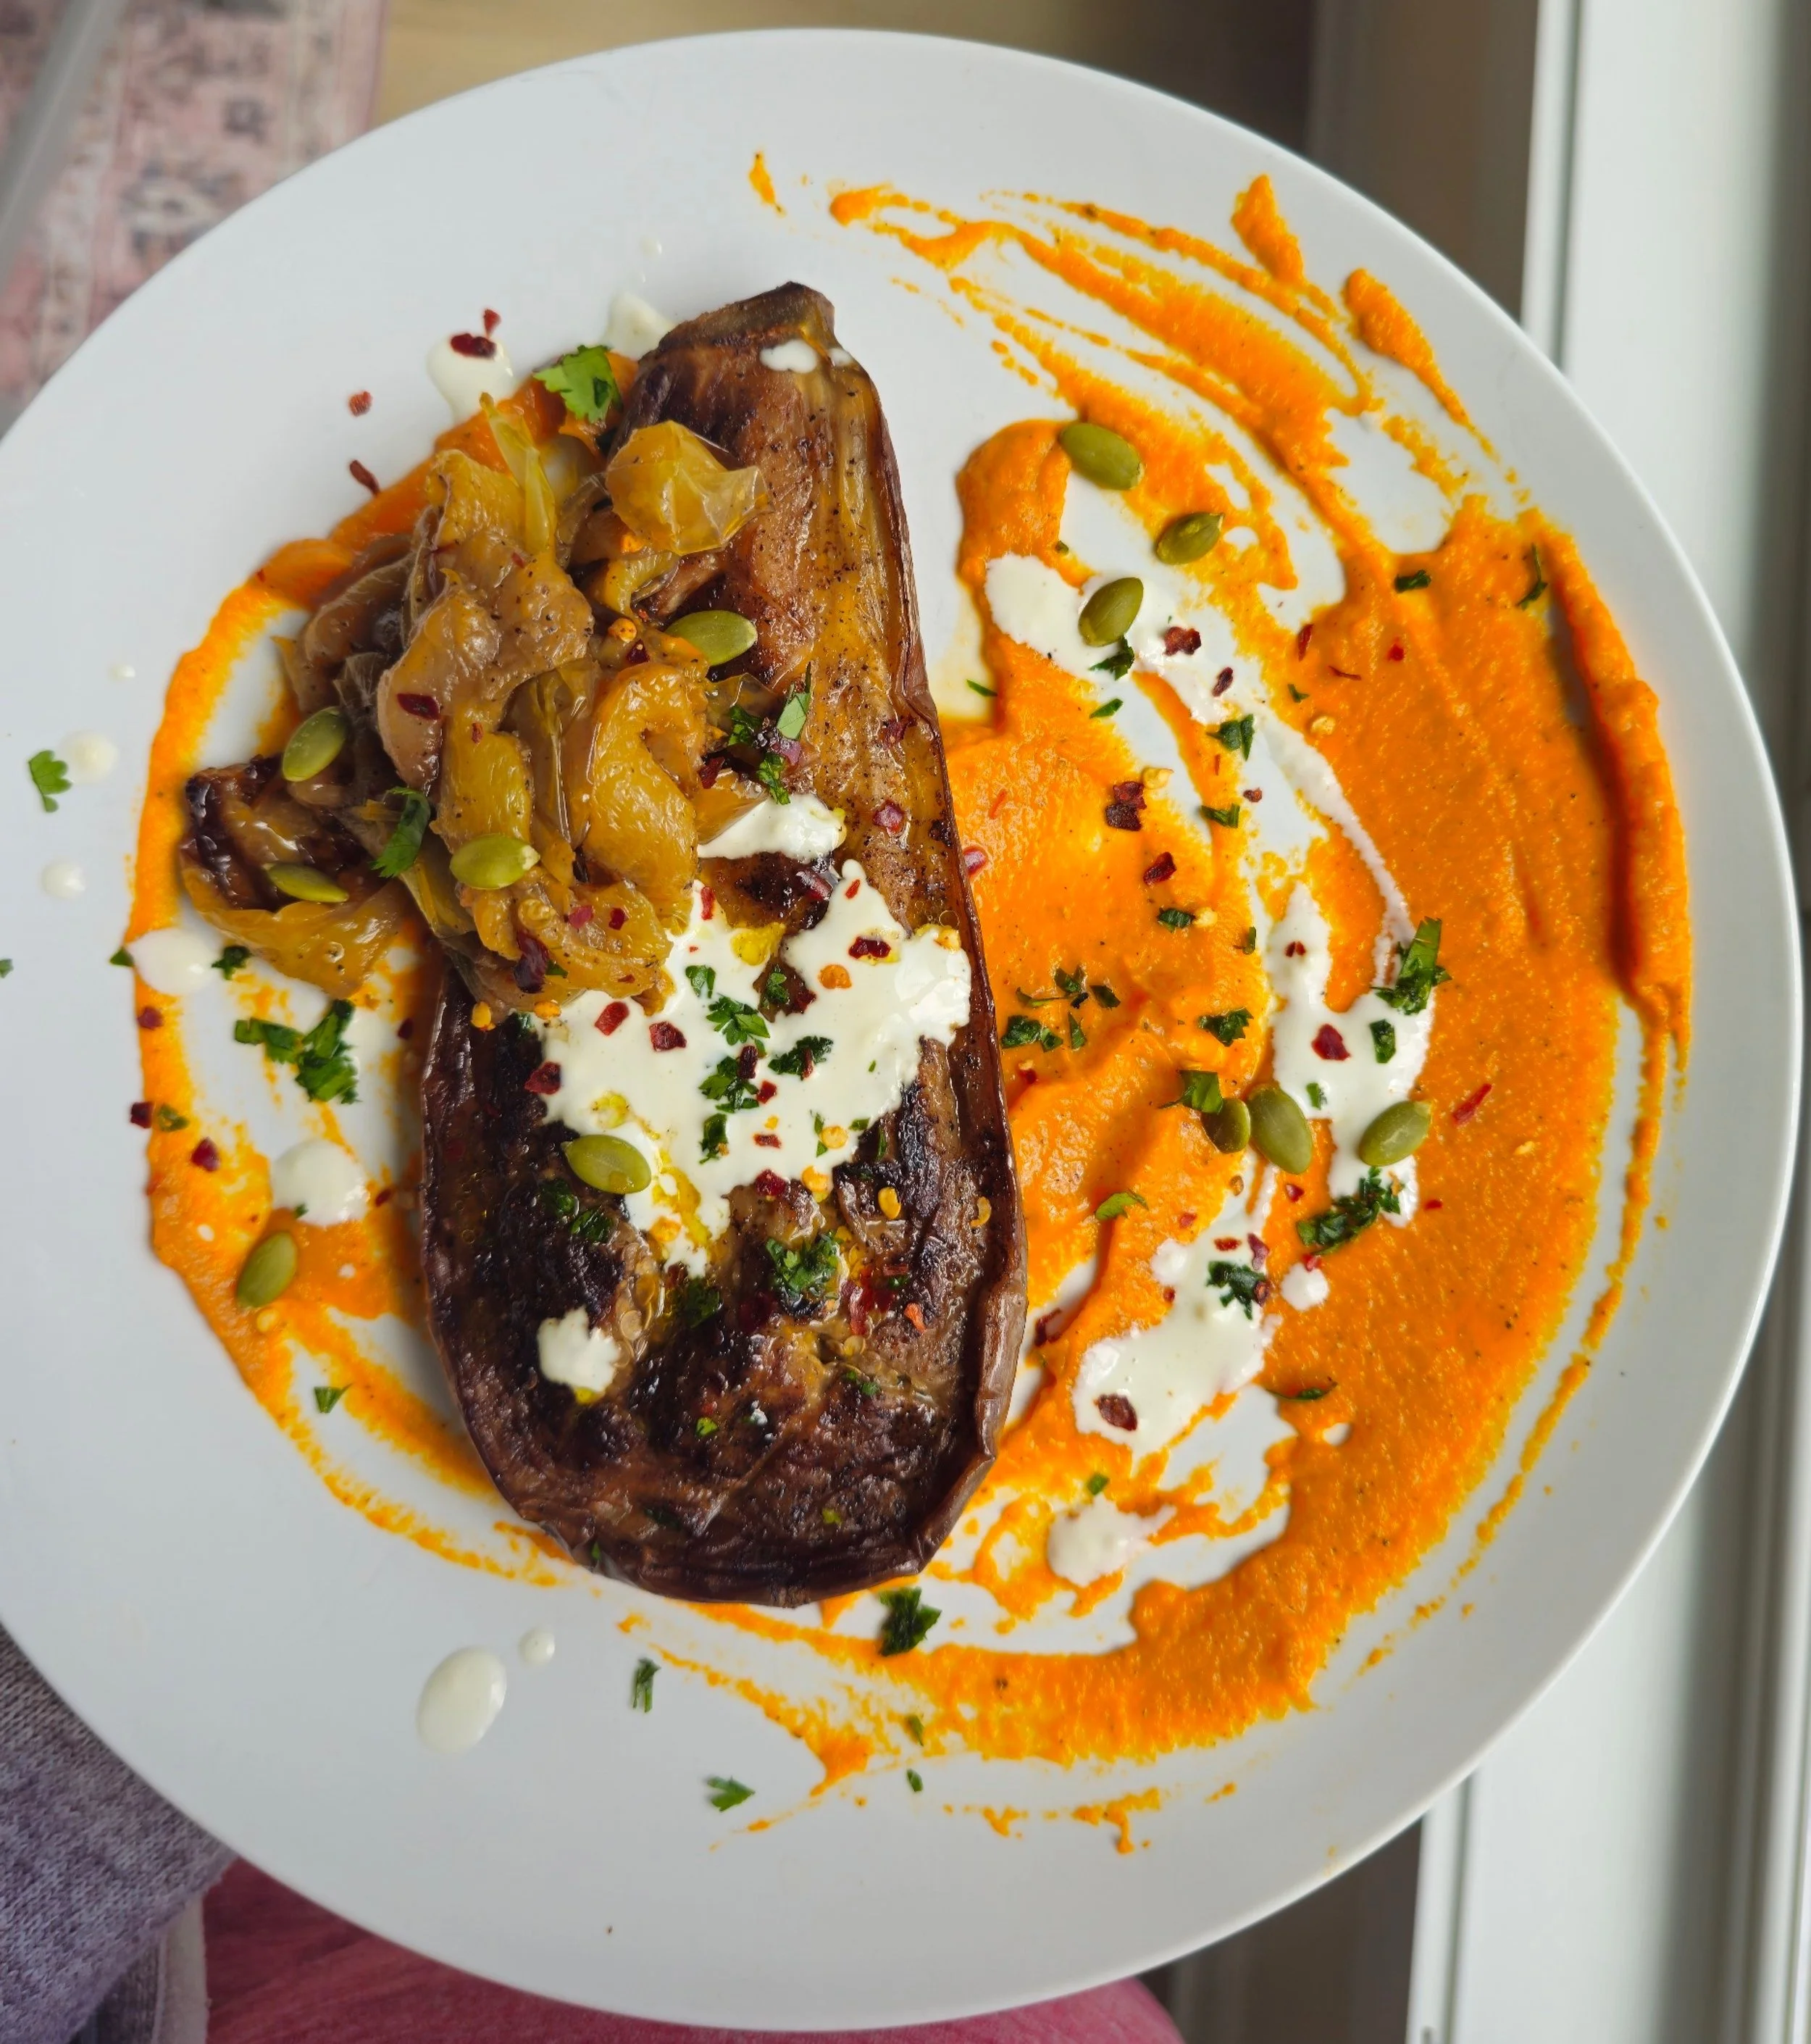
Roasted Eggplant and Blistered Peppers with Carrot and Sweet Potato Purée
As usual, this dish started at the farmers market — one of my favorite places to find inspiration. I love picking up vegetables I haven’t cooked with before, or ones I don’t use often enough. Sometimes it’s the shape or color that draws me in. This time, it was a mix of eggplants: a striking graffiti eggplant, a classic American, and some slender Japanese varieties. I didn’t end up using the Japanese eggplants in this recipe (they’ll star in something else soon), but the others became the foundation for this vibrant, plant-based plate.
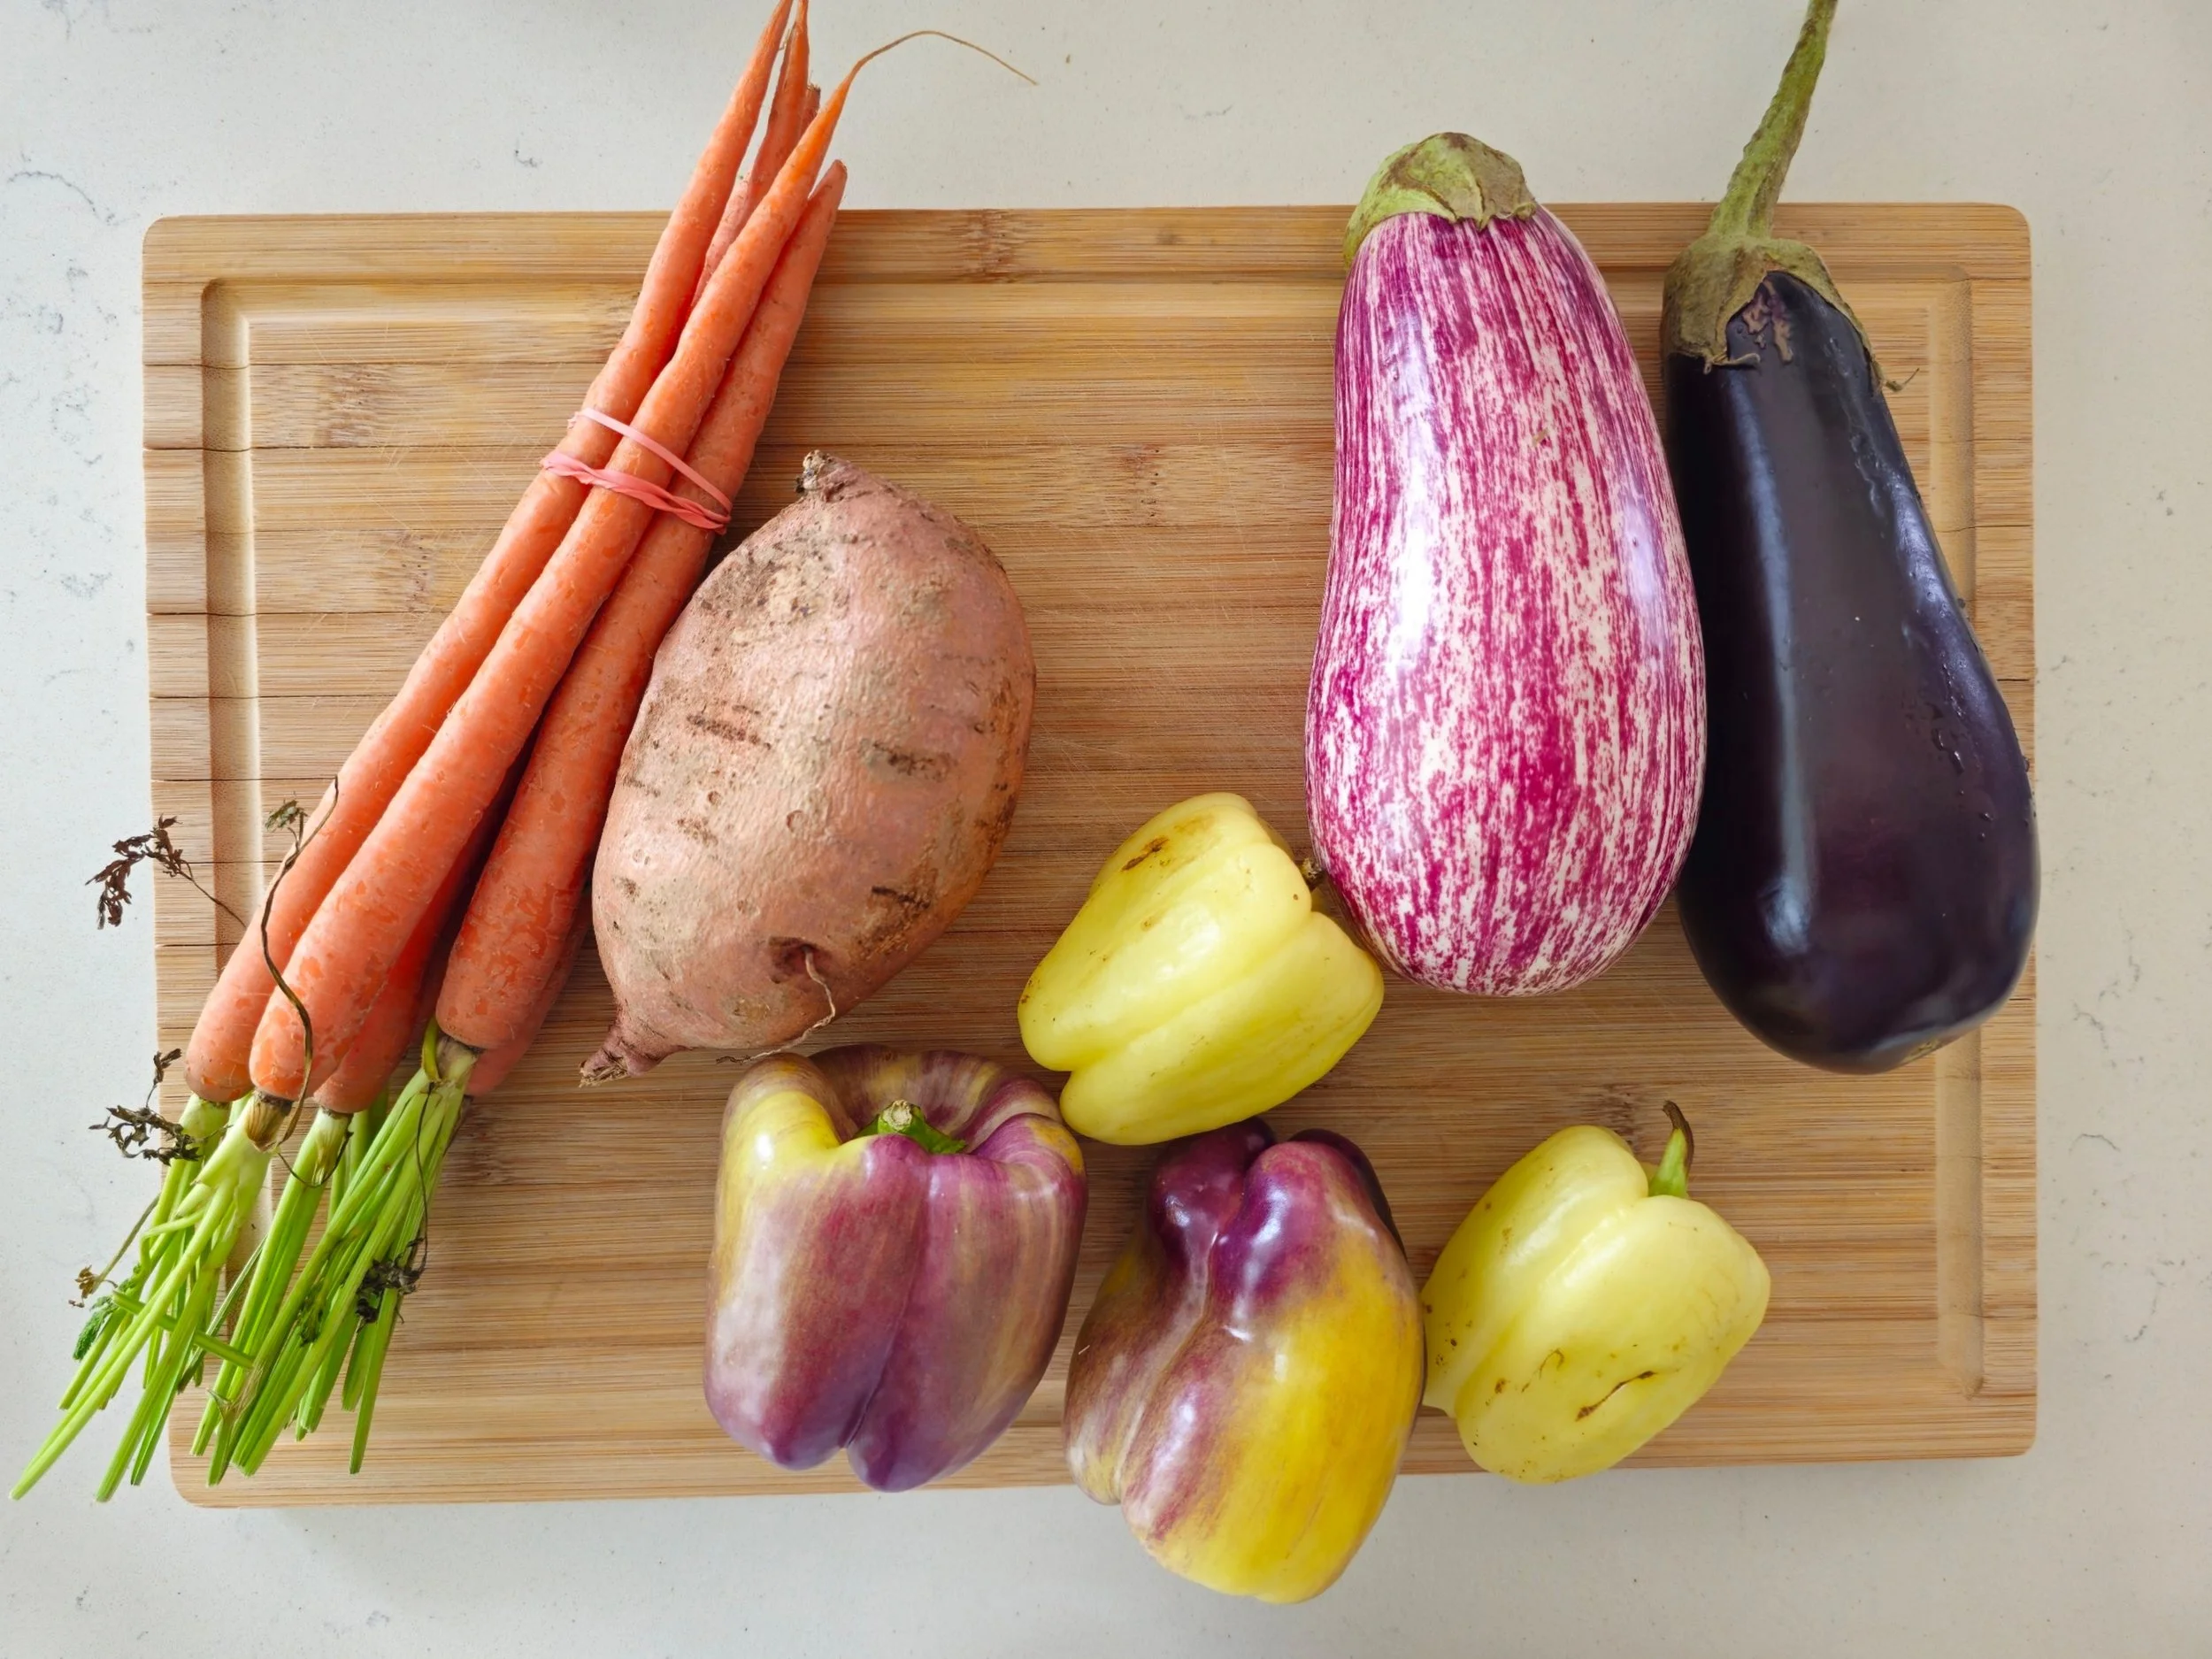
I also came across a basket of purple, white, and white bell peppers — softer, sweeter, and more delicate than the standard green or red. The white ones almost looked like frosted glass, and the purples had this beautiful, muted lavender tone. I couldn’t resist grabbing a few, even though I wasn’t sure how I’d use them yet. They ended up being perfect for blistering: their thinner skins charred quickly, adding a subtle smokiness without overpowering their natural sweetness.
I cross-hatched the eggplants and pan-seared them first to give them a beautiful char, then finished them in the oven for that perfect melt-in-your-mouth texture. I had carrots on hand and was originally going to roast them, but visually I knew they’d shine more as a purée. Since I’d also picked up a sweet potato, I blended them together for a purée that’s not only naturally sweet, but also thick enough to support the roasted vegetables on top. The blistered peppers, in all their unusual colors, add not just contrast, but personality to the finished dish.
This is a recipe that’s all about contrast: tender eggplant, creamy purée, and blistered skins, all coming together in one beautiful, nourishing plate.
Why I’m Choosing Graffiti Eggplants from Now On
I used both graffiti and American (globe) eggplants in this recipe, and the difference was clear. Graffiti eggplants are smaller with thin, purple-and-white striped skin and a naturally sweeter, creamier flesh. American eggplants are larger, darker, and have a firmer, spongier texture with a hint of bitterness. While both roasted well, the graffiti eggplants stood out for their tender texture and balanced flavor. For future versions of this dish, I’ll be reaching for graffiti eggplants — they’re perfect for plant-based recipes where texture and flavor really matter.

Roasted Eggplant and Blistered Peppers with Carrot and Sweet Potato Purée
Inspired by a farmers market bounty, this vibrant dish features charred eggplant, a silky carrot–sweet potato purée, and blistered heirloom peppers. It’s all about contrast—creamy, tender, smoky, and sweet in every bite.
Ingredients
- 2 medium to large graffiti and/or American eggplants
- Drizzle of olive oil
- 2 tablespoons coconut, sesame or peanut oil
- 2 teaspoons sea salt crystals
- 2 teaspoons black pepper
- 2 teaspoons Aromat (or all-purpose seasoning)
- 1 bunch carrots (about 4–5 medium carrots)
- 4–6 white and purple bell peppers
- 1 tablespoon + 1/8 cup olive oil
- 1 tablespoon Aromat (or all-purpose seasoning)
- 1 tablespoon black pepper
- 1 medium or large sweet potato
- 1 teaspoon cinnamon
- 1 teaspoon smoked paprika
- 1/4 teaspoon cumin
- 1/2 teaspoon oregano (dried or fresh)
- 1/4 teaspoon garlic powder
- 1–2 tablespoons milk or cream
- 1–2 tablespoons olive oil
- 1 tablespoon honey
- 1 teaspoon salt
- 1 teaspoon black pepper
- 1 tablespoon rice vinegar or lemon juice
- 2 tablespoons fresh parsley, chopped
- 1 teaspoon chili flakes (plus extra for garnish)
- Mexican crema or crema sauce, for drizzling
- Pumpkin seeds (optional), for garnish
Instructions
- Preheat the oven to 450°F (or use a grill if preferred).
- Toss the peppers with 1 tablespoon of olive oil and season with Aromat and black pepper.
- Roast on a tray until the skins blister and begin to blacken (about 15–20 minutes), turning once or twice.
- Once done, place the peppers in a bowl with the remaining olive oil. Peel off any extremely charred skin and slice.
- Peel and chop the sweet potato and carrots into chunks.
- Boil or steam until tender (15–20 minutes); test with a fork.
- Drain, then add olive oil, milk or cream, honey, salt, pepper, and spices.
- Add a splash of rice vinegar or lemon juice for brightness, if desired.
- Blend until smooth, adding more olive oil or milk for a silky texture.
- Slice the eggplants in half lengthwise.
- Score the flesh in a crosshatch pattern (deep but not all the way through).
- Drizzle and brush with olive oil, then sprinkle sea salt over the surface to help release moisture. Let sit for 10 minutes.
- Blot off excess moisture, then season with black pepper and Aromat.
- Heat coconut or peanut oil in a grill pan over medium-high heat. Sear the eggplants cut-side down for 5–7 minutes, then flip and cook the other side for 3 minutes.
- Transfer to a baking dish, cover with foil, and roast at 375°F for 25–30 minutes or until soft and golden inside. Check often, as time may vary based on eggplant size.
- Spoon a generous layer of warm carrot–sweet potato purée onto each plate.
- Place a roasted eggplant half on top.
- Drizzle with Mexican crema and layer the blistered peppers over or around the eggplant.
- Garnish with pumpkin seeds, fresh parsley, and chili flakes.
- Optional: Finish with a drizzle of olive oil or use the pepper-infused oil for extra flavor.
Notes
Serving Suggestions:
- Serve warm or at room temperature.
- This makes a beautiful vegetarian main course or a vibrant side dish alongside grilled chicken, fish, or tofu.
I am not a certified nutritionist and any nutritional information on dontmissmyplate.com should only be used as a general guideline.

Pasta Salad with Roasted Patty Pan Squash, Cherry Tomatoes and Basil
This vibrant pasta salad is a true celebration of summer produce and culinary discovery.
Lately, I’ve been exploring my local farmers market more intentionally—not just to shop, but to discover. Every trip brings something unexpected. On a recent visit, I came across three seasonal gems I’d never cooked with before. One of them was patty pan squash, a beautiful, scallop-edged vegetable that’s been cultivated since ancient times but is often overlooked today.
Curious and inspired, I turned those market finds into this golden, herb-filled summer pasta salad. Roasted patty pan becomes tender and caramelized, complemented by sweet cherry tomatoes and heaps of fresh basil. A bold yet simple vinaigrette made with avocado oil and red wine vinegar brings everything together.
This salad is sunshine in a bowl—bright, grounding, and alive with flavor. If you’ve ever hesitated to try an unfamiliar vegetable, let this be your sign. Sometimes the most unexpected ingredients lead to your next favorite dish.
Roasted Patty Pan Squash Summer Salad
Patty pan squash, with its scalloped edges and buttery texture, is an ancient variety of summer squash that deserves a fresh moment in the spotlight. When roasted, it turns golden and tender, its caramelized edges playing beautifully against sweet, blistered cherry tomatoes and fragrant handfuls of basil. Tossed with a bold avocado oil and red wine vinaigrette, this dish is light yet satisfying—perfect as a vibrant side or a nourishing meal on its own.
Lately, I’ve been wandering my local farmers market with more intention—not just to stock up, but to explore. Every visit reveals something unexpected. On a recent trip, I discovered three seasonal gems I’d never cooked with before. Patty pan squash was one of them: unfamiliar yet inviting, and steeped in history.
That curiosity turned into this sun-drenched summer salad. Roasting brings out the squash’s richness, while the tomatoes add bursts of sweetness. Fresh basil layers in brightness, and the vinaigrette ties it all together with just the right tang.
It’s a dish that celebrates simplicity, seasonality, and the joy of trying something new. If you’ve ever walked past a curious vegetable and wondered what to do with it—this is your sign to say yes.
Tips:
For extra smoky depth, roast the squash until the edges are deeply caramelized.
Harissa varies in heat—taste before adding more.
Make it a full meal by adding grilled chicken, shrimp, or tofu.


Pasta Salad with Roasted Patty Pan Squash, Cherry Tomatoes and Basil
This summer pasta salad features roasted patty pan squash, blistered cherry tomatoes, and fresh basil tossed in a smoky harissa vinaigrette. A vibrant, easy recipe perfect as a side dish or light main—seasonal, flavorful, and ready in under 30 minutes.
Ingredients
- 1 cup cherry tomatoes, halved if large
- 1 teaspoon Aromat seasoning (or your favourite all-purpose seasoning)
- ½ teaspoon black pepper
- 1 teaspoon oregano
- 1 teaspoon harissa seasoning
- 2–4 small-medium patty pan squash, sliced into wedges
- 2 tablespoons avocado oil
- 2 tablespoons Aromat seasoning
- 1 teaspoon black pepper
- 1 teaspoon garlic powder
- 1 teaspoon smoked paprika
- 1 1/2 cups short pasta, cooked (e.g., rigatoni, fusilli)
- 3 tablespoons avocado oil
- 1 tablespoon red wine vinegar
- 1 teaspoon mustard
- 1/4 teaspoon salt
- 1/4 teaspoon black pepper
- 1/8 cup fresh basil leaves, thinly sliced
- Optional toppings: crumbled goat cheese and almonds
Instructions
- Preheat your oven to 425°F (220°C).
- Slice the cherry tomatoes and toss them with avocado oil, Aromat (or all-purpose seasoning), oregano, black pepper, and harissa seasoning.
- Slice and quarter the patty pan squash into wedges. In a separate bowl, drizzle with avocado oil and season with Aromat, black pepper, garlic powder, and smoked paprika.
- Spread the tomatoes and squash on one or two baking sheets, keeping them in a single layer. Roast for 15–25 minutes, or until the squash is golden and tender and the tomatoes are soft and blistered. Keep a close eye on the tomatoes and rotate the baking sheet halfway through for even cooking.
- While the vegetables roast, cook the pasta in well-salted water until al dente. Drain and rinse with cool water to stop the cooking process.
- In a small bowl, whisk together the olive oil, vinegar, mustard, salt, and pepper.
- In a large bowl, combine the pasta and roasted patty pan squash. Drizzle in a bit of the dressing and toss gently to coat.
- On individual plates or a large serving dish, start with a few roasted tomatoes. Add the pasta and squash mixture, then drizzle with more vinaigrette. Finish with fresh basil, crumbled goat cheese, and toasted almonds.
- Serve at room temperature or chilled.
Nutrition Facts
Calories
408Fat (grams)
237 gCarbs (grams)
148 gProtein (grams)
21 gI am not a certified nutritionist and any nutritional information on dontmissmyplate.com should only be used as a general guideline.

Harissa Cauliflower Steak and Puree with Chimichurri
Cauliflower steak is proof that a humble vegetable can take center stage with the right preparation and bold flavors. Thick-cut slices of cauliflower are roasted or grilled until golden and tender, transforming into a hearty, satisfying dish. What truly sets this version apart is the use of North African spices—think warm cumin, smoky harissa, and toasted nuts like almonds or pistachios. These aromatic, earthy flavors bring depth and complexity, turning a simple cauliflower steak into a magnificent, flavor-packed experience.
Not Your Hospital Cauliflower
I remember the first time I heard of cauliflower steak. It didn’t immediately appeal to me. In fact, I only started paying attention to it when I went vegan for about nine months. Like many people, I associated cauliflower with bland, overcooked hospital food—soggy, flavorless, and uninspired. But I quickly learned how wrong I was.
When prepared the right way, cauliflower can truly shine. It becomes tender and crisp, rich with flavor, and—yes—magnificent. Especially when paired with bold seasonings like cumin, toasted almonds, or North African spice blends like harissa, cauliflower in steak form is elevated into something special. These flavors bring out its natural nuttiness and depth, turning a humble vegetable into the star of the plate.
Tips for Perfect Cauliflower Steaks
1. Choose the Right Cauliflower
Pick a large, firm head of cauliflower with tight, white florets. A larger head gives you more surface area to cut sturdy "steaks" without them falling apart.
2. Cut Carefully
Slice straight through the center to get thick steaks—about ¾ to 1 inch thick. You’ll usually get 2–3 solid steaks from one head. The rest can be roasted as florets.
3. Don't Skimp on Seasoning
Cauliflower loves bold flavors. Use a generous amount of oil and spice rub so the steaks get a nice crust. North African spices like harissa, cumin, coriander**, paprika, and a dash of cinnamon really elevate it.
4. Preheat Your Pan or Oven
Whether roasting or pan-searing, make sure your cooking surface is hot. This helps caramelize the edges and gives a golden-brown crust without overcooking the center.
5. Use a Cast-Iron Skillet (If You Can)
For the best sear, use a cast-iron skillet. It distributes heat evenly and gives the steaks a nice char.
6. Finish with Texture and Acidity
Top with toasted almonds or pistachios for crunch, and a drizzle of lemon juice or tahini sauce to brighten the dish and balance the spices.
7. Don’t Waste the Extra Bits
Any florets or broken pieces left over can be roasted alongside the steaks, tossed into a salad, or blended into soup later.
Why Chimichurri Is the Perfect Match for Roasted Cauliflower
If you're looking to take your roasted cauliflower to the next level, chimichurri is your secret weapon. This vibrant Argentinian sauce — made with fresh parsley, garlic, vinegar, olive oil, and a hint of chili — adds a zesty, herbaceous punch that beautifully complements cauliflower's earthy sweetness.
When the cauliflower comes out of the oven golden and crisp, a generous drizzle of chimichurri instantly livens up each bite. The acidity from the vinegar balances the caramelized edges, while the herbs bring a fresh, garden-bright contrast to the warmth of the roasted veggies.chili flakes.
For more cauliflower recipes, check out more on the website including Cauliflower Tumeric Chickpea Soup, Cauliflower Piccata, Fried Cauliflower 'Chicken’ Sandwich, Cauliflower Kedgeree with Farro and Raisins, Creamy Roasted Broccoli and Cauliflower Bake, and Mushroom, Broccoli and Cauliflower Stirfry.

Harissa Cauliflower Steak and Puree with Chimichurri
Elevate your veggie game with cauliflower steak—roasted or grilled until golden, then infused with bold North African spices like cumin and harissa. A hearty, flavor-packed plant-based dish that proves cauliflower is anything but bland.
Ingredients
- 1 tablespoon harissa spice
- 2 tablespoons olive oil
- 1 teaspoon garlic powder
- 1 teaspoon tomato sauce
- ½ teaspoon salt
- ½ teaspoon black pepper
- 2 cups steamed cauliflower
- 2 tablespoons olive oil
- 1 garlic clove (optional)
- Pinch of nutmeg
- Splash of rice wine vinegar
- ¼ cup water
- ½ teaspoon salt
- ¼ teaspoon black pepper (optional)
- Optional for creamier purée: 2–3 tablespoons cream and/or 2 tablespoons butter, cooked briefly with aromatics before blending
- 1 cup Italian parsley
- 3 garlic cloves
- ½ cup olive oil
- 2 tablespoon red wine vinegar
- 1 teaspoon chilli flakes
- 1 tablespoon sesame oil
- 2 tablespoons slivered almonds
- 1 tablespoon coriander seeds
- 1 tablespoon caraway seeds
- 1 tablespoon ghee
- 1 tablespoon sesame oil
- 2 tablespoons olive oil
- 2 tablespoons butter
- Splash of lemon juice
- Fresh herbs and butter (optional, for finishing)
- Water or broth (for steaming)
Instructions
- Slice thick “steaks” from the center of the cauliflower head. Set aside remaining florets for the purée.
- Steam or blanch the extra florets for 8–10 minutes until tender. Drain and cool slightly.
- While the cauliflower cools, mix the harissa spice, olive oil, garlic powder, tomato paste, salt, and pepper into a thick paste. Set aside.
- Blend the cooled cauliflower with olive oil, garlic (if using), rice wine vinegar, water, salt, pepper, and nutmeg until smooth.
- Optional creamier version: In a small pan, gently heat cream and/or butter with the garlic and a pinch of nutmeg before adding it to the cauliflower in the blender. This releases more flavor and creates a richer, silkier purée. Adjust seasoning to taste.
- Lightly toast the almonds, coriander seeds, and caraway seeds in sesame oil over medium heat for 5–6 minutes until fragrant.
- In a pan with a bit of butter or ghee, gently bloom the harissa paste for 5 minutes on low heat. Let cool slightly, then rub generously over the cauliflower steaks.
- Heat ghee, sesame oil, and olive oil in a pan. Sear the cauliflower steaks 5–7 minutes per side until golden and crispy.
- Pour a splash of water or broth around the steaks, cover, and steam for 2–3 minutes until tender.
- Plate the steaks over the cauliflower purée. Drizzle with chimichurri, top with the toasted aromatics, a squeeze of lemon, and optional fresh herbs or butter.
Nutrition Facts
Calories
280Fat (grams)
18 gCarbs (grams)
24 gFiber (grams)
6 gSugar (grams)
5 gProtein (grams)
7 gI am not a certified nutritionist and any nutritional information on dontmissmyplate.com should only be used as a general guideline.

Coconut Eggplant and Lentil Masala Curry
A cozy, plant-based curry with creamy lentils, tender eggplant, and fragrant coconut—served with spiced rice.
Hearty, fragrant, and deeply satisfying, this Eggplant and Lentil Coconut Curry is comfort in a bowl. Slow-cooked eggplant melts into a spiced lentil base, infused with ginger, garlic, and creamy coconut milk for a rich, velvety finish. Served with fluffy aromatic rice—steamed with warming spices like cardamom, cinnamon, or bay leaf—it’s a nourishing, plant-based dish that’s as cozy as it is flavorful. Whether you're looking for a weeknight dinner or a meatless showstopper for guests, this curry brings warmth and depth to any table.
Cooking eggplant is all about unlocking its rich, silky texture and ability to soak up flavor. When properly cooked, eggplant transforms from firm and spongy to tender and luscious, making it perfect for curries, stews, and roasts. Salting it beforehand can help reduce any bitterness and improve its ability to brown, while slow cooking allows it to absorb spices and sauces deeply. Whether roasted, sautéed, or simmered, eggplant acts like a sponge for bold aromatics—especially in dishes like coconut curries where it adds both body and depth.
General Tips for Cooking Eggplant
Salt First (Optional but Helpful):
Lightly salt sliced or cubed eggplant and let it sit for 20–30 minutes. This draws out excess moisture and any bitterness, helping it cook more evenly and brown better.Don’t Undercook It:
Eggplant should be fully tender when done—undercooked eggplant can be spongy or rubbery. Cook it until it’s soft and creamy inside.Use Enough Oil (or Bake/Roast):
Eggplant absorbs oil quickly, so don’t be afraid to use a bit more when pan-frying or roasting. Alternatively, brush with oil and bake at a high temperature for a healthier option.Pair with Bold Flavors:
Eggplant soaks up spices and sauces beautifully. It works especially well with garlic, ginger, curry spices, tomatoes, and coconut milk.Roast or Grill for Extra Depth:
Roasting or grilling brings out eggplant’s natural sweetness and gives it a smoky, rich flavor—perfect for dips, salads, or hearty stews.
A rich, spiced plant-based curry inspired by East African flavors, with tender eggplant, hearty lentils, and creamy coconut milk.
Combining lentils and eggplant creates a beautiful balance of texture and depth—soft, creamy eggplant melds with hearty lentils to form a rich, comforting base that’s both nourishing and satisfying. This pairing is common in many African and Indian-influenced dishes, especially in East African coastal cooking, where flavors are bold, layered, and full of warmth.
In East African cuisine, particularly along the Swahili coast, the use of spices like cumin, coriander, turmeric, and cloves is deeply rooted in centuries of trade with India and the Arabian Peninsula. Coconut milk is another hallmark of the region’s cooking, adding creaminess and a subtle sweetness that tempers the heat of spices while enriching the overall dish. When combined, lentils, eggplant, aromatic spices, and coconut create a dish that’s deeply flavorful, comforting, and rooted in tradition—perfect for sharing and savoring.


Coconut Eggplant and Lentil Masala Curry
Discover the rich, comforting flavors of lentils and eggplant simmered with creamy coconut milk—a staple in East African coastal cuisine. This nourishing plant-based dish blends hearty lentils with silky eggplant and bold, layered spices for a satisfying vegan meal inspired by African and Indian culinary traditions. Perfect for fans of coconut curry and wholesome comfort food.
Ingredients
- 1 large eggplant, chopped
- 1 small onion, chopped
- 1 teaspoon ground ginger
- 1/2 teaspoon paprika
- 2 teaspoons masala curry powder
- 1 teaspoon oregano
- 1 teaspoon salt (plus 1 teaspoon extra to remove water from eggplant)
- 1 teaspoon chilli flakes
- 1 can coconut, full cream
- 1/2 cup green lentils
- 2 cups chicken broth
- 1 teaspoon black pepper
- 1/4 teaspoon cumin
- 1/2 teaspoon Royco Usavi mix, chicken (optional)
- 2 bay leaves
- 1/2 cup fire-roasted tomatoes, diced
- 3 garlic cloves
- 2 tablespoons ghee
- 2 tablespoons olive oil
- 2 tablespoons sesame seed oil
- 1 tablespoon soy sauce
- 1 tablespoon red wine vinegar
- 1 teaspoon fish sauce
- 1 teaspoon rice vinegar
- 2 tablespoons + 1/2 cup fresh cilantro, roughly chopped (optional)
- 1/3 cup silvered almonds (optional)
Instructions
- Slice the eggplant in half and sprinkle with 1 teaspoon salt to draw out excess moisture. Let sit, then pat dry when ready to prepare.
- Peel and mince the garlic cloves. Roughly chop your washed parsley.
- In a separate bowl, combine your spices: ginger, masala curry powder, paprika, oregano, salt, pepper, chili flakes, and any other spices.
- Chop the eggplant into bite-sized pieces and sauté with the sesame oil until softened and golden brown. Remove from the pan and set aside.
- In the same pot, melt ghee over medium heat. Sauté the onion and garlic for 2–3 minutes, or until the onions are translucent. Add the spice mix and stir to bloom the flavors for about 1 minute (add a bit more ghee or the olive oil if needed.
- Deglaze the pot with soy sauce. Add the tomato, red wine vinegar, and lentils. Stir and cook for 1–2 minutes, then pour in the broth to cover and bring to a boil. Reduce heat and simmer for about 15 minutes, or until the lentils are softened.
- Add the eggplant back to the pot, followed by the coconut milk, bay leaves and 2 tablespoons parsley. Simmer for another 10 minutes.
- Finish with a splash of fish sauce and rice vinegar. Season to taste. Remove from heat and let sit for 2–3 minutes.
- Serve topped with extra parsley, sliced almonds, and a scoop of aromatic rice.
Nutrition Facts
Calories
378Fat (grams)
24.9 gCarbs (grams)
27.5 gFiber (grams)
12.6 gSugar (grams)
8.8 gProtein (grams)
10.2 gI am not a certified nutritionist and any nutritional information on dontmissmyplate.com should only be used as a general guideline.

Blackened Pan-Seared Trout with Herbed Yogurt Sauce
Marinated Alpine Trout, Blackened Warm with African Spices, Served with Creamy Dill Yogurt Sauce
Bold, soulful, and full of contrast, this Blackened (Alpine) Trout with Herbed Yogurt Sauce is a true flavor celebration. The trout is first marinated for hours in a blend of African-inspired spices, allowing the warmth of paprika, cumin, and subtle heat to deeply infuse the flesh. Just before searing, it’s pressed with fresh dill, which blackens beautifully—creating a crispy, herb-crusted finish that’s both rustic and elegant. Served with a cool, yogurt sauce brightened with lime and fresh herbs, this dish strikes a perfect balance of spice, creaminess, and charred depth. Ideal for a dinner that feels both homey and elevated.
Tip for Perfectly Cooked Trout
Start skin-side down in a medium-hot, oiled pan and don’t move it. Alpine trout (also known as Arctic Char) has delicate flesh and naturally high fat, so let it sear undisturbed for 3–4 minutes until the skin is crisp and releases easily. This locks in moisture and prevents sticking, but you’ll want to keep an eye out to prevent the oil and butter form burning. Baste the fish, for 2-3 minutes, then flip it gently and finish cooking for another 1-2 minutes on the other side. The fish is best when just cooked through and still tender—overcooking will mute those beautiful spices and dry it out.
Alpine Trout (Arctic Char) vs. Salmon vs. Rainbow Trout: What’s the Difference?
If you’ve never cooked with Alpine trout or Arctic char before, you’re in for a treat. Often called a hidden gem of the seafood world, it’s a cousin to both salmon and rainbow trout, and brings the best of both to your plate. But how does it compare?
| Fish | Flavor | Texture | Fat Content | Best Cooking Methods | Pairs Well With |
|---|---|---|---|---|---|
| Arctic Char (Alpine Trout) | Mild, buttery, slightly sweet | Tender, flaky | Medium-high | Pan-searing, roasting, grilling | Bold spices, brown butter, citrus, herbed yogurt |
| Salmon | Rich, stronger, slightly oily | Firm, meaty | High | Grilling, baking, smoking | Dill, mustard, sweet glazes, creamy sauces |
| Rainbow Trout | Light, slightly nutty | Soft, delicate | Low-medium | Pan-frying, baking whole, steaming | Lemon, garlic, herbs, butter |
This dish is the perfect canvas for African spices like cumin, paprika, coriander, and berbere—flavorful but not overpowering. Its buttery richness holds up to a crispy sear and balances beautifully with the tangy herbed yogurt sauce I serve alongside.
If you can’t find it, rainbow trout is a great substitute for a lighter version, while salmon will give you a heartier, more robust twist.

Blackened Pan-Seared Trout with Herbed Yogurt Sauce
This bold and easy fish recipe features Alpine trout marinated in African-inspired spices like paprika, cumin, and coriander. Seared with fresh dill for a crispy herb crust, it’s served with a creamy yogurt sauce brightened with lime and fresh herbs. Perfectly balanced, flavorful, and ready in under 30 minutes — a healthy seafood dish that feels both elevated and approachable.
Ingredients
- ½ cup plain Greek yogurt
- 1 tablespoon olive oil
- Juice of ½ lime or lemon
- 1 teaspoon garlic powder
- 1 tablespoon fresh parsley, chopped (or fresh rosemary)
- 1 tablespoon fresh cilantro, chopped (or fresh thyme)
- ½ teaspoon salt (adjust to taste)
- 1 teaspoon black pepper
- Optional: 1-2 teaspoons soy sauce
- 1 large Alpine Trout (Arctic Char) fillet
- 1 teaspoon herbed salt
- 1 teaspoon black pepper
- 2 tablespoons olive oil
- 1 garlic clove, grated or finely minced
- Optional: 1 teaspoon garlic powder
- 1 teaspoon ground coriander
- ½ teaspoon ground cumin
- ½ teaspoon smoked paprika
- Juice of ½ lime or lemon
- Zest of 1 lime or lemon
- ¼ teaspoon cayenne pepper
- ½ teaspoon ground ginger
- 1/4 teaspoon ground cloves
- Optional: ½ teaspoon Berbere spice
- 1 sprig of fresh dill
- 1 fresh sprig of thyme
- 2-4 tablespoons butter
- 2 tablespoons olive oil
- 2-3 lime/lemon wedges
- Optional: Crushed almonds and chilli flakes to garnish
- 2 cups arugula
- 1/3 cup broccoli sprouts
- 1/2 cup shredded carrots
- 2-3 tablespoons olive oil
- 1/4 cup chopped almonds
- 1/2 avocado, diced
- 1 tablespoon feta cheese
- 1 tablespoon raisins
- 1 tablespoon pumpkin seeds
- 1 teaspoon salt
- 1 teaspoon black pepper
- Optional: 1 tablespoon nutritional yeast
Instructions
- Pat the fish dry thoroughly for a crispier finish. Season both sides with herbed salt and black pepper (especially if you plan to eat the skin).
- In a small bowl, combine olive oil, garlic powder, minced garlic, coriander, cumin, paprika, lime juice, and zest. Add cayenne pepper, ginger, and optionally cloves or Berbere spice. Mix well.
- Coat the fish fillet evenly with the marinade. Add extra olive oil as needed to cover the surface. Optionally, tuck in fresh dill on both sides. Cover and refrigerate for 15–20 minutes.
- In a separate bowl, mix yogurt with olive oil, lime juice, herbed salt, black pepper, garlic (powder or fresh), and your choice of fresh herbs (e.g., parsley, cilantro, rosemary, thyme). Add a splash of soy sauce for umami, if desired. Chill until ready to serve.
- In a large bowl, combine arugula, broccoli sprouts, and shredded carrots. Drizzle with olive oil and toss. Top with avocado, feta, raisins, pumpkin seeds, salt, pepper, and optional nutritional yeast. Toss again and set aside.
- Heat olive oil in a pan over medium-high heat. Once hot, place the fillet skin-side down and sear for 1–2 minutes. You can drizzle any remaining marinade over the fish at this stage.
- Tip: For a cleaner taste, remove the fresh dill and gently scrape off excess seasoning. For a bolder, charred finish, leave it on.
- Add 2 tablespoons of butter to the pan along with any leftover fresh herbs. Watch your heat carefully to avoid burning the fats. Lower the heat if necessary. Use a spoon to baste the melted butter over the fish as it cooks.
- Flip the fillet carefully to crisp up the flesh side. Cook until the fish is just done—firm and opaque throughout—then remove from the heat.
- Remove the yogurt sauce from the fridge. Add a dollop to your plate or serving platter. Lay the cooked fish over the sauce. Serve with your salad and lemon or lime wedges on the side.
- Top the fish with a spoonful of extra yogurt, crushed almonds, and a sprinkle of chili flakes for heat and crunch.
I am not a certified nutritionist and any nutritional information on dontmissmyplate.com should only be used as a general guideline.

Shepherd’s Pie with Oxtail and Sweet Potato
Oxtail is a prized ingredient in many cuisines, celebrated for its tender, fall-off-the-bone texture and its ability to develop a rich, flavorful gravy when braised low and slow. Swapping out regular mashed potatoes for sweet potatoes adds a natural sweetness that perfectly complements the deep umami of the oxtail, while warm spices like cinnamon, garlic, and black pepper enhance the overall depth of flavor.
If you're looking for a foundational recipe or want to start with a classic preparation, be sure to check out the Oven-Braised African Oxtail Stew or the Oxtail and Butternut Stew—both are great bases for this dish.
Shepherd’s Pie is a timeless comfort food, traditionally made with ground lamb and topped with creamy mashed potatoes. In this bold twist, I’m elevating the classic by using slow-braised oxtail and a silky sweet potato mash. The result? A deeply satisfying dish that combines the comforting essence of traditional Shepherd’s Pie with the rich, indulgent flavors of slow-cooked oxtail.
This dish is a fusion of African and Caribbean culinary traditions, blending familiar comfort with bold innovation. Whether you're a longtime fan of Shepherd’s Pie or just looking for a new way to enjoy oxtail, this recipe is a must-try. With its savory oxtail gravy and naturally sweet, golden-baked sweet potato topping, it’s a next-level comfort food you’ll want to make again and again.


Shepherd’s Pie with Oxtail and Sweet Potato
This Shepherd’s Pie gets a bold and flavorful twist with tender, slow-braised oxtail and a creamy sweet potato topping. The result is a perfect blend of rich, savory oxtail gravy and the natural sweetness of mashed sweet potatoes baked to golden perfection.
Ingredients
- 6 cups cooked, drained, and deboned oxtail stew (adjust depending on baking dish and servings)
- 3 large sweet potatoes, peeled and cubed
- 4 tablespoons unsalted butter, melted
- ½ cup heavy cream or half-and-half
- ¼ teaspoon nutmeg
- ¼ teaspoon cinnamon
- ½ teaspoon oregano or thyme
- ½ teaspoon black pepper
- ½ teaspoon garlic powder
- ½ teaspoon salt
- ¼ cup grated Parmesan cheese
- Optional: 1 egg, beaten
- Optional: fresh feta cheese and fresh parsley
- Optional: seasoned flour or cornstarch (about ⅛ cup)
Instructions
- Peel and chop the sweet potatoes. Place them in a large pot of boiling water and cook until fork-tender, about 15–20 minutes.
- While the potatoes cook, lightly grease a 9×13-inch baking dish. Add the cooked oxtail stew and press it down gently with a spatula so it forms an even layer.
- If your stew still contains excess fat or liquid, lightly dust the top with a small amount of cornstarch or seasoned flour to help absorb the fat and thicken the filling as it bakes.
- Drain and mash the sweet potatoes. Mix in the melted butter, half the cream, Parmesan cheese, spices, salt, and pepper. Stir until smooth. If using, mix in the optional beaten egg for extra structure.
- Transfer the mash to a piping bag and pipe it in lines across the surface of the oxtail filling. Smooth gently with a spatula, then drag a fork across the surface to create ridges for browning.
- Sprinkle a little extra Parmesan cheese on top. Bake at 375°F (190°C) for about 25 minutes, then broil 2–3 minutes until the top is golden and slightly crisp.
- Garnish with optional feta cheese, parsley, or a drizzle of spiced oil. Serve hot.
Notes
- Oxtail can release a lot of fat. Drain the stew well before assembling the pie.
- The optional flour or cornstarch helps absorb excess oil and keep the filling cohesive.
- The egg in the mash helps the topping hold its shape if piping.
- You can find the full oxtail stew recipe here - https://youtu.be/WpDUkzeJm4g
I am not a certified nutritionist and any nutritional information on dontmissmyplate.com should only be used as a general guideline.
Shepherd’s Pie Tips for Rich Meats
I walked here so you can run! It’s an unusual recipe, but honestly worth a try.
1. Skim the Fat
Oxtail is incredibly flavorful but also quite fatty. After braising, let the stew cool slightly and skim off excess fat from the top. You can even refrigerate it for an hour or so—the fat will solidify, making it easier to remove.
2. Shred the Meat Well
Once cooked, remove the oxtail pieces, shred the meat, and discard any excess fat or connective tissue. This helps keep the filling tender, not greasy.
3. Balance the Richness
Counterbalance the rich oxtail with acidity or brightness. Add a splash of red wine vinegar, Worcestershire sauce, or a bit of lemon juice to the gravy to cut through the richness. Even a spoonful of tomato paste during braising helps with depth and balance.
4. Use a Thick Gravy
A watery filling will soak into the mash and ruin the texture. Make sure your gravy is thick enough to hold its shape, reduce it until it coats the back of a spoon. A little flour or cornstarch slurry can help if needed.
5. Choose a Sturdy Mash
Sweet potato mash works beautifully here, but keep it thick, not too creamy or runny. A looser mash can sink into the filling. A touch of butter and a splash of cream is enough, don't overdo it.
6. Add Texture on Top
For a golden crust, rough up the surface of your mash with a fork, then brush lightly with butter or egg wash before baking. You can also sprinkle breadcrumbs or grated cheese for added crunch and depth.
7. Bake Until Bubbling
Don’t just warm it through, bake until the top is golden and the filling is bubbling around the edges. This helps marry the layers and gives that classic Shepherd’s Pie texture.

Zimbabwean Finger Millet Porridge (Sadza ReZviyo) with Beef Stew
In Zimbabwean cuisine, sadza rezviyo (finger millet porridge) is a beloved staple, cherished for its deep, earthy flavor and rich nutritional benefits. Unlike traditional maize-based sadza, this version is made with finger millet (zviyo), an ancient grain packed with fiber, iron, and a nutty taste that pairs beautifully with hearty stews.
To complete this comforting meal, we’re serving it with nyama (beef stew)—slow-cooked to perfection with aromatic spices, tomatoes, and onions. The result is a wholesome, satisfying dish that embodies the warmth of Zimbabwean home cooking. Whether you’re reconnecting with your roots or exploring African flavors for the first time, this recipe is a must-try!

Zimbabwean beef stew, or nyama, is a comforting and flavorful dish that brings together tender beef, aromatic spices, and rich, savory gravy. Slow-cooked to perfection, this hearty stew features ingredients like tomatoes, onions, garlic, and fragrant herbs, creating a depth of flavor that pairs beautifully with traditional sides. Whether served with sadza rezviyo (finger millet porridge), rice, or dumplings, this dish is a staple in Zimbabwean households, offering warmth and nourishment in every bite. Perfect for family meals or special gatherings, this beef stew is a true celebration of Zimbabwean home cooking.


White Sadza vs. Zviyo (Finger Millet Sadza)
Both white sadza and zviyo (finger millet sadza) are popular staples in Zimbabwean cuisine, but they differ in terms of their base ingredients, texture, nutritional content, and cultural significance.
1.. Base Ingredient
White Sadza: Made from maize (corn) meal, white sadza is the most common form of sadza in Zimbabwe. The maize is ground into a fine powder, which is then cooked into a thick, smooth porridge.
Zviyo (Finger Millet Sadza): Made from finger millet, zviyo is a gluten-free grain that is milled into a finer flour. Finger millet is often used in traditional African dishes due to its rich nutritional profile and slightly nutty flavor.
2. Nutritional Content
White Sadza: While maize sadza provides a good source of carbohydrates, it is lower in nutritional value compared to finger millet. It lacks the higher levels of iron, calcium, and fiber found in finger millet.
Zviyo (Finger Millet Sadza): This is a highly nutritious alternative, packed with iron, calcium, magnesium, and dietary fiber. Finger millet is also considered to be more digestible and easier on the stomach, making it a great choice for individuals looking to boost their nutrient intake.
3. Texture and Flavor
White Sadza: The texture is typically smooth, firm, and dense, with a mild, neutral flavor that easily complements rich stews and vegetables.
Zviyo (Finger Millet Sadza): The texture is often a bit more grainy and hearty than white sadza. Its flavor is slightly **earthy and nutty**, offering a more complex taste that pairs well with savory dishes, especially those rich in spices.
4. Cultural and Regional Significance
White Sadza: As the more commonly consumed form of sadza in Zimbabwe, white sadza is seen as a symbol of comfort and is typically served with a variety of meats, vegetables, and stews.
Zviyo (Finger Millet Sadza): Traditionally consumed in rural areas, finger millet sadza is often considered a healthier option, especially for those with dietary restrictions or seeking to add more nutrients to their diet. In some regions, it’s also regarded as a more traditional meal.
Both types of sadza have their place in Zimbabwean cuisine, and the choice between them largely depends on personal preference and health considerations. Whether you enjoy the smooth comfort of white sadza or the nutrient-packed punch of zviyo, each offers a delicious base for a variety of flavorful dishes!


 with Beef Stew")
Zimbabwean Finger Millet Porridge (Sadza reZviyo) with Beef Stew
Sadza rezviyo (finger millet porridge) is a Zimbabwean staple with a deep, earthy flavor and rich nutrients. Paired with nyama—a slow-cooked beef stew with aromatic spices, tomatoes, and tender short ribs—this dish is comforting and flavorful. Simmered with herbs, chili, and a touch of red wine, the stew’s bold flavors perfectly complement the wholesome, nutty taste of sadza rezviyo. A must-try for those reconnecting with their roots or exploring African cuisine!
Ingredients
- 1 ½ lbs beef stew cubes
- 1 ½ lbs chuck short ribs
- 4 beef bouillon cubes
- 3–4 cups water
- 1/8 cup Worcestershire sauce
- 1/8 cup red wine or cooking wine
- 1 bunch kale, chopped
- 1 ½ yellow onions, diced
- 2 tomatoes, chopped
- 1 chili pepper, finely chopped
- 3 spring onions, chopped
- 2 garlic cloves, minced
- 2 tablespoons fresh thyme
- 2 tablespoons butter
- 2 tablespoons olive oil (more if needed)
- 1 tablespoon Royco Usavi Mix Beef (optional, all-purpose soup seasoning)
- 1 tablespoon dried oregano
- 1 tablespoon black pepper
- 1 tablespoon seasoning salt
- 1 tablespoon smoked paprika
- 1 tablespoon chilli flakes
- 1- 1 1/2 cups toasted rapoko (finger millet), millet, or sorghum meal (adjust as needed)
- ½ cup cold water
- 1 tsp seasoned salt
- 2 cups hot water (adjust as needed)
Instructions
- Prepare your vegetables by chopping the onions, tomatoes, garlic, and kale, and measure out your ingredients.
- Heat your Dutch oven or large pot, and melt your fats. Add the beef and cook until browned on both sides, then remove and set aside.
- Add the onions and cook for 1–2 minutes until translucent. Follow with the garlic and cook for another minute.
- Add the seasonings and spices, cooking for another 1–2 minutes to activate the flavors. Add a little extra oil if needed. Deglaze the pot by adding your liquids, scraping up the browned bits.
- Add the tomatoes and cook for another 2–3 minutes, then stir in the bouillon cubes.
- Return the beef to the pot, then add water in proportion to the bouillon cubes.
- Bring to a boil, then reduce to a simmer for 1 ½ – 2 hours, or until the meat is tender.
- Season with salt and pepper to taste, then add the kale. Stir and allow it to wilt. You can also add more chili flakes if desired.
- Simmer for 5 minutes, then remove from heat. Turn your attention to the Sadza.
- In a non-stick or steel pot, use a wooden spoon or mugoti to mix the cold water with 1/2 cup of millet until a smooth paste forms. Add your seasoning.
- On medium to medium-high heat, gradually add water in 1/2-cup increments while stirring constantly until the porridge begins to simmer violently, or kwata. As the porridge thickens, switch to a whisk or musika to remove or prevent lumps—smoother porridge results in smoother sadza and a better eating experience!
- Cover the pot with a lid and let the porridge cook for 15–20 minutes on low-medium heat.
- Once the porridge is cooked, gradually add the remaining millet, 1/2 cup at a time, using the whisk or musika to incorporate the dry meal into the dough. Stop when you reach your preferred consistency—thick but not overly dry. For a softer texture, add less millet.
- Once fully combined, switch to the wooden spoon or mugoti. Using a figure-eight motion (kumona), aerate and knead the dough until it becomes smooth, slightly sticky, and clings to the spoon.
- Reduce the heat to low, partially cover the pot, and let it rest for about 5 minutes before serving.
- For an extra step, use cling wrap to shape the sadza into a smooth ball or oval before serving.
I am not a certified nutritionist and any nutritional information on dontmissmyplate.com should only be used as a general guideline.

Spaghetti Squash with Creamed Beet Greens and Roasted Mushrooms
If you're looking for a delicious, gluten-free alternative to pasta, spaghetti squash is a game-changer. This versatile winter squash transforms into tender, noodle-like strands once roasted, making it perfect for soaking up sauces, tossing with fresh ingredients, or enjoying on its own with a simple drizzle of olive oil. Not only is it low in calories and carbs, but it's also packed with fiber, vitamins, and antioxidants. Whether you're trying to eat healthier or just want to mix up your meals, spaghetti squash is a tasty and satisfying option worth adding to your kitchen rotation.

Roasted Mushrooms with Basil: A Flavorful Upgrade
Roasted mushrooms bring a rich, savory depth to any dish, and when paired with fresh basil, they add an aromatic, slightly sweet contrast that elevates the flavors of spaghetti squash. As the mushrooms roast, they develop a deep umami flavor with crispy edges and a tender bite, making them the perfect complement to the squash’s delicate texture. Tossed with olive oil, garlic, and a sprinkle of sea salt, these mushrooms become irresistibly flavorful, while the fresh basil adds a burst of brightness. Together, they turn this simple dish into a satisfying, restaurant-quality meal.

Beet Greens: A Nutrient-Packed, Flavorful Boost
Beet greens are often overlooked, but they’re a powerhouse of nutrients and add a beautiful pop of color to any dish. Rich in vitamins A, C, and K, along with iron and calcium, these leafy greens bring both health benefits and a mild, earthy flavor. When sautéed and combined with a creamy sauce, the beet greens soften into a velvety texture that beautifully balances the roasted mushrooms and spaghetti squash. Their slight bitterness is mellowed out, making them a perfect addition to this dish, creating a harmonious blend of flavors and textures that’s as nourishing as it is delicious.

A Cozy, Flavor-Packed Dish
If you’re looking for a satisfying, veggie-forward meal that’s both comforting and nutritious, this **Spaghetti Squash with Creamed Beet Greens and Roasted Mushrooms** is the perfect choice. It’s a delicious balance of earthy, roasted mushrooms, silky creamed greens, and tender spaghetti squash that twirls beautifully on your fork—no pasta required!
Roasting the squash enhances its natural sweetness, while the mushrooms develop a deep umami richness. The creamed beet greens tie everything together with their vibrant color and luscious texture, making this dish feel indulgent yet wholesome. Whether you’re looking for a light but hearty dinner or a creative way to incorporate more vegetables into your meals, this recipe delivers on both flavor and satisfaction.
Serve it as a meatless main or alongside your favorite protein for a complete meal. Either way, get ready to enjoy a dish that’s simple, nourishing, and packed with bold flavors!

Spaghetti Squash with Creamed Beet Greens and Roasted Mushrooms
If you’re looking for a satisfying, veggie-forward meal that’s both comforting and nutritious, this Spaghetti Squash with Creamed Beet Greens and Roasted Mushrooms is the perfect choice. It’s a delicious balance of earthy, roasted mushrooms, silky creamed greens, and tender spaghetti squash that twirls beautifully on your fork—no pasta required!
Ingredients
- 1 medium to large spaghetti squash
- 2 teaspoons salt
- 2 teaspoons black pepper
- 1/4 cup water
- 2 tablespoons olive oil
- 8 oz Bella mushrooms
- 2 teaspoons seasoned salt
- 2 teaspoons black pepper
- 2 teaspoons onion powder
- 2 teaspoons garlic powder
- 2 teaspoons oregano
- 4 tablespoons olive oil
- 1 bunch beet greens
- 1 tablespoon butter
- 2 tablespoons olive oil
- 1 teaspoon salt
- 1 teaspoon black pepper
- 1 teaspoon cumin
- 1 teaspoon chilli flakes
- 1 cup half-and-half or heavy cream
- 1/4 teaspoon cornstarch (if using half-and-half)
- 1 tablespoon soy sauce
- 1/3 large yellow onion, chopped
- 2–3 garlic cloves, minced
- 2 green onions, chopped
- 2 tablespoons fresh Thai basil (plus extra for garnish; smaller leaves preferred)
- 2 tablespoons fresh sage, chopped
- Optional:Parmesan cheese for garnish
- Optional: 1 teaspoon spaghetti squash or pumpkin seeds per serving (or substitute with walnuts)
Instructions
- Microwave the spaghetti squash for 4–6 minutes if large, or 1–2 minutes less if medium. Set it aside to cool slightly before cutting it in half. In the meantime, turn your attention to the other vegetables you’ll be roasting.
- Drizzle the mushrooms with olive oil, then season with seasoned salt, black pepper, garlic powder, oregano, and onion powder. Set aside.
- Preheat the Oven and turn the it on to 400°F.
- Using a sharp chef's knife, hold the squash steady with a paper towel or kitchen cloth. Pierce down vertically in the center and push down slowly and carefully lengthwise to cut it open on one side. Turn it around and repeat the process on the other side. You’ll feel some resistance, but microwaving the squash softens it enough to cut through.
- Scoop out the seeds with a spoon and transfer them to a small bowl. **Optional:** Pat them dry, drizzle with oil, and roast them separately with the mushrooms and squash until toasted and crunchy—just be careful not to burn them! This reduces waste and adds texture to your final dish.
- Drizzle the squash with olive oil and brush it all over before seasoning with salt and black pepper. Line a baking tray with parchment paper and place both halves face-down.
- Place the squash on the middle rack and the mushrooms on the top rack. Roast the *mushrooms for 35 minutes and the squash for 45 minutes.
- Halfway through, flip the mushrooms with a spatula. For the squash, check to ensure it isn’t burning. When 10 minutes remain add 1/3 cup of water to the tray, ensuring the squash sits in the pooled water to steam rather than burn in the final stage of cooking. Remove both when done.
- Prepare the creamed beet greens. This will serve as the sauce for the spaghetti squash and mushrooms. Crush and mince the garlic, then place it in a bowl. Chop the yellow onion and add it to the bowl.
- Remove basil leaves from their stems, roll them tightly, and slice thinly (a technique called chiffonade..
- Trim the roots from the green onions, then finely chop both the white and green parts.
- Roll the sage leaves, slice them thinly, then chop across the sliced sage.
- Wash the beet greens. Remove the leaves from the stems and separate them from the center rib. Roll the leaves together and slice thinly.
- Cook the sauce. Melt butter in a pan over medium heat. Add the yellow onion and sauté for 1–2 minutes. Stir in the green onions and garlic and cook briefly. Add salt, cumin, black pepper, and other desired spices, along with the olive oil, then mix well, then deglaze the pan with soy sauce.
- Stir in the beet greens and cook until slightly wilted. Pour in the half-and-half, followed by the chili flakes, and cook for 1–2 minutes, seasoning as needed.
- Assemble the dish. Using a fork, gently pull the spaghetti squash strands with a raking motion. Transfer them to a bowl. Depending on the squash's size, you may want to set some aside for another meal and add the bulk to the creamed beet greens.
- Using tongs, gently incorporate the spaghetti squash, ensuring it’s well mixed. Add in the roasted mushrooms.
- Plate and serve. Use tongs to twirl the spaghetti squash onto the center of your plate. Sprinkle with parmesan cheese, toasted seeds (if using), and the smallest basil leave for garnish. Serve while hot!
Nutrition Facts
Calories
304Fat (grams)
19 gCarbs (grams)
31.2 gFiber (grams)
4.4 gSugar (grams)
3.2 gProtein (grams)
8.7 gI am not a certified nutritionist and any nutritional information on dontmissmyplate.com should only be used as a general guideline.


How to Butterfly (Spatchcock) a Chicken - Peri Peri Style
How to Butterfly a Whole Chicken
Butterflied chicken is a game-changer. It delivers bold flavors and a show-stopping presentation despite its simplicity. By flattening the chicken, you reduce cooking time and ensure a perfect char on the outside while keeping the meat juicy inside. Pair that with smoky, spicy, and tangy peri-peri sauce—a staple in Portuguese and Southern African cuisine—and you’ve got a dish perfect for grilling or roasting.
During marination, flavors penetrate the meat better, and the chicken cooks more evenly. Because it is flattened, it also cooks faster, so watch the oven or grill closely to avoid overcooking. The main way to prepare the chicken this way is to split it in half by separating the breasts and removing the backbone, as shown in the video. Cut carefully along the joints and around tough bones to free the rest of the chicken.
Whether you’re hosting a summer barbecue or craving something vibrant for dinner, this recipe delivers big on flavor with minimal fuss. Plus, it’s easily customizable—you can tweak the heat level or adjust the seasonings to suit your taste.
If you love this butterflied peri-peri chicken, you’ll also want to try my updated peri-peri recipe with a bold, tangy wet marinade — it’s perfect for those who want even juicier, flavor-packed chicken.
Tips for the Perfect Butterflied Chicken
Butterfly Like a Pro
Use sharp kitchen shears to remove the backbone, then press down firmly on the breastbone to flatten the bird. This ensures even cooking and maximum exposure to the marinade and heat.Marinate for Maximum Flavor
Let the chicken marinate for at least 2 hours, but overnight is best. The longer it marinates, the deeper the peri-peri flavors will infuse the meat.Adjust the Heat
Peri-peri sauce can be as fiery or mild as you like. Use more chili peppers for a kick or balance the heat with extra lemon juice and olive oil for a milder sauce.Choose the Right Cooking Method
For smoky, authentic flavor, grill the chicken over medium heat, turning frequently. If using the oven, roast at a high temperature to achieve crispy skin, then finish under the broiler for charred edges.Serve It Right
Peri-peri chicken pairs beautifully with cooling sides like cucumber salad or a dollop of yogurt sauce. For a more authentic touch, serve with Portuguese-style rice or grilled vegetables.Don’t Waste the Marinade
Reserve some peri-peri sauce before marinating to use as a basting sauce or drizzle over the cooked chicken. Keep it separate from any sauce that touched raw chicken.
The Magic of Homemade Peri-Peri Sauce
I grew up eating peri-peri at least once a month on Fridays. As a family, we’d make trips to Nando’s, famous for flame-grilled chicken marinated in the sauce.
Since then, I’ve tasted peri-peri chicken both in Portugal and across Southern Africa. Nando’s celebrates both culinary traditions, and my love for the sauce has grown even more. Bird’s eye chili peppers give peri-peri its unique flavor. “Piri-piri” and “peri-peri” are derived from the Swahili word pili pili, meaning “pepper.”
There are many variations of the sauce, but three essentials remain: peppers, garlic, and acid. Aromatic spices and fresh herbs elevate the flavor even further.
Peri-peri sauce is incredibly versatile. Use it as a marinade, dipping sauce, or finishing drizzle for grilled meats, seafood, and vegetables. Making it at home allows you to tailor it to your taste (mild, medium, or tongue-tingling hot) and it’s always fresher and more flavorful than store-bought versions.
I remember tasting authentic peri-peri sauce for the first time in a small coastal town about 30 minutes from Lisbon, Portugal. The heat was exhilarating but perfectly balanced by the bright tang of lemon and the richness of olive oil. It transformed simple grilled chicken into something unforgettable. When I returned home, I couldn’t wait to recreate it. After a bit of experimenting, I found my go-to version. Once you make it from scratch, it will become a staple in your kitchen too.
Tips for Crafting the Perfect Peri-Peri Sauce
Choose the Right Peppers
Traditional peri-peri sauce uses bird’s eye chilies, but you can substitute Thai chilies, serranos, or even habanero if you want extra heat. For a milder version, include a few sweet peppers to balance the spice. Bird’s eye chilies are fruity and peppery, half as hot as habanero but twice as hot as jalapeños.Blend for the Perfect Texture
Use a blender or food processor for a smooth consistency. If you prefer chunkier sauce, pulse until just combined.Balance the Flavors
Great peri-peri sauce balances heat, acidity, and richness. Add lemon juice or vinegar to cut through the spice, a touch of sweetness to mellow it, and oil for a silky finish. Taste as you go to find the right harmony.Let It Rest
After blending, let the sauce sit for at least an hour to allow flavors to meld. For best results, make it a day ahead.Store It Right
Keep peri-peri sauce in the fridge up to two weeks in an airtight container, or freeze in small portions for future use.Experiment with Variations
Add smoked paprika for smokiness, fresh herbs like oregano for fragrance, or roasted red peppers for a sweeter, milder sauce.Use It Everywhere
While it’s famous for chicken, peri-peri sauce elevates roasted potatoes, scrambled eggs, grilled vegetables, and more. Keep some on hand to make everyday meals exciting.
 Peri-Peri Chicken")
Spatchcock (Butterflied) Peri-Peri Chicken
This vibrant sauce, inspired by Portuguese and African cuisines, blends chili, garlic, citrus, and spices. Perfect as a marinade, dip, or drizzle, it enhances grilled meats, seafood, and veggies. Flattening the chicken through the butterfly method ensures quick cooking, a charred exterior, and juicy meat.
Ingredients
- 1 whole chicken
- 1/2 cup sweet bell peppers
- 4 garlic cloves
- 4 fresco chilli peppers*
- 1 habanero pepper*
- 1/2 cup cup olive or avocado oil
- 2 tablespoons fresh thyme
- 1/3 cup (cooking) wine
- 2 lemons, juiced
- 1 tablespoon salt
- 1 tablespoon sugar
- 1 tablespoon smoked paprika
- 1 teaspoon ground ginger
- 1 teaspoon cumin
- 1 tablespoon cayenne pepper
- 1 tablespoon dried thyme
- 1 tablespoon black pepper
- 1 tablespoon onion powder
- 1 tablespoon dried oregano
- Optional: 4 tablespoons chicken spice blend
Instructions
- Prepare and marinate the chicken.For the best flavor, let the chicken soak up the piri piri marinade for at least 4–8 hours or overnight.
- Gather your ingredients and juice the lemons.
- Blend the marinade. In a blender or food processor, combine the peppers, hot chili peppers, garlic, fresh thyme, and all the spices and seasonings.
- Add the liquids. Blend in the oil, lemon juice, and wine to create a smooth marinade.
- Butterfly the chicken. Clean and prep the chicken. Pat it dry and remove any remaining feathers or excess fat.
- Remove the backbone. Hold the tail, and use your fingers to locate the backbone. Cut from tail to neck and set it aside for broth or discard it.
- Make small incisions. Flip the chicken over and, using a sharp knife, make two small cuts at the bottom where you see cartilage on each side—this helps the chicken cook evenly.
- Flatten the breastbone. Score the center of the breastbone to help the chicken lay flat, or remove the bone entirely if preferred.
- Tuck the wings in and transfer the chicken to a dish. Pour the marinade over both sides, cover, and refrigerate until ready to cook.
- Cook the chicken. Preheat the oven to 350°F (177°C).
- Sear on an indoor grill for about 5 minutes per side, then transfer to the oven and bake for 45 minutes, or until the internal temperature reaches 165°F (74°C).
- Alternatively, you can skip the grilling step and bake the chicken directly in a tray. If so, increase the baking time by 10 minutes, flipping the chicken halfway through.
- Rest for 5 minutes before serving with homemade or store-bought piri piri sauce.
Notes
- For the peppers, use bird’s eye chili, Fresno for color, or habanero—but use less of the latter, as it’s much hotter. Adjust the quantity based on your heat tolerance. If using Fresno peppers, use four to achieve a reddish tint.
- You can save some of the sauce to cook on the stovetop and serve with your chicken once it's done.
- For extra flavor, season your chicken with all-purpose chicken spice before marinating.
- To prevent drying out the meat, avoid overcooking the chicken once it reaches a safe internal temperature.
Nutrition Facts
Calories
180Fat (grams)
11.6 gSat. Fat (grams)
3.4 gCarbs (grams)
2.3 gFiber (grams)
1.1 gProtein (grams)
16.4 gI am not a certified nutritionist and any nutritional information on dontmissmyplate.com should only be used as a general guideline.

Crispy Sticky Tofu with Suya
Easy Tofu Recipe with a West African Twist
Crispy tofu is a game-changer for anyone looking to add a satisfying crunch to their meals—whether you're a longtime tofu lover or just testing the waters. With the right technique, tofu transforms into golden, crispy bites that are perfect for tossing into stir-fries, salads, bowls, or enjoying on their own with a flavorful dipping sauce. The best part? It’s incredibly versatile, easy to make, and packed with plant-based protein. In this post, I’ll walk you through how to achieve that perfect crisp, plus some of my favorite ways to enjoy it!
Suya spice is the secret behind one of West Africa’s most beloved street foods—suya! This bold, smoky, and nutty spice blend brings a fiery kick and rich depth of flavor to grilled meats, veggies, and even snacks. Made with a mix of ground peanuts, paprika, ginger, garlic, and fiery cayenne, suya spice is a must-have for anyone looking to add an authentic West African touch to their cooking. Whether you're marinating beef skewers or sprinkling it over roasted vegetables, this spice blend transforms any dish into something irresistibly flavorful. Ready to bring the heat? Let’s dive into the magic of suya spice!
This recipe brings two worlds together in a simple way to give you a satisfying bite. if you can, serve the tofu on top of a bed of Cape Malay rice (all known as yellow South African rice).
How to Make Tofu Crispy
Making crispy tofu can be a bit tricky, but with the right techniques, you can achieve that perfect crispy texture! Here are some tips:
1. Press the Tofu
Why? Tofu has a lot of moisture that can prevent it from becoming crispy. Pressing out as much moisture as possible helps.
How? Use a tofu press or wrap the block in a clean kitchen towel or paper towels, then place a heavy object (like a can or a cast-iron skillet) on top for at least 15-30 minutes.
2. Cut into Small Pieces
Why? Smaller pieces have more surface area, which leads to crispier edges.
How? Cut the pressed tofu into cubes or triangles (depending on your preference).
3. Coat the Tofu
Why? A thin coating of cornstarch, arrowroot, or rice flour will create a crispy crust as it fries.
How? Toss the tofu pieces in a mixture of cornstarch (or any of the other options) and a bit of salt or seasoning. You can also use flour or a combination of both if you want a thicker crust.
4. Use High Heat for Frying
Why? High heat ensures a crisp exterior and a tender inside.
How? Heat a good amount of oil (vegetable, canola, or peanut oil works best) in a non-stick or cast-iron pan. The oil should be hot enough to sizzle when the tofu hits the pan.
5. Don’t Overcrowd the Pan
Why? Overcrowding can cause the tofu to steam rather than crisp up.
How? Cook the tofu in batches if necessary, giving each piece enough space to brown.
6. Let it Cook Without Moving It
Why? Letting the tofu sit in one place creates a nice golden crust.
How? After placing the tofu in the pan, let it cook on one side until it’s crispy and golden brown before flipping it.
7. Drain Excess Oil
Why? This keeps the tofu crispy and prevents it from getting soggy.
How? Once cooked, transfer the tofu to a paper towel-lined plate to drain any excess oil.
8. Optional: Bake for Extra Crispiness
Why? If you want less oil but still want a crispy texture, baking the tofu after it’s coated with cornstarch or flour can also yield crispy results.
How? Preheat your oven to 400°F (200°C). Place the tofu on a baking sheet lined with parchment paper or a silicone baking mat and bake for 25-30 minutes, flipping halfway through.

Crispy Sticky Tofu with Suya
Ingredients
- 1 - 14oz block extra firm tofu
- 1/4 cup olive or coconut oil
- 1 tablespoon suya seasoning
- 1 cup corn starch
- Optional: Sesame seeds, crushed peanuts, and/or chili flakes
- 2 tablespoons soy sauce
- 3 garlic cloves, minced
- 1 teaspoon teryaki sauce
- 1 teaspoon fish oil sauce
- 1 teaspoon cooking wine
- 1 teaspoon granulated sugar
- 1 teaspoon vinegar
- 1 teaspoon ground ground ginger
- 1/2 cup water
- 2 teaspoons authentic suya seasoning
- 1 teaspoon cornstarch
Instructions
- Remove the moisture from your tofu by draining and patting it dry. Wrap it in a paper towel and microwave for 2 minutes, heating in 30-second increments to help remove residual moisture. Alternatively, let the tofu sit after draining for at least 30 minutes to dry out. This step ensures crispier tofu.
- Dice the tofu or cut it into 1-inch pieces.
- Make the Sauce. Crush and mince the garlic, then add it to a bowl. Pour in the soy sauce, teriyaki sauce, cooking wine, fish sauce, vinegar, 2 teaspoons of suya, ginger, and 1 teaspoon of cornstarch. Stir or whisk until fully combined, then set aside.
- Coat the Tofu. In a shallow dish, mix 1 cup of cornstarch with 1 tablespoon of suya. Coat each piece of tofu, shaking off any excess, then set aside.
- Heat a skillet or non-stick pan over medium heat. Cook the tofu for 12-15 minutes, turning halfway, until golden brown and crispy. Remove and set aside.
- Add the sauce ingredients to the pan and bring to a boil, stirring continuously. Reduce to a simmer and cook until the sauce thickens—avoid overcooking or over-reducing.
- Return the tofu to the pan, tossing to coat each piece evenly in the sauce.
- Garnish with sesame seeds, chili flakes, and peanuts. Serve hot.
Notes
To reheat, use an oven or air fryer to maintain crispiness.
Nutrition Facts
Calories
117Fat (grams)
5.9 gSat. Fat (grams)
1.2 gCarbs (grams)
6.3 gProtein (grams)
11.9 gI am not a certified nutritionist and any nutritional information on dontmissmyplate.com should only be used as a general guideline.


Oven-Braised African Oxtail Stew
Cooking Oven-Braised Oxtail Stew Recipe African-Style
Oxtail is a beloved delicacy across many African cuisines, known for its rich flavor, tender texture, and deep, comforting stews. Slow-cooked to perfection, oxtail transforms into a melt-in-your-mouth dish infused with aromatic spices, herbs, and hearty ingredients. From the peppery, tomato-based oxtail stew of West Africa to the deeply savory, slow-braised variations of South Africa, this dish is a true celebration of bold flavors and traditional cooking techniques.
Whether served with rice, dumplings, fufu, Sadza, or pap, African oxtail dishes bring warmth and nostalgia to every bite. Its gelatinous richness makes for an irresistibly silky sauce, perfect for soaking up with your favorite side. If you’re looking for a meal that embodies comfort and tradition, African oxtail is a must-try!
Coming from Zimbabwe, I regarded oxtail as a special treat, typically reserved for special occasions. However, from time to time, we would get it as a surprise on a random winter weeknight for dinner. Honestly, though, this dish can be enjoyed all year round.
My mother kept it simple, using a combination of yellow onions, green onions, tomatoes, chili peppers, salt, and pepper—and the result was perfection. The dish was perfectly balanced: not too greasy, not dry, spicy yet slightly sweet, and incredibly satisfying, especially when served with sadza (Zimbabwean cornmeal) and muriwo (sautéed kale).
Living in the United States exposed me to various oxtail preparations I had never encountered before, from Vietnamese oxtail pho (Phở Đuôi Bò), a traditional broth-based soup, to Caribbean-style oxtail with browning sauce and white beans.
This recipe is relatively simple but can be elevated by using high-quality ingredients, such as locally sourced meat from the butcher. It also benefits from leaning into the bold spices commonly used in African cuisine—masala curry powder, cardamom, nutmeg, and cumin—all of which enhance the depth of flavor in oxtail stews.
Does rendered fat make stew taste better?
Also known as liquid gold, oxtail preparation is a matter of personal preference and may be influenced by health goals or the dish you plan to pair it with. If you're committed to reducing animal fats, feel free to trim away! However, keep in mind that some fat contributes to the rich flavor, signature color, texture, and moisture that make oxtail so special.
You can also leave the fat intact while cooking, then simply skim off the rendered fat that rises to the top once it's done. In general, oxtail is a fattier cut of meat compared to others, but that’s part of what makes it so delicious!
Some points to consider:
In addition to adding flavor, richness, and moisture to the dish, fat acts as a flavor carrier, helping to coat the ingredients and intensify their taste. Essentially, it enhances the overall mouthfeel and depth of the stew. Key benefits include:
Flavor Enhancement: Rendered fat releases flavorful compounds that infuse the stew with a deeper, richer taste.
Moisture Retention: Fat helps keep the meat and vegetables moist during cooking, preventing them from drying out.
Browning Potential: Cooking meat in rendered fat creates a delicious caramelized crust, adding another layer of flavor.

Oven-Braised African Oxtail Stew
Ingredients
- 3 tablespoons olive oil
- 1.5 lbs oxtail
- 1 tablespoon seasoned salt
- 1 tablespoon black pepper
- 1 tablesppon dark brown sugar
- 1 cup mirepoix (carrots, onion and celery)
- 1/3 cup green onions/scallions (optional)
- 1/2 cup red bell peppers
- 1/2 cup diced tomatoes (frozen or fresh)
- 3 garlic cloves
- 1 tablespoon Masala curry powder
- 1 tablespoon Royco Usavi Mix or all-purpose seasoning
- 1 tablespoon flour or cornstarch (optional)
- 1 tablespoon onion powder
- 1 teaspoon cayenne pepper
- 1 teaspoon smoked paprika
- 1 tablespoon oregano
- 1 teaspoon cumin
- 1 tablespoon garlic powder
- 4 beef bouillon cubes
- 1/4 cup red cooking wine
- 4 cups water
- 1/2 lime juice
- 1/2 teaspoon ground ginger
- 1/4 teaspoon cardamon
- 1/4 teaspoon cloves
- 1/4 teaspoon nutmeg
- 2 tablespoons Worcestershire sauce
- 2 tablespoons tomato paste
- 1 thyme spring
- 1 habanero pepper
- 3 bay leaves
- 2 cups carrots and peas, cooked
Instructions
- Preheat the oven** to 350°F (175°C).
- Prepare the oxtail: Wash the oxtail in cold water, vinegar, and lime juice, then pat dry. Depending on your preference and the leanness of the cuts, trim any excess fat or leave the bones as they are.
- Brown the oxtail. In a Dutch oven, heat some oil over medium to medium-low heat. Add the oxtail pieces, then season with sugar, salt, and pepper, mixing to coat evenly. Sear until browned on all sides, ensuring even color. Remove the oxtail from the pot, keeping the oil in the pan.
- Sauté the vegetables. Add the mirepoix (onions, carrots, and celery) and cook for 1–2 minutes. Add the peppers and cook for another 1–2 minutes.
- Stir in the tomatoes (if using frozen, cook down for 2–3 minutes). Add the garlic and cook for another minute.
- Reduce the heat to low to prevent burning. Stir in curry powder, Royco Usavi mix, onion powder, cayenne pepper, smoked paprika, oregano, cumin, and garlic powder. Mix gently to incorporate and bloom the spices.
- Add the bouillon cubes, followed by cooking wine to deglaze the pot. Stir well, crushing the bouillon cubes as they dissolve.
- Return the oxtail to the pot: Stir to coat the meat in the aromatics and seasonings.
- Pour in water and stir, then add lime juice.
- Stir in ginger, cardamom, cloves, nutmeg, and Worcestershire sauce.
- Add tomato paste, thyme, bay leaves, and habanero. Mix thoroughly, ensuring the tomato paste is well incorporated.
- Cover and place the pot in the oven for 2 ½ hours. Halfway through cooking, reduce the oven temperature to 325°F (163°C) and give the stew a stir.
- Remove from the oven and stir in peas and carrots. Let the stew rest for 10 minutes before serving.
I am not a certified nutritionist and any nutritional information on dontmissmyplate.com should only be used as a general guideline.

Homemade Alfredo Sauce with Shrimp
Quick Weeknight Pasta Dishes
After a long day, there’s nothing more satisfying than a quick, comforting bowl of pasta. Whether you’re craving something creamy, hearty, or light and fresh, pasta is a go-to weeknight staple that can be customized to whatever ingredients you have on hand.
Shrimp Alfredo is the ultimate comfort dish—rich, creamy, and packed with flavor. But what takes it to the next level? A homemade Alfredo sauce that’s silky, cheesy, and far better than anything store-bought. Paired with tender shrimp and perfectly cooked pasta, this dish is indulgent yet surprisingly simple to make. Whether you're cooking for a cozy night in or impressing guests, this Shrimp Alfredo is guaranteed to be a hit!
This is the kind of dish most people would not turn down unless they were allergic or on a strict diet. Perfect for a weeknight dinner, the creamy, saucy, rich, flavorful sauce that coats the pasta and sits until the perfectly pan-seared, juicy shrimp is all you need, preferably with a giant helping of fresh vegetables on the side to balance your nutrition wheel out!
Making Alfredo Sauce From Scratch
At its core, Alfredo sauce is a simple yet indulgent blend of butter, heavy cream, and Parmesan cheese. The key to achieving that restaurant-quality richness is in the technique—slowly melting the cheese into the warm cream and butter to create a smooth, luscious sauce that clings perfectly to your pasta. A pinch of garlic, a dash of nutmeg, and freshly cracked black pepper elevate the flavors without overpowering the delicate balance.
One of the best things about Alfredo sauce is its versatility. It pairs beautifully with fettuccine, of course, but also works wonders with shrimp, chicken, or even roasted vegetables. Whether you're looking for a quick weeknight dinner or an impressive dish for guests, this classic sauce is always a winner.
Want to take your Alfredo to the next level? Try experimenting with different cheeses like Pecorino Romano for a sharper bite or adding a splash of white wine for extra depth. However you choose to customize it, homemade Alfredo sauce is a must-have recipe in any home cook’s repertoire.

Homemade Alfredo Sauce with Shrimp
Ingredients
- 1- 1 1/2 pounds jumbo shrimp, deveined with tail on
- 1 1/2 + 1 tablespoon Old Bay seasoning (for the shrimp and flour)
- 1 tablespoon oregano
- 1 teaspoon + 1 tablespoon garlic powder (for the shrimp and flour)
- 2 teaspoons black pepper (one each for the shrimp and flour)
- 1 tablespoon + 1 teaspoon onion powder (for the shrimp and flour)
- 1 cup flour
- 1/4 cup olive oil
- 1 container or packet fettuccine pasta (fresh is preferred)
- 1 teaspoon Royco Usavi Mix or all-purpose seasoning
- 1 tablespoon flour
- 1 1/2 cups grated parmesan cheese
- 3 garlic cloves, minced
- 2 cups heavy cream (you can also use milk or half and half)
- 1/2 cup butter
- 1 teaspoon Worcester sauce
- 1 tablespoon oregano
- 1 teaspoon black pepper
- 1 teaspoon salt
- 1 teaspoon onion powder
- 1 teaspoon cayenne power
- 1 teaspoon smoked paprika
- Chili flakes, cheese and parsley to garnish (optional)
Instructions
- Prepare the pasta according to the package instructions. Once cooked, drain the noodles and toss them in olive oil to prevent sticking. Set aside 1-2 cups of the pasta water for later.
- Prepare the shrimp by patting them dry. Peel and devein the tail-on shrimp, leaving the tails on for flavor and to prevent shrinking. Season the shrimp on both sides. You can keep the shells to make seafood broth, so consider sealing and freezing them for later.
- Season the flour with Old Bay, garlic powder, onion powder, and black pepper. Coat each shrimp in the flour, making sure to shake off any excess to prevent clumping when pan-searing.
- Heat oil in a non-stick pan or skillet, enough to cover at least half the surface of the shrimp. Cook the shrimp in batches for 2-3 minutes per side, ensuring you don’t overcrowd the pan or overheat it. Cook over medium to medium-high heat until the shrimp are golden brown and the coating is crispy. Remove from heat and set aside.
- In a separate pot, melt the butter and add the fresh garlic. Stir in the spices, then add the flour. Continue to mix, then gradually add the cream, remaining herbs, and Worcestershire sauce.
- As the sauce thickens, gradually add the pasta and Parmesan cheese to reach your desired ratio and sauciness. Season to taste, and add a little bit of the reserved pasta water to help bring the sauce together. Bring to a simmer and stir until the desired consistency is reached, but do not boil. This should take no longer than 5 minutes.
- Remove from heat and serve the pasta with the shrimp. Garnish as desired.
Nutrition Facts
Calories
1342Fat (grams)
55.6 gCarbs (grams)
144.7 gFiber (grams)
12.1 gSugar (grams)
15.8 gProtein (grams)
76.3 gI am not a certified nutritionist and any nutritional information on dontmissmyplate.com should only be used as a general guideline.

Creamy Roasted Broccoli and Cauliflower Bake
If you’re looking for a comforting, veggie-packed dish, this cheesy roasted broccoli and cauliflower bake is an easy winner. Roasting the vegetables brings out their natural sweetness and nuttiness, while a rich, creamy cheese sauce ties everything together. It works beautifully as a hearty side or even a main for a simple weeknight meal.
Start by tossing broccoli and cauliflower florets with a little olive or avocado oil, seasoning generously with salt, pepper, and perhaps a hint of smoked paprika or garlic powder. Roast at high heat until the edges are golden and crispy, giving them a stir halfway through. The dry heat intensifies the flavors and adds a satisfying texture that boiling or steaming just can’t match. A squeeze of fresh lemon or a drizzle of balsamic glaze right before serving brightens the dish and balances the richness.
Once the veggies are roasted, fold them into a smooth cheese or mornay sauce, topping with extra cheese or breadcrumbs for a golden, bubbly finish. Serve it straight from the oven for maximum comfort, or make it ahead and reheat—it’s just as delicious the next day. Whether you’re cooking for a crowd, prepping meals for the week, or just craving something cozy, this bake delivers flavor, texture, and ease in every bite.


Creamy Roasted Broccoli and Cauliflower Bake
If you’re craving a cozy, veggie-packed dish, this creamy vegetable bake is perfect! Roasting enhances the natural sweetness of the broccoli and cauliflower, while a rich, cheesy mornay sauce and crispy topping make it irresistible..
Ingredients
- 32 oz cauliflower florets
- 32 oz broccoli florets
- 1/4 cup olive oil
- 1 tbsp garlic powder
- 1 tbsp onion powder
- 1 tsp seasoned salt
- 1 tsp cayenne pepper
- 2 garlic cloves, minced
- 1 medium yellow onion, chopped
- 1 tbsp butter
- 3 tbsp flour
- 8 oz heavy cream
- 1 chicken bouillon cube + 1 cup water (or 1 cup chicken broth)
- 1 tbsp oregano
- 1 tsp cayenne pepper
- 1 tsp Royco Usavi Mix (or all-purpose seasoning)
- 1 tsp salt (optional)
- 1 1/2 cups grated pepper jack cheese
- 3 tbsp grated Parmesan (optional)
Instructions
- Roast the vegetables: Preheat oven to 350°F. Toss broccoli and cauliflower with olive oil, garlic powder, onion powder, seasoned salt, and cayenne. Spread on a baking sheet and roast 15–20 min, tossing halfway.
- Prepare aromatics: In a skillet, sauté onion and garlic until soft. Add to roasted vegetables in a baking dish.
- Make the sauce: Melt butter in a small saucepan over medium-low heat. Stir in flour to form a roux. Gradually whisk in cream, water, and crushed bouillon cube. Add oregano, cayenne, Royco Mix, and salt. Cook until thick and smooth.
- Assemble bake: Pour sauce evenly over vegetables. Sprinkle with pepper jack cheese (and Parmesan if using).
- Bake: Bake at 350°F for 15–20 min. Broil 2–3 min until cheese is golden and bubbling.
- Serve: Let set slightly, then serve hot.
Notes
- For best texture, roast the vegetables until lightly golden before baking. This prevents the dish from becoming watery.
- You can substitute broccoli or cauliflower with other vegetables like zucchini or mushrooms, but adjust roasting time as needed.
- For a milder version, reduce or omit the cayenne and use a mild cheese instead of pepper jack.
Nutrition Facts
Calories
470Fat (grams)
35 gSat. Fat (grams)
21 gCarbs (grams)
12 gFiber (grams)
4 gProtein (grams)
12 gI am not a certified nutritionist and any nutritional information on dontmissmyplate.com should only be used as a general guideline.

Huku ne Dovi (Zimbabwean Peanut Chicken Stew)
Huku ne dovi, or Zimbabwean peanut butter chicken stew, is a hearty dish made with chicken simmered in a rich peanut butter sauce alongside tomatoes, vegetables, hot chilies, and sometimes bell peppers. The result is a beautiful balance of savory, nutty, and mildly spicy flavors. While often served as a thick stew alongside sadza, rice, or bread, it can also be prepared more like a soup, with the addition of leafy greens, vegetables, and tubers.
For those unfamiliar with the combination of chicken and peanut butter, it may sound unusual at first. Yet throughout much of Africa, groundnuts (peanuts) are a staple ingredient used to enrich sauces, soups, and stews. Similar pairings can also be found in parts of Southeast Asia, where peanuts are used to add richness and depth to savory dishes. In Zimbabwe, peanut butter gives huku ne dovi its distinctive flavor and velvety texture, creating a sauce that coats each piece of chicken beautifully. Beyond its flavor, peanut butter is also an important source of protein and is often used to enrich vegetable dishes or provide nourishment when meat is scarce or unavailable.
Growing up, huku ne dovi was not an everyday meal in my household, which made it feel even more special whenever it appeared on the table. It was the kind of dish that brought warmth and comfort, especially during the cooler months, and one that was best enjoyed with a generous serving of sadza, rice, or fresh bread to soak up every last bit of sauce.
One of the secrets to a great peanut butter chicken stew is finding the right balance between the richness of the peanut butter and the heat of the chilies. Neither should overpower the other. Instead, the gentle sweetness of the peanuts softens the spice, creating layers of flavor that develop as the stew simmers. This recipe is also highly adaptable. Some people prefer the chicken simmered until it becomes tender and nearly falls off the bone, allowing it to absorb the flavors of the sauce. Others enjoy chicken with a firmer texture and crisp, browned skin. If you prefer the latter, simply roast or brown the chicken separately and add it back to the stew just before serving.
The consistency of the sauce can be adjusted to suit your preference as well. A slightly thinner sauce is wonderful spooned over rice, while a thicker stew pairs beautifully with sadza or bread, allowing the sauce to cling to every bite. For the best flavor, use bone-in chicken pieces whenever possible and take the time to brown them before simmering. This simple step adds depth and richness to the finished dish. Allow the stew to cook gently rather than rushing the process, giving the flavors time to meld together and the sauce time to develop its signature richness.
Whether you're discovering Zimbabwean cuisine for the first time or recreating a familiar favorite, this is a dish that showcases the comforting simplicity and bold flavors that make home cooking easy, and memorable.
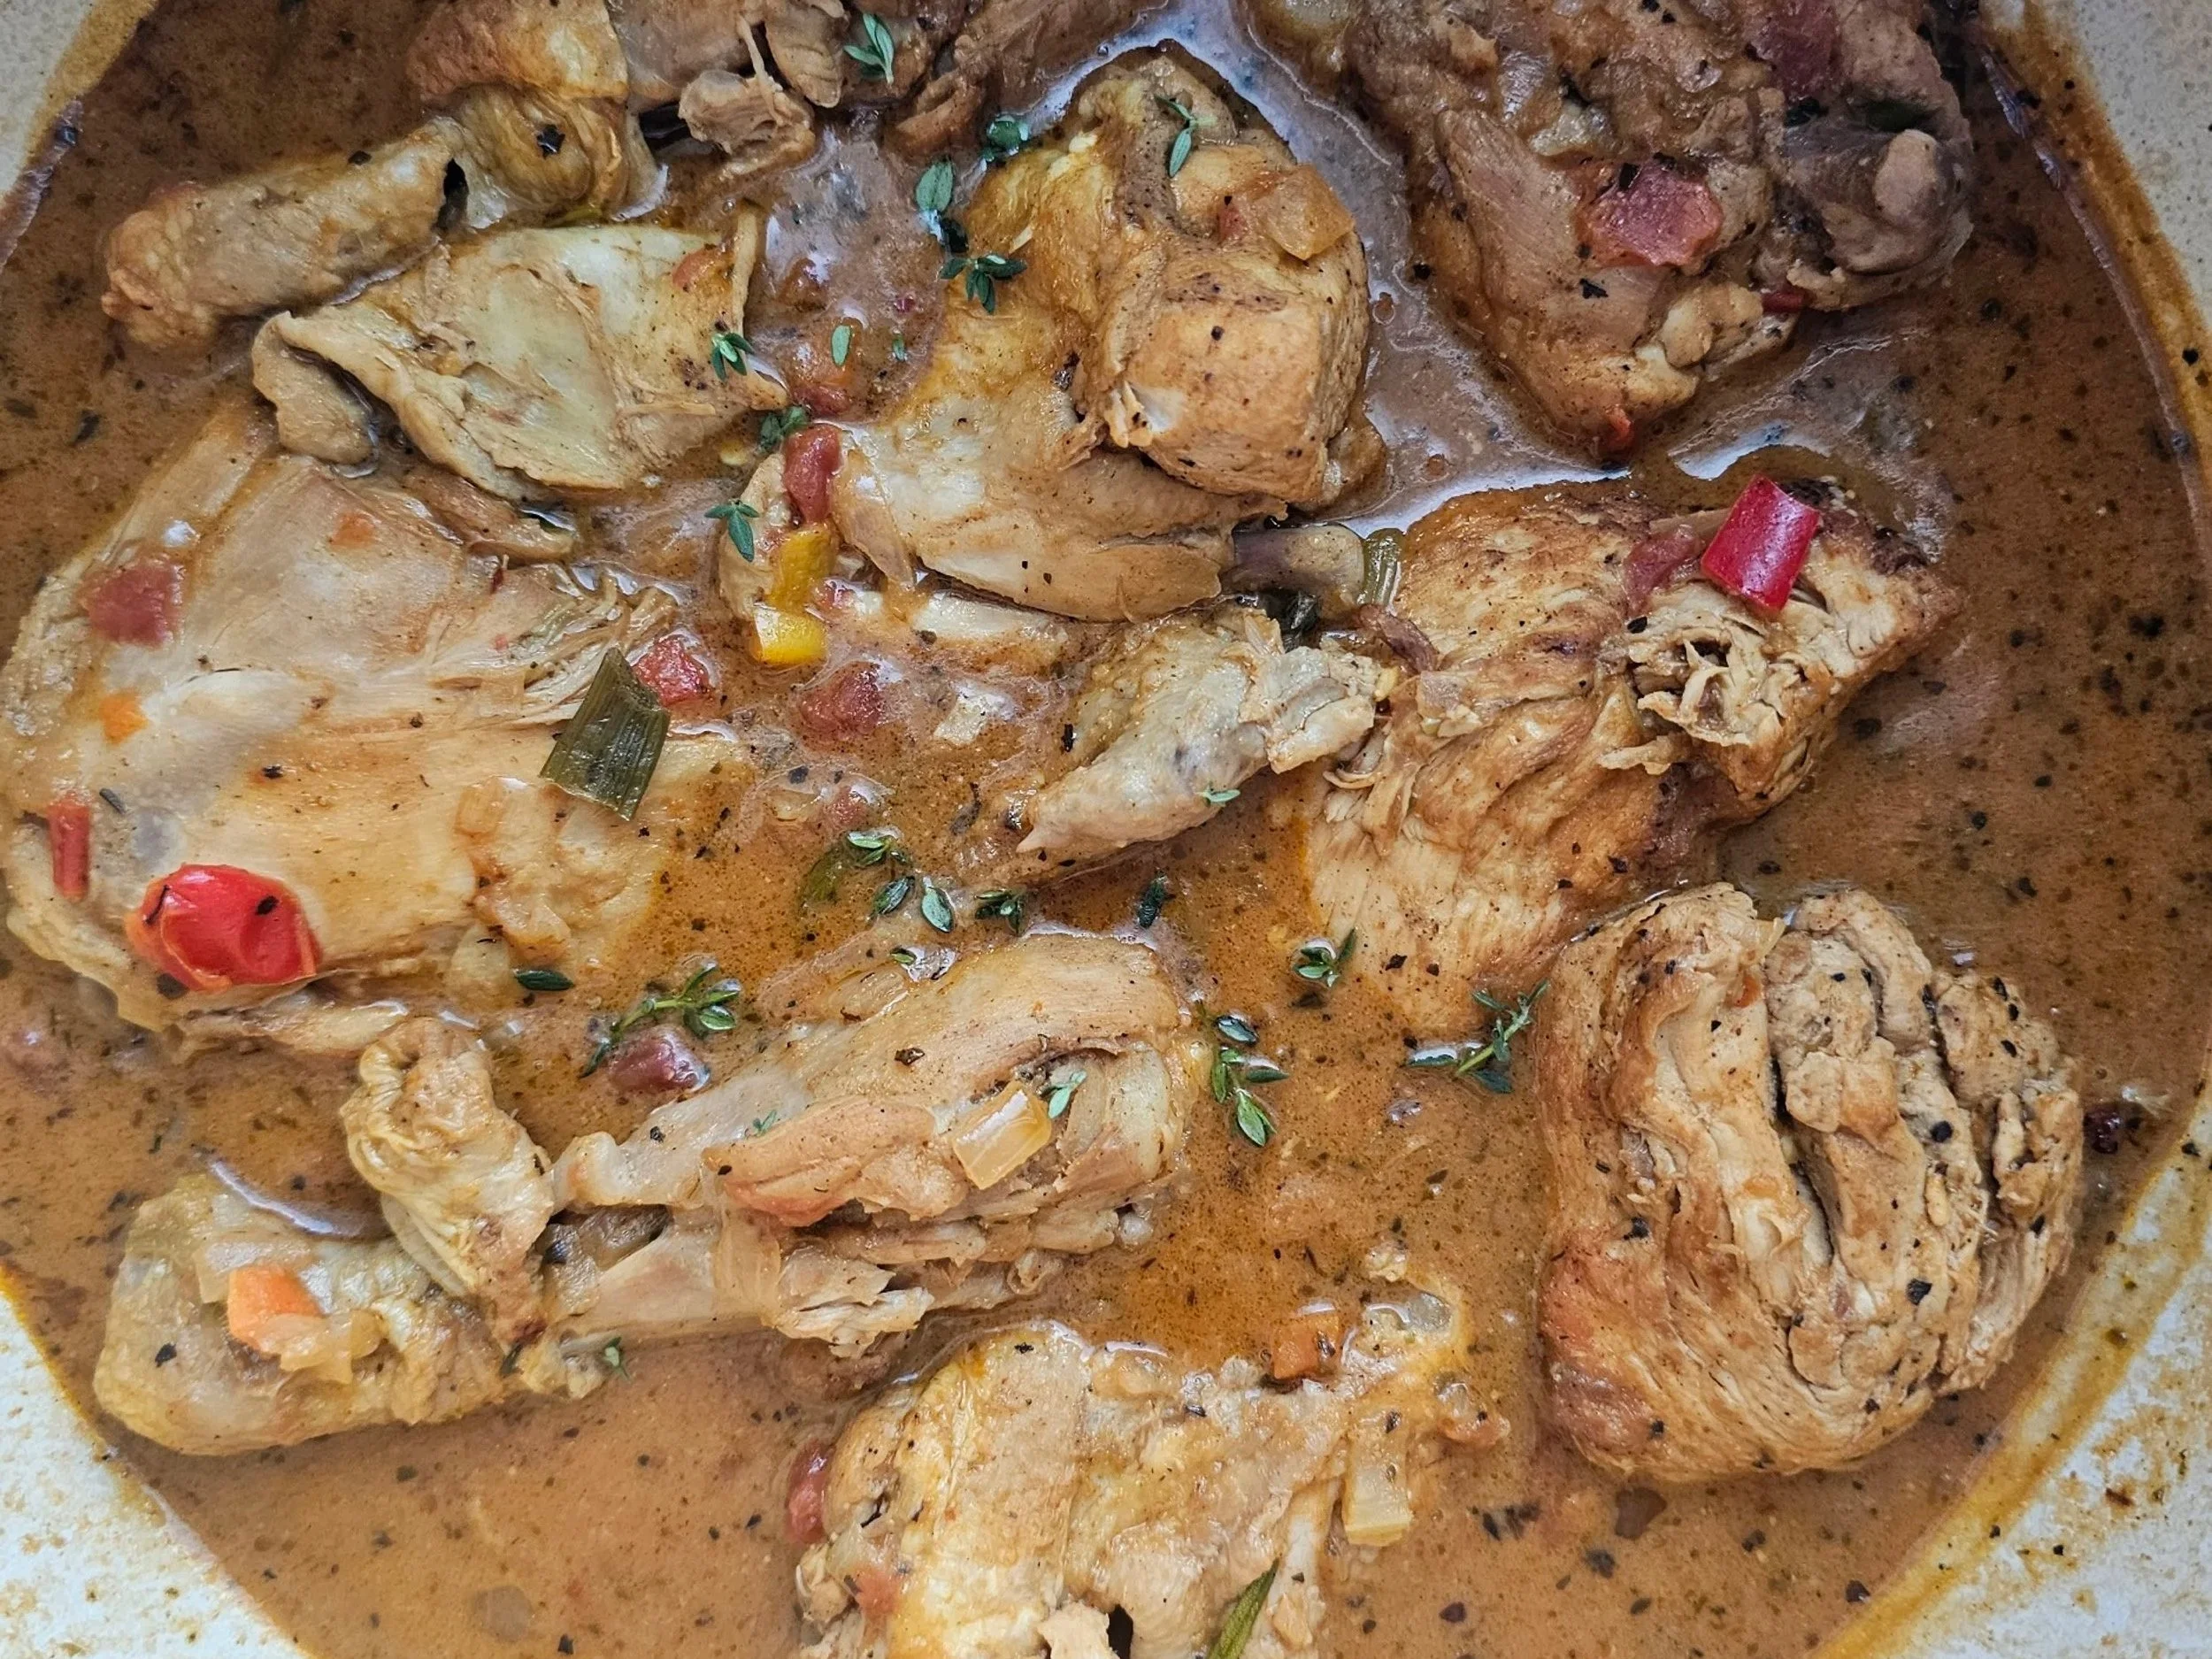

")
Huku ne Dovi (Spicy Zimbabwean Peanut Chicken Stew)
Zimbabwean Peanut Chicken Stew, or *huku ne dovi*, is a flavorful and comforting dish that combines tender chicken, smooth peanut butter, vibrant vegetables, spicy chilies, and fragrant spices.
Ingredients
- 1/4 cup olive oil
- 1 whole chicken, cleaned and cut into pieces
- 2 tablespoons chicken spice (I used Hind’s)
- 2 green onions
- 1 large hot chilli pepper
- 1/2 large yellow onion
- 1/2 cup mirepoix (chopped onion, carrots and celery)
- 1-2 tablespoons butter
- 1 tablespoon garlic powder
- 1 teaspoon black pepper
- 1 tablespoon paprika
- 1 tablespoon Royco Usavi Mix
- 3 chicken bouillon cubes
- 1/3 cup red wine
- 1 cup diced tomatoes
- 3 sweet bell peppers
- 1/3 cup peanut butter
- 2 tablespoons tomato paste
- 1 teaspoon ginger
- 1 teaspoon cumin
- 1 teaspoon coriander
- 1 teaspoon herb blend (I used basil and thyme)
- 3 cups water
- 3 bay leaves
- 2-3 tablespoons cornstarch or flour (optional)
Instructions
- Season the chicken with all-purpose chicken spice, then brown it in a Dutch oven or non-stick pan over medium to medium-high heat. Once browned, remove the chicken and set it aside.
- In the same pot, add the remaining oil and butter. Stir in the mirepoix, onions, bouillon cubes, garlic powder, black pepper, paprika, and Royco Usavi Mix. Sauté for 2-3 minutes until caramelized. Deglaze the pot with the wine, scraping up any browned bits to incorporate all the flavors.
- Next, add the tomatoes, peppers, chili peppers, cumin, ginger, and coriander. Cook for 1-2 minutes to allow the spices to bloom and the vegetables to soften.
- Return the chicken to the pot and pour in the water. Add more water if you prefer a thinner stew or soup-like consistency. Ensure as much of the chicken as possible is submerged to help it cook evenly. Simmer on low heat for 15-20 minutes.
- In a small bowl, mix the peanut butter with some of the hot stew liquid to thin it out. Stir in the tomato paste, then add the mixture to the pot, ensuring it is evenly distributed.
- Add the bay leaves and continue simmering for another 15-20 minutes.
- Optional: After 5-10 minutes, if you don’t want the chicken to fall off the bone, you can remove it and let the stew continue cooking separately to allow the flavors to come together.
- To thicken the sauce: Remove the chicken, then mix 2 tablespoons of cornstarch or flour with hot liquid from the pot to create a smooth slurry. Stir the slurry back into the pot, mixing well to activate the thickening. Continue cooking until the desired consistency is achieved.
- Season to taste, return the chicken to the pot, and serve hot with yellow rice or your preferred starch.
Nutrition Facts
Calories
438Fat (grams)
20.3 gSat. Fat (grams)
4.8 gCarbs (grams)
62.1 gFiber (grams)
18.5 gProtein (grams)
15.6 gI am not a certified nutritionist and any nutritional information on dontmissmyplate.com should only be used as a general guideline.

Baked Snapper with a Quick African Pepper Sauce
At least in its authentic glory, African pepper sauce is commonly served as a condiment, dip or cooking sauce to pair with grilled meats and vegetables or used in stews, giving your dish a perfect balance of heat and depth of flavour. It's most popular in West Africa, but you see other versions of this with other peppers taking centre stage across the Continent. The combination of peppers, herbs, and spices can enhance or top off almost any dish, and it is extremely versatile. I pick this over conventional hot sauce any day because it uses fresh vegetables, and you can make batches to freeze for future use.
This version provides a quick, easy and convenient way to add flavour to your fish. I used red snapper in this recipe, but you can also use halibut, sea bass, bream, tilapia, or any fish with a mild taste that will absorb all the flavours. For the pepper sauce, instead of cooking down and frying the blended vegetables on the stovetop as is typically done, I roasted the vegetables to bring the flavours out before blending them, then used the pepper mix to coat the fish while it baked.
One great thing about this sauce is that you can tailor it to your tastes and tolerance by adding more or fewer tomatoes and peppers. You can also remove the seeds from the hot peppers to take the heat down a notch. I prefer habanero peppers in terms of the heat and flavour, but you can use a range of peppers, from jalapenos to scotch bonnet. In any case, I recommend using the freshest ingredients possible. In addition, especially since peppers are part of the Dirty Dozen, try using organic peppers if you can afford them.

Baked Red Snapper with Quick African Pepper Sauce

Ingredients
- 1 large red snapper
- 1 tablespoon garlic powder
- 2-3 garlic cloves
- 2 lemon slices (optional)
- 1 sprig fresh thyme
- 1 sprig fresh parsley
- 2 teaspoons salt
- 2 teaspoons black pepper
- 2 teaspoon Royco Usavi Mix (optional)
- 2 teaspoons oregano
- 2 teaspoons basil
- 1/2 cup olive oil, and extra for roasting the peppers
- 1 teaspoon salt
- 1/2 teaspoon black pepper
- 1 chicken bouillon cube
- 1/4 cup parsley, stems removed
- 5 large basil leaves
- 1/3 large yellow onion
- 3-4 mini sweet peppers
- 2 small habanero peppers
- 1 1/2 - 2 Roma tomatoes
- 1 inch piece fresh ginger
- Salt and pepper to taste
Instructions
- Place your peppers, onion, tomato, and garlic on a baking sheet with parchment paper—season with salt and pepper to taste.
- Roast the vegetables for 25 minutes at 400F or until roasted to your desired doneness.
- Remove from the oven and allow to cool for 15 minutes, then transfer to a food processor or blender. Add the ginger, parsley, basil, bouillon cube, salt, and pepper. Blend until combined, and a paste forms. Add the olive oil during this process to help smoothen the mixture.
- Set aside while you prepare the fish.
- Make sure your fish is clean, and then pat it dry with paper towels. Add the salt, pepper, garlic, herbs, and optional Royco/all-purpose seasoning.
- Stuff the inside of the fish with the thyme, parsley, lemon and garlic.
- Place the fish inside some foil and place it on a baking tray. Spoon the pepper sauce over both sides of the fish, ensuring it is fully coated.
- Place the fish in the oven and bake at 350F for 30 minutes. After 15-20 minutes, remove the fish, open the foil (without burning yourself with the hot air) and baste the sauce over the fish.
- Leave the foil open and allow the cause to continue cooking. This will help thicken and caramelize the sauce, developing the flavours further.
- Remove from the oven and spoon some sauce into the serving dish, placing the fish on top and adding the rest of the sauce on top. Garnish with fresh parsley and serve!
Notes
- To avoid overcooking the fish, check the internal temperature after 15-20 minutes and use that to determine how much more time you need.
- If you want a thicker sauce, you can place it on the stovetop before covering the fish with it and baking.
- If you get fresh fish from the market, ensure it is cleaned and descaled.
Nutrition Facts
Calories
237Fat (grams)
13.3 gSat. Fat (grams)
1.9 gCarbs (grams)
24.9 gFiber (grams)
6 gProtein (grams)
10.9 gI am not a certified nutritionist and any nutritional information on dontmissmyplate.com should only be used as a general guideline.

Creamy Coconut Cornbread Ice Cream (No Churn)
Who isn't down for eating ice cream regardless of the season? As Summer ends and makes way for the Fall, flavours change, and various fruits and vegetables will take the stage, from pumpkins and sweet potatoes to corn and apples, pears and figs. When people think about corn (or maize, or mealie cobs), ice cream probably doesn't come to mind--although some of the more experimental producers, companies like Van Leeuwen and Jeni's may have made that the case.
But what if you want to make some corn ice cream in your own at home? Better yet, still decadent, possibly dairy-free, and without an ice cream maker.
Be sure to explore the website for other sweet recipes, the no churn ice cream recipes listed below which you can use with dairy or alterative milk products to make.
Nature's Charm produces two main ingredients (linked below) you need for your ice cream base - whipped cream (to help add air to the mixture, especially since you won't be getting the smooth, light texture that typically comes from the churning motion of an ice cream maker) and condensed milk (which supplies the sugar and fat content). I am a fan of their quality, organic products and recommend trying them. They even make condensed oat milk! Even if you don't have specific dietary requirements and restrictions, check out some of my favourite gluten-free and vegan baking items here.
If you are in need of some quality loaf pans, for ice cream, bread, or whatever else, try these!

These Nordic Ware Aluminum Loaf Pans (Set of 2) , 1.5-pound pans can do it all—and then some with oven-safe aplomb. They’re made of pure cast aluminum reinforced with steel, so they’ll heat up in a flash and bake extra-evenly time after time. Even more: They’ve got galvanized steel rims to prevent warping, and they’ll never rust either.
Have you ever used coconut milk products as your base?
How to Make Non-Dairy No-Churn Ice Cream
This website has several recipes that do not require an ice cream maker. There is no need to purchase an overpriced machine; you have total control over what goes into your easy, homemade sweet treat.
As previously noted, an integral part of making ice cream is the churning process or adding air into the mixture, which you can achieve using a hand mixer (in addition to the whipped cream). There is also no need for eggs or to cook the main ingredients. You can substitute the coconut products with another alternative or dairy milk with this recipe. One thing to note is that using products with less fat or sugar could impact the creaminess factor and how hard the ice cream turns out. This is because fat doesn't freeze, and sugar helps keep ice cream softer in texture (by preventing some of the water from turning into ice, but it works both ways, so there's no need to overdo it!)
You can substitute the coconut products with another alternative or dairy milk with this recipe.
Why is My No Churn Ice Cream hard?
Yep, I had asked myself this question before and even tried homemade ice cream recipes a few times before getting it right, especially when switching to low-fat and reduced-sugar products. The main potential drawback or challenge with no-churn ice cream is the consistency and texture not meeting expectations. You will likely need to leave it out longer once it is frozen.
Be sure to do two things during the process:
Mix your ingredients well, but don't beat to the point of separating or depleting your whipped cream.
Make sure the container is airtight when you freeze the ice cream.
These are not the only factors; for example, cling wrap helps prevent water particles from crystalizing on top of the ice cream. You can add alcohol to the base mixture, which does not freeze, ensuring you whip your cream adequately. There are also natural additives known as 'stabilizers' like guar gum or thickeners like tapioca flour (used in gelato), and keeping all your ingredients and the freezer cold!
")
Creamy Coconut Cornbread Ice Cream (No Churn)
Ingredients
- 1 can (14-ounces) coconut condensed milk
- 1 can (15-ounces) coconut whipped cream
- 1 can (8.5-ounces) creamed corn
- 1 box gluten-free cornbread (I used Bob's Red Mill Mix)
- 1 tablespoon pure vanilla extract or paste
- 1 teaspoon lemon juice
- 1/2 teaspoon lemon zest
- 1/2 teaspoon salt
- Pinch of cinnamon
Instructions
- Follow the instructions for the cornbread premix: bake, cool and crumble the desired amount into pieces, set aside.
- Combine the condensed milk, creamed corn, and vanilla, whisking until well incorporated in a large bowl.
- Add the (chilled overnight) whipped coconut cream to another separate bowl and beat for about three minutes on high speed and/or until stiff peaks form. Watch for curdling or separation in the coconut mix; you will want to mix sparingly, or else the ice cream may have an undesirable texture.
- Using a large spoon or whisk, fold the whipped cream into the corn mixture, starting with two or three initial portions--this will help ensure you don't deflate the whipped air.
- Fold in the crumbled cornbread pieces, then pour the mixture into a loaf pan or ice cream container. You can also swirl in any extra creamed corn and condensed milk mixture.
- Cover with cling film, laying it directly on the ice cream's surface, then place in the freezer overnight or for at least four hours.
- When ready to serve, leave the ice cream at room temperature for about 10 minutes, then enjoy it in cups or cones!
I am not a certified nutritionist and any nutritional information on dontmissmyplate.com should only be used as a general guideline.